Heavy weapons prototype special

Anti-Tank, Area effect, Area-effect, Cold War, LAW, PIAT, SMBL 2" mortar, War on Terror, Weapons, WWII

Nothing too in-depth today, just a short video showing off some of the prototypes we’ve been working on for over a year…

All of these are now available to order by email, we will be putting up pictures of the finished articles in the next few weeks.

If these products are of interest to you, please do get in touch at: enquiries.vintageairsoft@gmail.com or join us on our Facebook page. Don’t forget you can buy many of our complete products via Etsy.


PIAT: Part Two

Anti-Tank, Area-effect, PIAT, Weapons, WWII

PIAT Part One was quite a while ago now and the project had to take a bit of a back seat for a while. Since then it has undergone a few changes to improve it and get it working!

Firstly, the shell holder is now welded onto the receiver for strength and simplicity. The whole unit now strips from the back.
_DSF6891

The back now uses a bayonet locking lug system to hold the internals in place.

_DSF6892 The trigger mechanism is now also smaller and smoother to operate, so it now looks like this:
_DSF7051

With the prototype shell in place! The production shells will be much more authentic in shape, this is just a proof of concept at this stage.

_DSF7090

Time for a first coat of paint. Panzer green will do to prevent rust for now, though surviving examples are painted everything from a forest green to a chocolate brown.

_DSF7092

Time for a bit of bang:

If you like the look of this piece and would like a build of your own or want to support this project please do get in touch! Email us on enquiries.vintageairsoft@gmail.com or get in touch via our Facebook page.

Don’t forget to visit our Etsy page HERE.

PIAT: Part One

Anti-Tank, Custom builds, PIAT, Products, Weapons, WWII

Using CAD has started to become a bit of a habit… The PIAT was no exception!

I wanted to use a massive spring in this, even though there are more practical ways of firing a shell it’s true to the original and has some serious man-points attached!

Screen Shot 2015-08-25 at 18.38.15

This is actually my second design, my initial design was slightly different internally and used the direct power of the spring to drive the projectile. Although this worked in my initial experiments, once I made the piston captive (necessary to stop half a kilo of steel from smacking someone in the face) the ball barely fired. The redesign will use a CO2 shell or blank-firing mechanism depending on use._DSF5532

_DSF5534

The buttplate is 2mm folded steel, welded into place purely for aesthetic reasons, as the original was stamped steel. Once polished up that is how it will look.

Sight units next: foresight and rear sight are different shapes but much the same idea. I fitted them together before welding so that they would line up correctly.

_DSF5535

_DSF5537

With these two units complete, I could make the trigger mechanism. This is my version one, I have since then made some refinements that will make it smoother to use.

_DSF5540

One spring resets the second sear. You can see in this photograph that the spring pushes the sear up very high, this ended up being a problem as the force of the mainspring would make it almost impossible to actuate the mechanism. The next version fixes this by keeping the second sear at a usable height against the piston.

_DSF5542

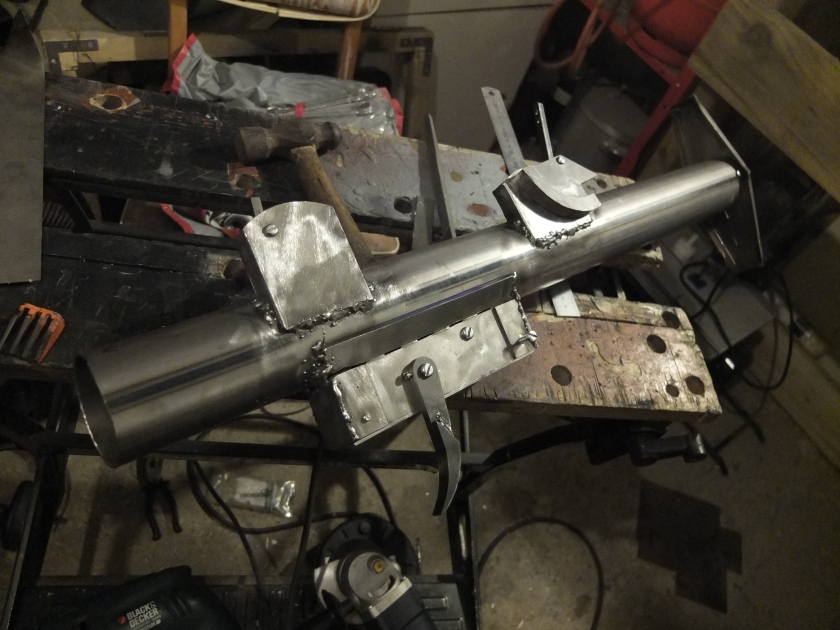
All welded in place, ready to be cleaned up.

_DSF5545

Testing rig prior to making the piston captive. I also ended up making lightening cuts to the piston to improve travel speed. You can see the size of the spring in this shot, at one point I was unfortunate enough to be in the way of the piston when the sear slipped and it gave me a smart upper-cut to the chin. Fortunately it was only at half-cock otherwise I would have been in a pretty bad way!

_DSF5546

So, I’ll admit I have skipped a bit ahead here but the back end of the launcher was pretty well finished at this stage except for some adjustments to be made just before completion. Like the original, re-cocking is achieved by standing on the buttplate and lifting the rest of the launcher. I set to work on the fore-end that would hold the projectile.

This is a spare piece of mild steel tube I had left over from a previous build. I marked out the cutout on the top and removed it with an angle grinder.

_DSF5852

I then cut out a steel disk for the back of the head, drilling the centre for the ‘spigot’ (the steel rod that in the real version would fire the explosive charge in the shell) to come out of. This could then be welded in place along with the collar that attaches the head to the body. Five screws distributed around the circumference hold it in place.

As well as the mainspring, at this point I added a smaller spring that sits around the spigot to absorb the shock of the piston finishing its travel. This spring just bounces freely off the back of the head.

As I said at the start, this is the point where testing became less successful. Without the weight of the piston carrying the tennis balls I was firing originally they only just left the barrel. As a result, the design is being modified to take CO2 grenades. In the longer run it will also be able to fire blanks for re-enactment purposes.


If you are interested in this build, have any questions or would like a build of your own, let me know! Our email is: enquiries.vintageairsoft@gmail.com or you can contact us through our Facebook page!

Projector, Infantry, Anti-Tank

Anti-Tank, Cold War, Custom builds, PIAT, Products, Weapons, WWII

A_PIAT_(Projectile_Infantry_Anti-Tank)_in_action_at_a_firing_range_in_Tunisia,_19_February_1943._NA756

At the beginning of the Second World War, every major nation had a tanks of some description. What very few nations had was an effective way for infantry to counter them. At the time, the only way to disable a tank was with a risky sprint and throwing of a satchel charge (unofficially) or use of an anti-tank rifle. However anti-tank rifle technology was a hangover from the Great War and was already pretty outdated by the quality of armour on most tanks and was only useful against light armour and soft-skinned targets.

After the Battle of France, the British Army studied reports of infantry/tank contacts and failed to find a single example of the Boys anti-tank rifle actually destroying a tank.

Boys_Mk_I_AT_Rifle

The Projector, Infantry, Anti-Tank or PIAT was what Britain came up with. Designed by Major Jefferis of MD1, the toy box of the War Office, with a great deal of input from Major Blacker of Blacker bombard fame. The basic design was that of a Spigot mortar, adapted for use as a direct-fire system.

A Spigot mortar uses a combination of a hefty spring and a small explosive charge at the base of the projectile to operate the weapon. The warhead, instead of sitting inside a barrel as per a regular mortar, sits over a small diameter tube and is actuated by a bar hitting the priming cap. A diagram explains this far better than words do:

British_Piat_schem.jpg~original

In this diagram you can just make out the guide tube in the centre of the projectile support. The missile slots over this and the firing pin travels through it.

piatgordon2

The effectiveness of the PIAT in use is much debated. Some sources cite that ammunition was unreliable, others that accuracy was a major issue at any kind of range and many that recoil was truly horrendous (some users said that you deserved the Victoria Cross just for firing it!). However a study of Canadian Officers ranked the PIAT as the number one most “outstandingly effective” weapon, above even the Bren, so in spite of its many foibles it was clearly well enough liked!

The PIAT was used by British and Empire forces throughout the war both as a direct fire anti-tank weapon and indirect fire support weapon. It was also given to the Soviet Union as part of lend-lease, dropped to partisans throughout Europe as well as by Israel post-war. It was last used officially by the Australians at the start of the Korean War, but it was quickly replaced.

The_British_Army_in_North-west_Europe_1944-45_B11928

As progress occurs we shall of course keep you posted on this build (follow the blog to help you keep track!), if this has inspired you to want a project of your own or you have any questions, do drop us a line! Our email is: enquiries.vintageairsoft@gmail.com. Also, ‘Like’ our Facebook page for updates and interesting articles.