MP28: New 2018 Pattern

Complete builds, Custom builds, Inter-War (1918-1939), MP28, Sub Machine-guns, Weapons, WWII

A while ago I finished the first of a new pattern of MP28. There are a few differences between this and the previous versions.

_DSC9069

Firstly, I have used a new hung-back trigger, which reproduces the trigger location more realistically than previous versions. The stock wrist is also slightly thicker to allow a wire to run to a battery compartment in the stock.

_DSC9075

I have formalised the battery compartment cover, accessed by loosening one screw and levering up the cover.

_DSC9073

The rear sight is now a simpler, non-windage-adjustable pattern. Elevation is still adjustable via the sight leaf.

_DSC9076

The magazine well is an all new pattern. This allows me to produce a more accurate magazine well and adds in details I couldn’t possibly do by hand. I think all will agree that these markings really do look the part and really add to the replica.

_DSC9071

The new buttplate pattern, slightly slimmer than its predecessor.

_DSC9074


If you are interested in the history or would like to see the first build you can find them here.

If you like this project or have an idea of your own, drop us a line on enquiries.vintageairsoft@gmail.com to discuss. ‘Like’ our Facebook page or follow the blog to get regular updates on projects and interesting videos and articles.

Don’t forget you can buy many of our complete products via The website.


MP18 and family.

Cold War, History, Inter-War (1918-1939), MP28, Sub Machine-guns, Weapons, WWI, WWII

During the stalemate of the Great War, both sides took to the laboratory to try and get an edge on the battlefield and level the massive attack/defence discrepancy in their favour.

To this end each side ended up using to varying degrees: tanks, poison gas, aerial bombardment, advanced artillery spotting, mining, aerial reconnaissance, indirect machine gun fire, mortars… the list is pretty endless.

One area that was somewhat neglected in spite of its potential was small arms development. Repeating, smokeless rifles were still a relatively new thing, and commanders expected to make use of them in a similar way to the way they were used in the colonies. Blocks of men firing into an attacking force while the attacking force tried to get close enough to shoot back. Unfortunately this idea was put paid to by the enemy having very similar ballistic capabilities and ability to hit targets at quite the same ranges.

hms-alacrity_china

Although massed rifle fire at range did play something of a part in the early days of the war, especially at Mons and in the defence of Paris when both sides ground to a halt and entrenchment began volley fire became almost useless.

14th-group

Of course in defence soldiers would line up on the parapet and shoot those missed by the machine guns but once the enemy was in the trench, your rifle that could shoot accurately somewhat further than you could see with the naked eye was only useful when you spun it round and used it as a club.

What soldiers needed was something with a high rate of fire that could deal with the high number of targets at close quarters experienced in trench conditions that didn’t necessarily have the range of a full rifle cartridge and certainly didn’t come with the weight of a typical machine gun of the era.

There were ready-made options. DWM already produced a carbine Luger with the infamous ‘trommel’ magazine for the German Army and a shorter Luger that could be fitted with a stock for the Navy.

2285cf54beeb0dded2b9ff05ad1f60e2

Mauser produced the C96 for both the Austrians and the Germans and was used internationally. This frankly was much better with a stock used as a carbine than as a pistol.

Mannlicher had designed a carbine that, although it looks very C96-esque, operates differently and used a very early form of intermediate cartridge. These were never produced in large numbers and as far as I know never saw service anywhere.

For some reason, the Imperial Army decided to introduce a new firearm instead. There are a few plausible reasons for this, the Luger series and C96 pistols fired at extremely fast rates. Though this could be fixed (especially for the C96) they decided a new design would be cheaper and easier to achieve a desirable result with.*

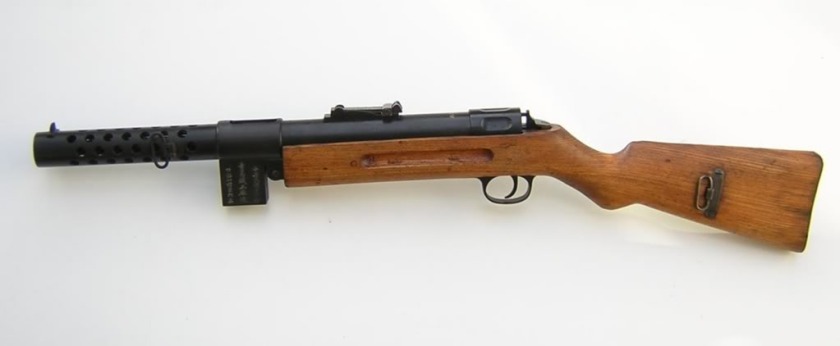
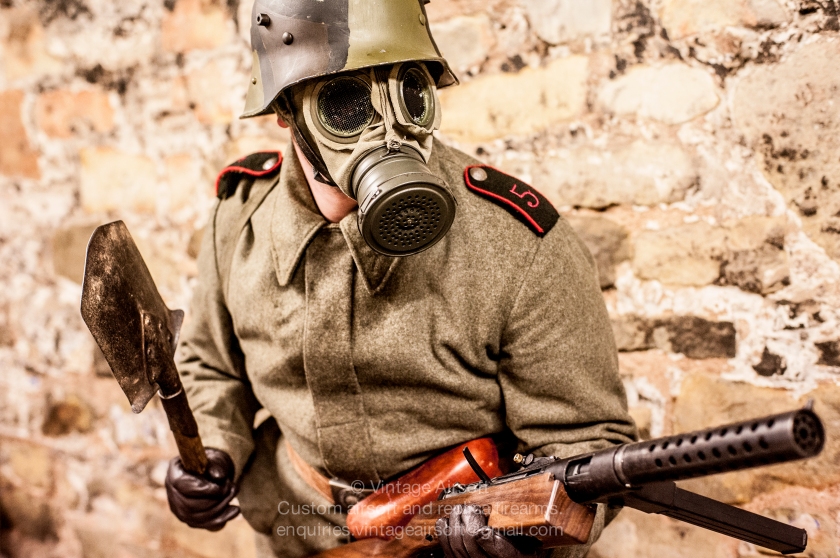
Thus the MP18/I was born. This is the first dedicated infantry sub-machine gun, though some will cite other early SMGs, the MP18 was the only one widely used and issued in WWI, anything else used at this point really only featured as a footnote in the fighting.

It saw extensive use in the Spring Offensive of 1918, where the Germans took huge (in WWI terms) swathes of territory, exhausting their country’s war effort in the process.

Post-war, MP18s saw use in the Weimar Republic, especially in urban fighting between the  German State, Freikorps and the German Red Army during various uprisings in Munich, Berlin, the Ruhr, Saxony and Hamburg. There was a good deal of rebellion and fighting, especially in the inner cities in between various political factions. During this time, the MP18 saw extensive use, showing a distinct superiority over conventional rifles and pistols in close quarter urban fighting.

spartacists1


Around the same time, these submachineguns saw use in South America, China and the Spanish Civil War. These things really got about.

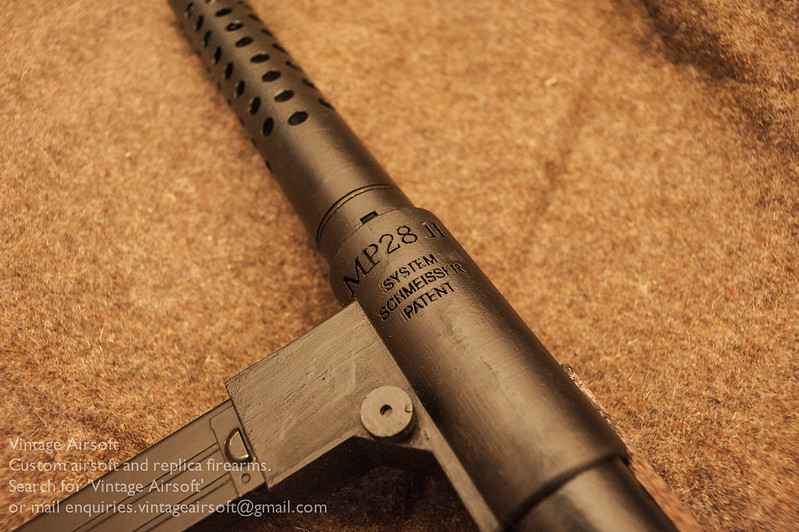
During the early Weimar Republic, MP18s underwent some improvements: the Government took existing MP18s  and modified the magazine wells to take stick magazines rather than Luger magazines and drums. During this later service they were issued with 20, 30 and 50 round magazines. There were also many licensed and unlicensed versions produced, with SIG and Haenel (under Schmeisser) each producing their own versions. Haenel developed it into the MP28 which the Spanish copied, having converted it to 9mm Largo.

There are dozens of descendants of the MP18, the most significant are the MP34, MP28, Sten and the Lanchester. These and their relatives were used internationally all through the late 20th century.  

Although the open bolt submachine gun has fallen out of popular use with militaries and police forces, due to so many being produced you will still find descendants of the MP18 still in service in some parts of the world.


Notes:

*This said, the Imperial Army did experiment with a form of the C96 with detachable 40 round magazines. Few were produced, very few survive today.


Identification notes:

MP18/I: Slanted magazine well, takes Luger magazines (standard and Trommel). Two-option non-adjustable rear sight. Hooked Op handle

bergmann_mp18-1_submachine_gun_with_drum_magazine_theodor_bergmann_suhl_germany_1918-1920_ad_-_braunschweigisches_landesmuseum_-_dsc04716

MP18 (type two): An MP18 in all respects except that the magazine well has been changed out to take a straight magazine. These should also have ‘1920’ stamped on the magazine well and on the receiver.

MP28/II: An MP18 but with perpendicular magazine well, box magazines and either the MP18 or a straight, tapered op handle with a ball end. Adjustable tangent rear sight.

mp28

Mitraillette 34: An MP28 made in Belgium. Cannot find pictures but expect Belgian markings and proofs.

Sig Bergmann 1920: Rounded Op handle, with bead on end. Collar at front of barrel shroud. Tangent rear sight. perpendicular mag well. Stick magazines.

sigbergmann1920

Tsing Tao: Chinese characters, vertical magazine well. It looks like they also produced direct copies of the MP28.

tsingtaomp18

MP34: straight sides, magwell angled around the circumference of the receiver. Vented foresight guards. Bayonet lug on side. Adjustable rear tangent sight. Hinge behind magazine well to lift top cover. Unusual as has magazine charger at 90 degrees built into the mag well.

mp34_right_angle_front

Lanchester MkI: Brass magazine well (though if still finished this may not be visible). 50 round magazine. Hooked op handle. Vented front sight guards. Tangent rear sight. Bayonet lug for SMLE P07 bayonet. Stock similar in shape to a P14 Enfield.

zlanchester-037683_2

Lanchester MkI*: As MkI but straight op handle, fixed rear sight with two very large sight guards. 

be67b9480990d7b11a60c42974fb5756

Bergmann MP35. You can take a look at the picture to ID this oddity.

bergmann_mp-35


The majority of decedents from beyond this point (Stens, Sterlings etc…) are for another article really. This is a rough guide, due to their extensive re-use and circulation there will be variants on variants I am quite sure. I have tried to give you the best chance of identifying different models, sometimes using original and sometimes applying my own nomenclature to differentiate between models. If you see anything that you can prove is incorrect with quality sources, please do get in touch on enquiries.vintageairsoft@gmail.com.


If this content interests you, subscribe to the blog or join us on Facebook for more! Don’t forget you can buy several of our ready-made products on Etsy.

The MP28 in context

Custom builds, MP28, Products, Sub Machine-guns, Weapons, WWI, WWII

Yesterday, the owner of the MP28 came to collect his new gun and kindly brought his WW1-era Sturmtruppen impression for some photographs! The whole impression is mildly terrifying and it’s fair to say you wouldn’t want him appearing in front of you on a dark night…
_DSC5517

Although the MP28 isn’t a small fire-arm, it is very compact compared to the standard German service rifle, the G98 and even compares favourably to the K98a then in service with  advance units. Add in that the rate of fire is significantly higher than any bolt-action rifle and you have a fearsome new weapon for trench raiding.

_DSC5520

Jim has made and modified much of this uniform himself.

_DSC5526

Particularly noteworthy is the gas mask, in which he has replaced the glass vision ports with  mesh.

_DSC5528

He hand-painted his Stahlhelm based on photographs of originals, that distinctive block-camouflage was used by both sides in various forms, sometimes including unexpected colours like vivid yellows and sky blues.

_DSC5530

And of course, a vital part of any Sturmtruppen’s outfit, the spade:

“But the bayonet has practically lost its importance. It is usually the fashion now to charge with bombs and spades only. The sharpened spade is a more handy and many-sided weapon; not only can it be used for jabbing a man under the chin, but it is much better for striking with because of its greater weight; and if one hits between the neck and shoulder it easily cleaves as far down as the chest”

Eric Maria Remarque, All Quiet on the Western Front.

_DSC5533


You can follow the long process of building the MP28 here. This version has both a safety catch and a select-fire system built in with elevation and windage-adjustable rear sight.

If this replica firearm is of interest to you, please do get in touch at: enquiries.vintageairsoft@gmail.com or join us on our Facebook page. Don’t forget you can buy many of our complete products via Etsy, though builds like this are made to order.

MP28 Sten build Part 2

Custom builds, MP28, Sub Machine-guns, Weapons, WWI, WWII

At the end of the last piece on the MP28, I was doing battle with the fire select mechanism. I found a solution in cutting off the automatic mode altogether, not just one of the wires. Below is my original (functional) test rig.

_DSF6714

And built into a usable switch.

_DSF6754

This can be mounted into the Sten body with a screw. I have placed it at the back of the operation handle channel where it will be both accessible and discrete.

_DSF6772

One oil finished knob later and the fire select is complete. You’ll note the rather ugly M6 screw which is temporarily filling the role of op handle until one is made.

_DSF6776

Next job is to replace the trigger. The original was too short once it was set into the wooden stock. I simply cut around the top to keep the shape and improved the size and shape of the trigger blade itself.

_DSF6777 _DSF6778 _DSF6779

I fitted the battery compartment cover, this gun will take LiPo batteries which keeps the battery compartment size down.

_DSF6794

Closely fitting the buttplate before applying the finish to both parts.

_DSF6796

Several coats of Danish oil darkened up the stock and brought out the natural colouring nicely.

_DSF6807

I could then fit the oil blued buttplate with two oil-finished screws to blend in.

_DSF6814

And apply several coats of a new finish I am experimenting with that should produce a hard, wear resistant and semi-gloss surface.

_DSF6816

The bottom of the gun just after fitting the blacked trigger guard plate and battery compartment cover.

_DSF6865

The extending wire that links the battery compartment to the mechanism.

_DSF6867

Another view of the extending wire. The catch is screwed down with machine screws rather than woodscrews as it may need to be removed and this will reduce wear on the stock.

_DSF6868

And finally… with the mechanism in place.

_DSF6869

More photos and video to follow when test firing is complete!

_DSF6871


Like this gun? Why not email us on enquiries.vintageairsoft@gmail.com to find out more. Also, why not check out our Etsy page where we have ready-made kits and accessories?

MP28 Sten build Part 1

Custom builds, MP28, Sub Machine-guns, Weapons, WWI, WWII

Taking a different approach to an MP28 build here! Going to be brief and to the point.

Roughing out the stock: The overall shape is cut with a bandsaw using a template. I then take the corners off with a router where applicable. The timber I am using here is Walnut, a beautiful piece I acquired from a furniture maker’s near York.
_DSF6441

I then cut out a recess for the catch and receiver, this is partway through cutting.

_DSF6442

I can then remove materiel from the bottom where the trigger guard will protrude.

_DSF6450

To get a really close fit between the metal and wooden components, I smeared a very thin layer of boot polish over the surfaces of the metal to be mated. This leaves an impression on the high points (or accents as some people call them) that can then be removed tiny bit by tiny bit with a sharp chisel or small file. Using this technique and going slooooowly you can get a very close fit as demonstrated below:

_DSF6443

And with the receiver in position on its initial fitting. I have since adjusted the positioning slightly so it is a bit lower in the stock.

_DSF6453

So, confession time: this is how that Sten receiver fits into that shaped stock. I took an angle grinder to the trigger mechanism housing and removed all the metal below the top of the trigger guard.

_DSF6448

I could then weld on a flat plate of my own to seal the unit in. One of the really good things about the ASG Sten is that it is largely steel, not monkey metal like most airsoft guns! This means it is very easy to work with and I can MIG weld bits together as needed.

_DSF6449

Now, 40mm mild steel tube is damned hard to find. As a result I ended up buying a piece of 42.4mm OD tube with a 4mm wall and turning it down on the lathe. The original tube is on the right, the turned piece is mounted on the lathe.

_DSF6460

I could then mark out and punch where the holes needed to be:

_DSF6465

Before drilling them out.

_DSF6466

The front end of the Sten’s hop-up housing was then turned down to fit snugly inside the heat guard. You could also bore out the inside of the heat guard and leave this unaltered but life is short and this is easier!

_DSF6461

Fitted in place. Worryingly I quite like the look of it in the white, in fact this whole gun looks good with bright steel parts!

_DSF6467

I brazed on the foresight for two reasons: 1. my welder has broken down and is out for repair. 2. It produced a really neat little joint that looked right.

_DSF6522

I could then heat up the entire piece with the propane torch until bright red, the end nearest the camera was topped up with a MAPP torch to get it to temperature.

_DSF6528

I’ll attach a video as well, I thought this looked pretty cool! You will also see in the vid how I rolled the piece over several times to get even heat distribution, which is vital to an even finish.

Dipping this large part in oil, I decided to take a prolonged lunch break and avoid the cancer.

_DSF6530

I allow parts to cool off in the oil pretty much, then allow them to drip as much excess as possible back into the trough, sometimes reheating slightly to ensure maximum removal. I can then rub the piece down with a rag to show the finish. I’m pretty pleased!

_DSF6540

I can then fit the endcap and outer barrel unit, which is one brazed piece.

_DSF6542

And dry fit it to the gun to see the effect!

_DSF6544

Again, because of the broken welder, I brazed the rest of the magwell (the top and sides having been welded earlier). I used a piece of steel tube as the magwell band.

_DSF6553

And in place on the gun, the receiver is also polished ready to be re-finished.

_DSF6554

The rear sight base mounted in place.

_DSF6563

Due to the shape of the magwell, it is necessary to have a bit of an extension to the feed tube in place so that it can open the magazine. I turned this on the lathe in nylon, which should be resilient but not harsh on the magazines that will have to be pushed up against it time and again.

_DSF6606

During disassembly, this extension will have to be removed to remove the mag well. It is easily replaced with a pair of long nosed pliers and a finger.

_DSF6609

Everything oil blacked:_DSF6667

_DSF6665

And fitted into the stock, which still requires finishing. I want to get the fire select working before I finish the stock.

_DSF6668

Some of you follow the Facebook page, and you will have seen pictures of random bits of odd-looking wiring. Those are being used for this: the select fire system. Unfortunately, whoever produced the ASG Sten decided not to use a gearbox with a select fire mechanism built in, so I am having to mess about with a MOSFET in order to make this select fire.

_DSF6673

Having played about with the setup in this configuration, I can make the gun safe and fire in automatic. Just not in semi! Back to the drawing board, but I think I know what needs doing.

More next time!

If this post has inspired you to want a gun of your own, do drop us a line on enquiries.vintageairsoft@gmail.com to discuss or find us on Facebook to look at more related content.

MP28 Part Three

Custom builds, MP28, Sub Machine-guns, Weapons, WWI

At the end of the last post, I had the receiver tube cut, the stock made and a gearbox partially modified.


_DSF5397 _DSF5388 _DSF5577
Since then, I have realised that the receiver tube isn’t quite right, the gearbox modification is a pain in the neck to get working and as a result the stock is too shallow to take the gearbox in its native configuration. This has put the project back a bit.

To save time and get a working gun I am scrapping the modified gearbox. I will keep the incorrect receiver tube for now and treat it as a prototype so that all the parts fit and the newer correct one leaves the workshop clean and not abused.

On to progress!

The new magwell is very slick and the mechanism is really solid in comparison to my first attempt. For those who don’t recognise them, the magazines are identical to those used for the Sten and MP40.


The next step was to fix this to the receiver. At this point though I say so myself I am quite good at rolling and bending steel accurately! I rolled a collar in steel around a spare piece of 38.1mm tube (the same as the receiver tube).

_DSF6119

This could then be tacked and welded in place.

_DSF6120

Some work with a hammer later, I managed to get it off the tube former and polished it inside with the drill drum sanders I have for jobs such as these. I kept going until it fitted just on the end of the receiver tube with a little friction.

_DSF6121

In order to get it all the way down the required location, I also had to take a sheet of wet and dry paper and sanded the receiver tube down. The main issue was the little rises around the cooling holes (you can see the little white rings in the photo below).

_DSF6123

With a little work, it slipped on comfortably._DSF6124

As you can see, the holes are not perfect, but they will also be invisible once assembled. I wanted to give a little extra space to ease aligning them.

_DSF6126

I could then clamp the magwell to the tube and tack it in place with the MIG welder  to test it before going to town and welding it permanently in place.

_DSF6129

I’ll grant, not that pretty yet. With jobs like this I like to leave plenty extra weld on top so that I get minimal porosity on the part that will be visible when I grind it smooth into shape.


And ground and polished roughly into shape:

_DSF6132

_DSF6133

So, progress is slowly being made. At least I have been able to discount a few options in this deign and I have a nice spare stock! Hopefully this build should speed up a little now as I have done a lot of the design work for the improved version.

MP28 Part two

Custom builds, MP28, Sub Machine-guns, WWI, WWII

At the end of Part One, I had the two main external components at hand:_DSF5389_DSF5397

The receiver tube and the stock have been roughly cut, so most of the work to do was internal. I designed a custom hop unit to fit inside the receiver and feed the BBs back from the magwell to the chamber.

_DSF5520 _DSF5521

I sent off the orthographic drawings to a guy who can do 3D CAD work and he converted my designs into a digital model before 3D printing it in ABS. It looks smashing, far better than I ever expected!

_DSF5522

A bit of filing was needed to fit the hop in the tube, combined with a light tap with a small hammer and it was seated in place. A piece of barrel sits in the space in the side to engage with the magazine.

_DSF5549

_DSF5550
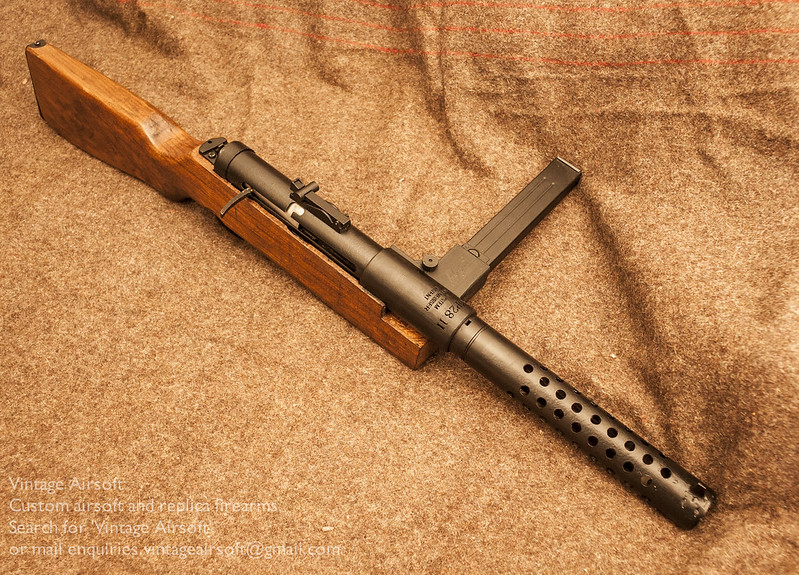
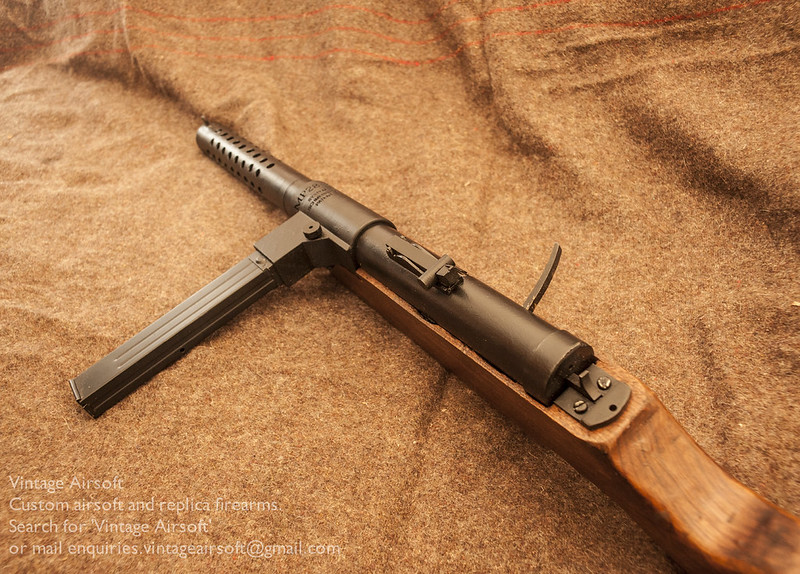
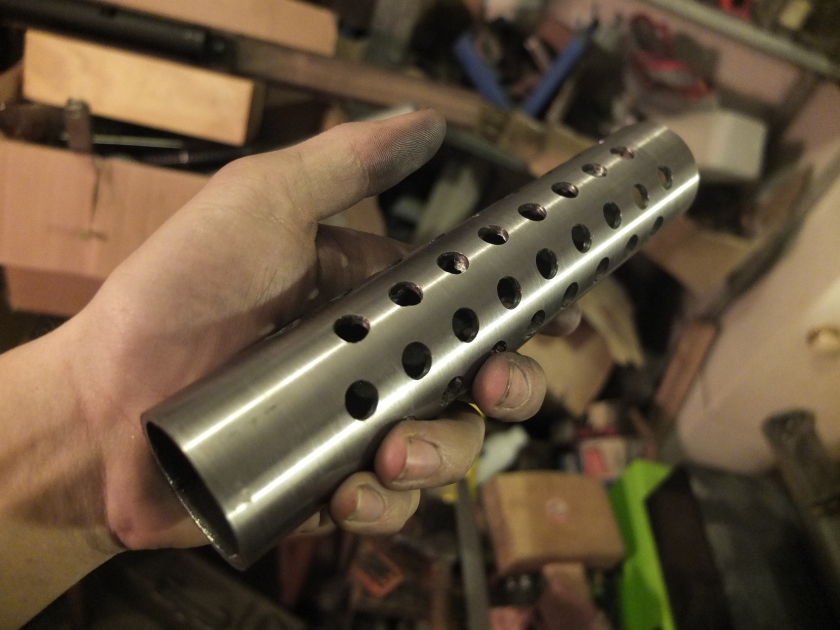
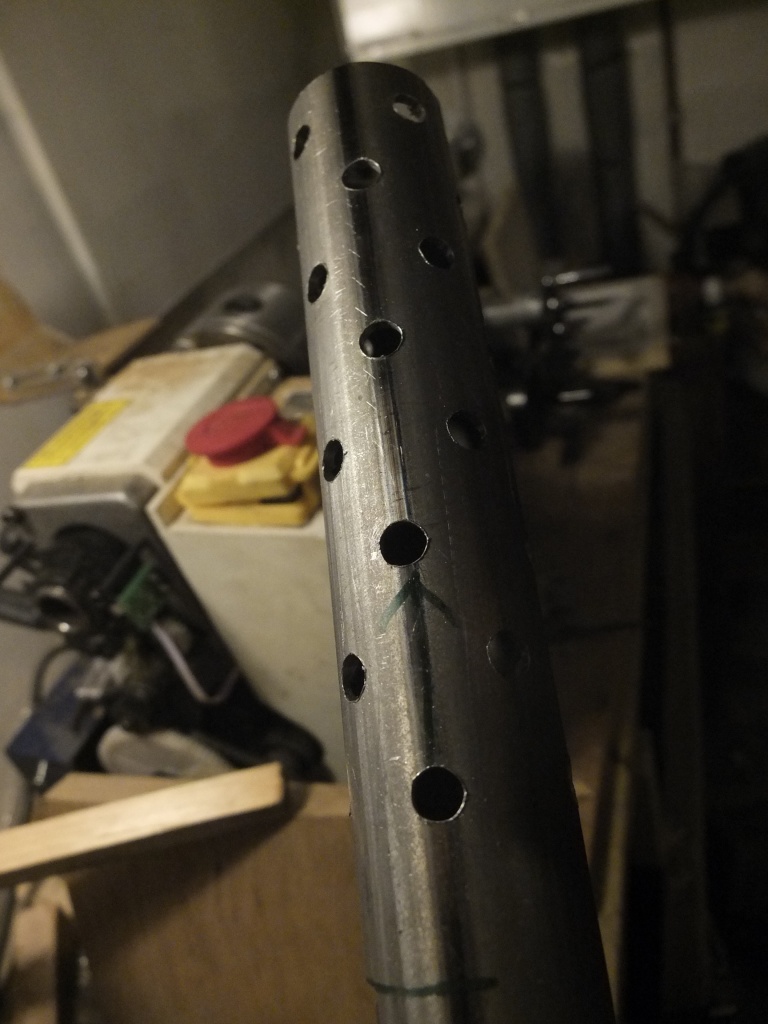
The outer barrel is a piece of tube sat in the centre of the cooling jacket. Welded at the front and back are two steel rings to suspend the tube and at the front is the perforated front cap.

_DSF5552

Another little tap with the mallet and bingo, it fits very nicely!

_DSF5557

The rear cap has a space to take the locking latch, which is sprung with a tension spring. There are two screws in the edge of this back cap to secure it in place, though I may put another in the top.

_DSF5574

This latch then locks into the locking unit on the stock.

_DSF5564
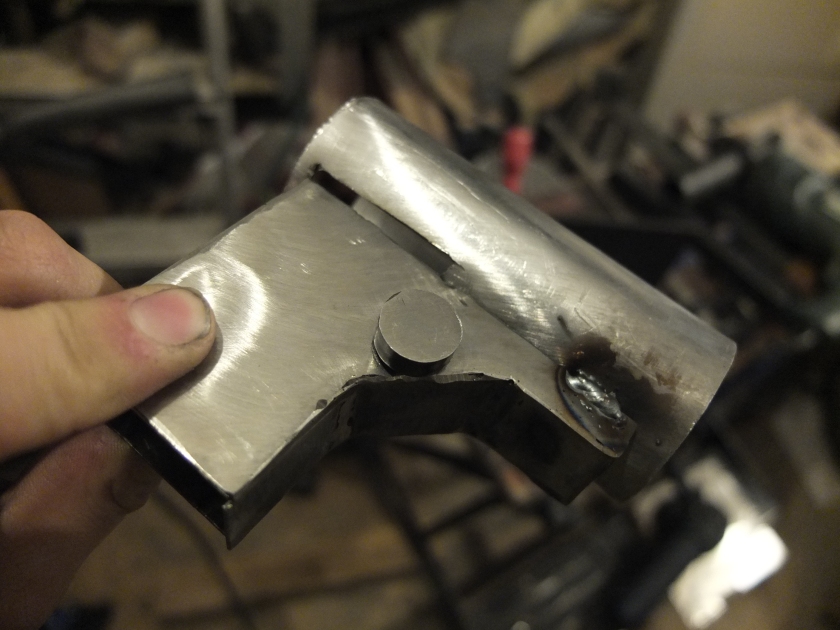
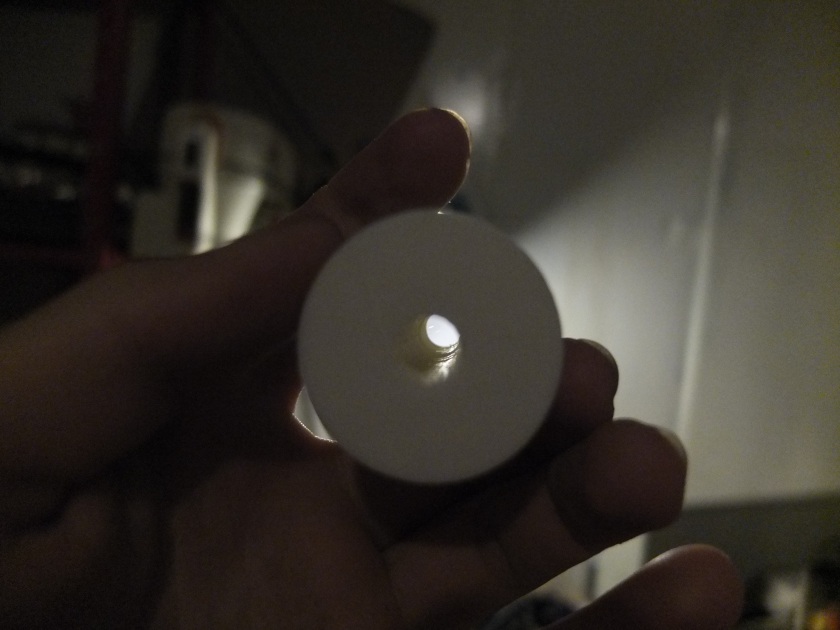
The rear sight functions much like the original, it is basically a miniaturised version of the sight I put on the MG08/15 with a ramp providing elevation adjustment and the leaf moving left and right for windage.

_DSF5563

There comes a point where you have to just try and fit the gearbox! Inevitably somewhere in your designs something will come a-cropper, in this case I forgot to factor in the nozzle position being at the top, not the centre of the cylinder casing. As a result the stock would have to be about 10mm deeper to fit the gearbox. Given that I have already made the stock this isn’t a great option! I plan to get a custom cylinder head made so that the nozzle is in a more convenient place.

_DSF5575 
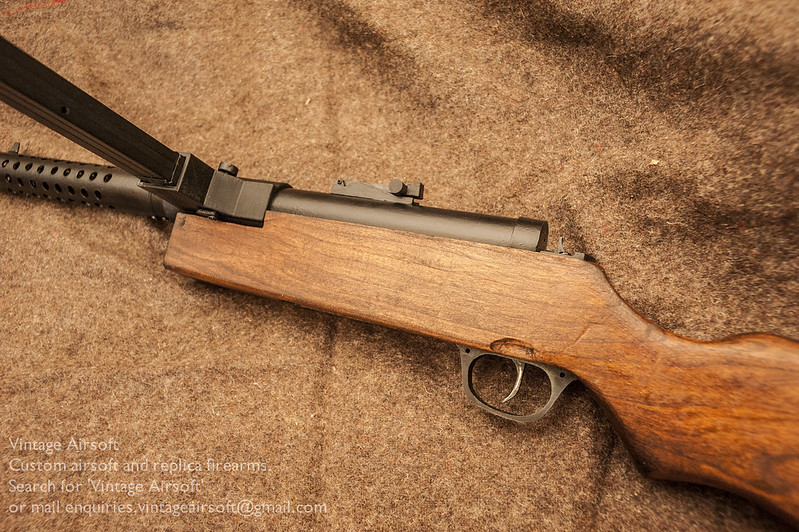
Also to save space I have conducted a little modification to the gearbox externals. The motor cage in most V7 gearboxes is angled down slightly to fit in M14 models. This is great if you are building a rifle, not so much for this project!

_DSF5577 
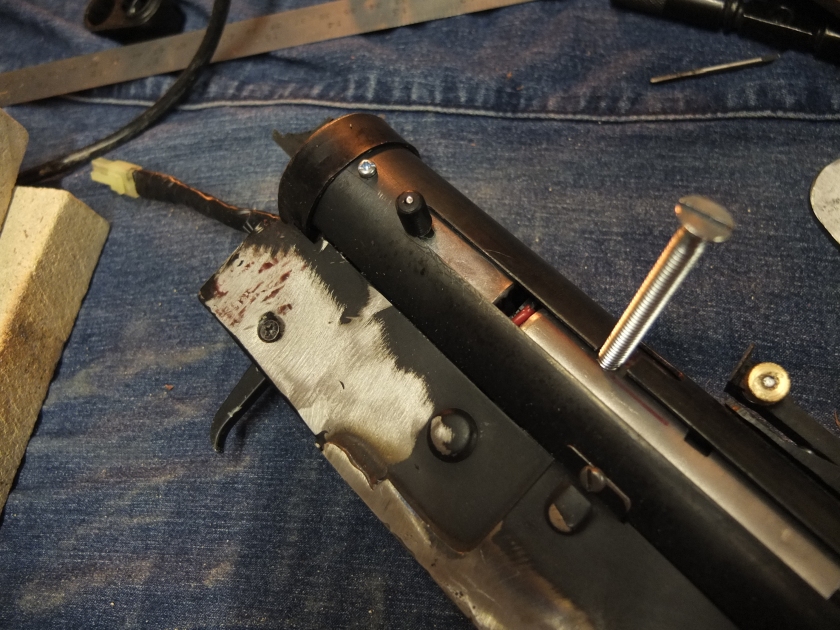
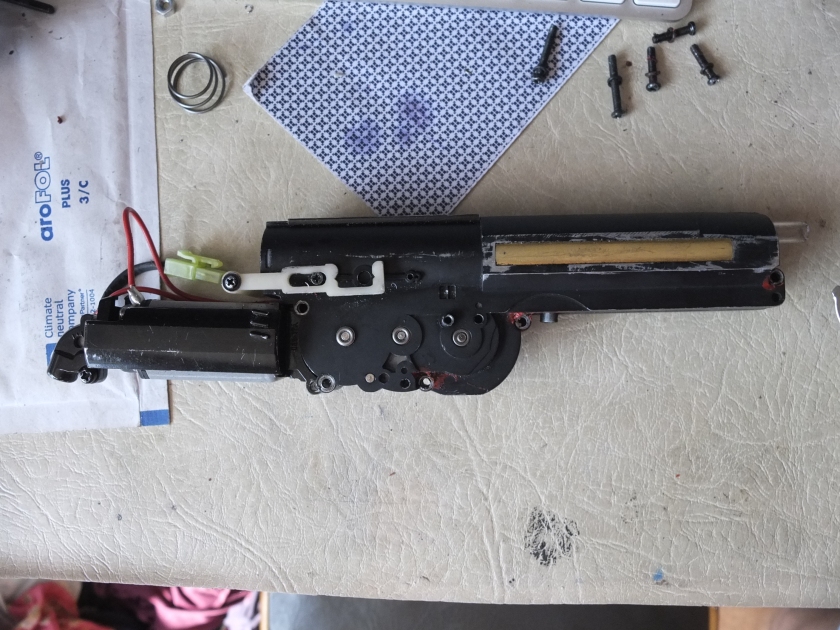
My first thought was to build a whole custom motor cage but this would be a huge job. Instead I modified the original cage so that it sits slightly angled up. The motor came into contact with the back of the spring casing before it could be secured so a little material had to be removed from there. As you can see from the photo above, the trigger and a part of the fire select has also been removed.

_DSF5449 _DSF5561

The stock also needed a bit of space cutting out to take the gearbox. The shape eventually had to be quite complicated to take the wire guides on the side.
If this post has inspired you to want a project of your own, email us at enquiries.vintageairsoft@gmail.com. You can get regular updates on Facebook as well as here.

Still to come! Trigger unit, gearbox mounting and the magazine housing.

MP28 Part One

Custom builds, MP28, Sub Machine-guns, Weapons, WWI, WWII

It has been a while since I posted my introduction to the MP28 and quite a lot has happened since then!

Most of the parts needed are in now and components progress is going well. There are lots of photos of this project so you can see it progressing nicely.

_DSF5378

I had the magwell cut with the last batch of laser cuttings and welded it quite a while ago. As you can see, it fits snugly against the tube used for the outer shell of the gun.

_DSF5379

The fore-end of the MP28 is heavily perforated for cooling. This required a very precise set of measurements and I decided it would be easiest to draw out a 2D representation in Qcad. I then printed this out and taped it to the tube in the right place. A centre punch in the dead centre of the circles allowed for accurate drilling.

_DSF5388

I drilled small 4mm pilot holes first, then holes to the full size. In the photo above you can see the second drilling in progress.

_DSF5389

Drilling finished!

_DSF5391
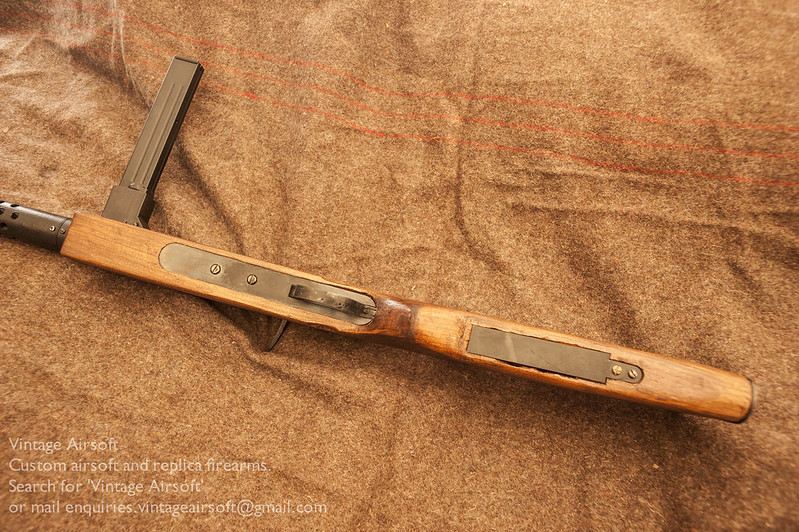
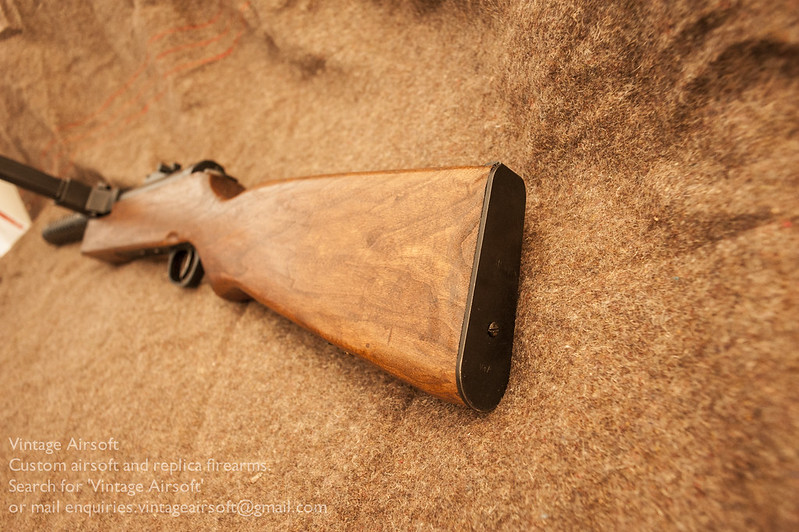
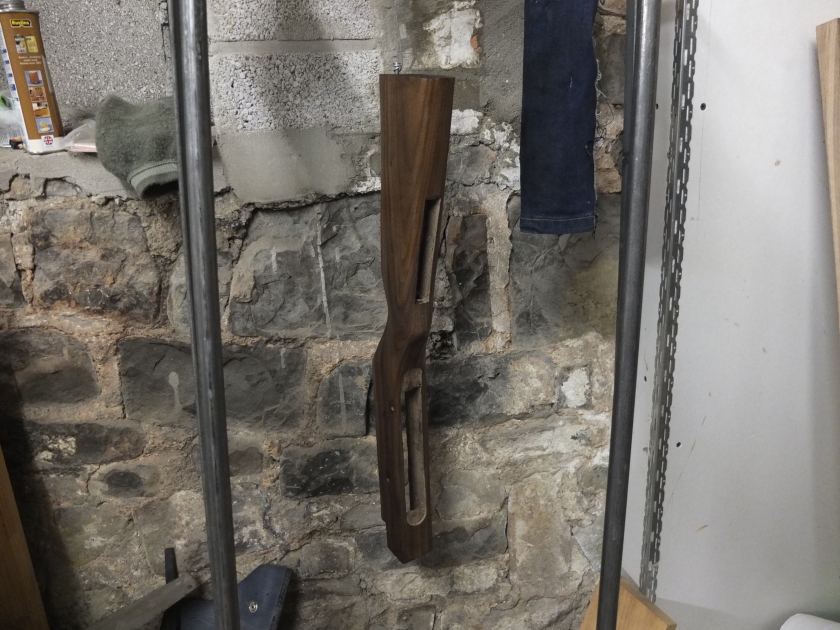
A bit of work on the stock next. Having marked out the template on the wood, I cut the straight lines with a circular saw. The more complex area around the pistol grip I cut freehand with the router. This did however leave me with a little excess wood still holding the whole unit together.

_DSF5393

Drilling through weakened the area considerably. Only a little work with the chisel was needed to free the piece.

_DSF5394

Separated. Once the excess was cleaned off I could start shaping in earnest.

First shape was done with the electric plane, a favourite tool of mine. Finer detail and smoothing was achieved with a hand plane. Working in and around the pistol grip, the half-round file did a fine job.

_DSF5397Finally, where the stock is at now. I’ve inhaled most of the wood removed today so it’s time to take a break! A bit more work with the mini sander and this will be as smooth as a baby’s bottom. That will have to wait until the action is fitted though as it is likely to sustain some bumps by then.

It is only when you have all the components together that you realise how big this gun is. When most people think of a sub-machine-gun it is a compact firearm for close quarters. This is nearly 90cm (three feet) long. I guess they had to start somewhere to be fair though!

More to come soon on this! If you have any questions email me (Dom) on enquiries.vintageairsoft@gmail.com or leave a note in comments.

The MP28

Custom builds, MP28, Products, Sub Machine-guns, Weapons, WWI, WWII

Development

The MP28 has its roots deep in the deadlock of the Great War. Both sides had tried great waves of infantry, poison gas, vast artillery barrages but none of these seemed to do anything to break the stalemate of the Western Front.

As history has shown us, the Tank ultimately won the day but for a while it looked as though specialised raiding parties that were highly trained, aggressive and well equipped may be the secret. The MP18 was one of the first attempts to miniaturise the killing power of the machine gun and make it portable. At just over 9lbs it was still no side-arm but it definitely gave soldiers who carried it an edge in close-quarters fighting.

Bergmann_MP18.1-2

MP18 with Luger Snail magazine

The MP18 was the firstborn in a long line of submachine guns that carried on serving into the 1970s, so many people copied the design (with some minute changes) including the Chinese, Austrians, Finns and Estonians. In spite of a ban on the study and development of automatic weapons put in place by the Treaty of Versailles, from this evolved the MP28. This used a straight 20 round magazine that sat perpendicular to the barrel (later there was also a 32 round magazine made available).

MP28

MP28

This design was also shamelessly copied, with the Danes, British and Chinese all getting in on the act. The British Lanchester SMG is a copy so direct that the bolt and magazine from an MP28 can be used in it, though it wins some man-points for being able to use the 17-inch SMLE bayonet!

Lanchester with SMLE bayonet and 50 round magazine. Courtesy of deactivated-guns.co.uk.

Lanchester with SMLE bayonet and 50 round magazine. Courtesy of deactivated-guns.co.uk.

Service

The MP28 served with German forces until at least 1945. Its derivatives served with countless other nations for years afterwards, with the Royal Navy using the Lanchester until the 1980s. The MP28 saw use by riot police in the 1920s, the Second World War, its derivatives in numerous French colonial wars, by the Japanese in the Pacific, the Koreans against the Japanese at so on and so on….

Everyone killed everyone with this gun.

So, when a client asked for an MP18 or 28 I was only too happy to oblige!

As ever, if this has inspired you for a project of your own, do drop me a line on the usual email address to discuss! enquiries.vintageairsoft@gmail.com.

Also, join us on our new Facebook page!