MG08/15: Upgraded internals

Custom builds, Machine-Guns, MG08/15, Products, Weapons, WWI, WWII

A quick video to show you what this gun shot like prior to a couple of improvements!

It was a little inconsistent, though bear in mind that this is without the hop set at all. There are several improvements that have been made since then to improve consistency and power.

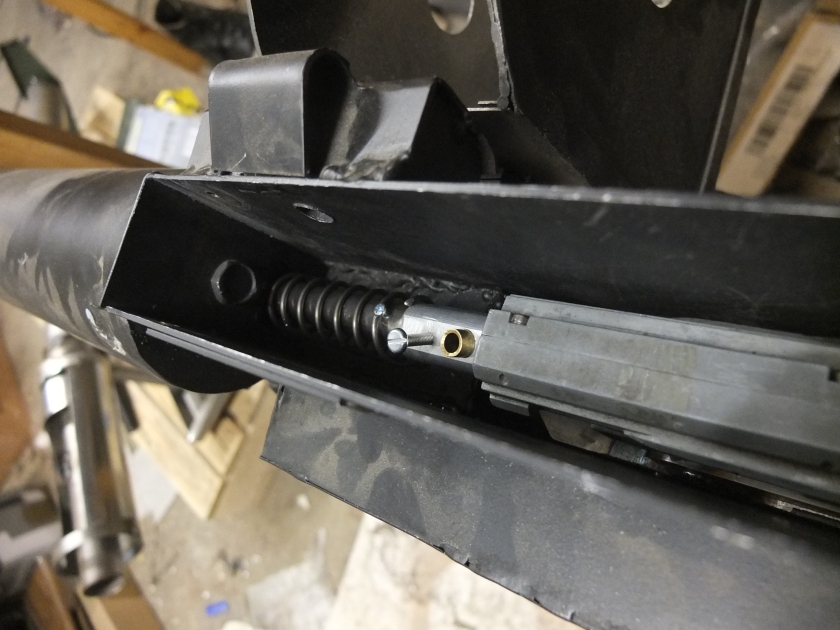
Firstly, a large, stiff spring holds both the outer barrel and the hop unit in place against the gearbox.

_DSF7323

At this point, it became apparent that having quick-replacement magazines is a bit pointless as any magazine for this gun will be a high-capacity one. As a result I dropped this idea and went for the far more secure (and better feeding) fixed version.

_DSF7350

This can still be swapped between an electronic hi-cap (stored in an MG42 ammunition box, as used in WW2 with the MG08/15) and a smaller hi-cap that can be stored in the drum itself.

_DSF7353

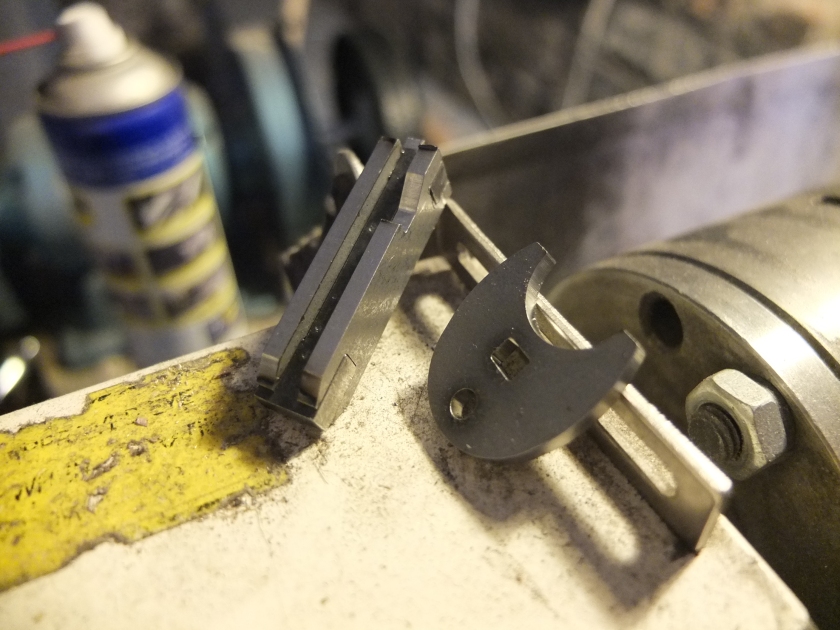
A drum magazine lock was added to stop the drum from opening unexpectedly. The crank handle on the original was used to wind in the cloth bullet belt. It is fixed on this and the sides of the spindle hold the magazine in place.

_DSF7370

The details on the water tank, filling cap and steam hose connector.

_DSF7371

The small magazine attachment for the drum magazine. This attaches to the top of an M14 magazine.

_DSF7372

A top-up of paint to get it pretty before testing!

_DSF7374

Ready to go!

_DSF7382

The elevation adjustment and rear sight.
_DSF7387


If this post has inspired you to want a gun of your own, do drop us a line on enquiries.vintageairsoft@gmail.com to discuss or find us on Facebook.

The Sten MkV kit in action

Add-on kits, Customer Reviews, Products, Sten, Sub Machine-guns, Weapons, WWII

Many of VA’s followers are also on the UK WW2 Airsoft forum and will know regular contributor Ken by his handle ‘Kendo’. Ken was one of the first people to buy one of my ready-designed kits and has been using it heavily for well over a year now. I caught up with him recently to get some feedback:

“I was first made aware of Vintage Airsoft’s MkV Sten kit through the WW2 Airsoft forums, perhaps better known to some as ‘Comrades in Arms’. Dom had posted his prototype MkV build, and was looking to put together some more kits for those of us stuck with the perhaps not-entirely-accurate MkII Sten, especially for the many folks like me that portray the iconic late-war British paratroopers!
The idea was inspired: a hand-built, wooden stock, comprising a mounting bracket and pistol grip, that slotted directly onto the receiver of the AGM Sten, replacing the standard T-stock; the kit would be complete with a wooden foregrip that bolted to the Sten barrel shroud, and topped off with a metal front sight that slipped over the outer barrel. As if that wasn’t enough, the wooden stock was hollowed out and wired, meaning the Sten was no longer bound to tiny batteries. All of that for a fraction of the price of a full custom gun, and you could swap back to the old MkII components without any permanent modifications.

0_A3_O4412

I jumped at the chance, and I’m pleased to say after a solid year of near constant use in all weather, the kit has held up admirably. It’s been dropped, fell on, submerged in nasty bog water, and survived me crashing through foliage in full combat kit, with the only appreciable outcome being a slight looseness at the stock mounting (which was subsequently fixed with the liberal application of B&Q’s finest super glue). I’ve found it to be a very comfortable weapon to hold – a far cry from the plumber’s nightmare that was the MkII – and the battery compartment in the stock is truly a godsend; battery switches can be done in a flicker of the time, and without dismantling the gun to boot.

Now, being a drop-in kit, as it were, all of the pieces are obviously made to be easily installed or removed without modifications to the base gun, and there are some drawbacks to this. The front sight, for example, was initially held on by friction, meaning that knocks and bumps to the gun would frequently misalign it with the rear sight. I also found that the paintwork of the metal band that fits around the barrel shroud would wear away very easily, due to the steel fitting of the sling rubbing against it with use. The nature of the kit also means that certain aspects of the real MkV cannot be replicated – the rear pistol grip sits further back, most tellingly, although this is a small price to pay in my opinion.

13130983_495867643943213_1781590228028683325_o

The front sight issue can be easily solved: boring and tapping a small hole through the underside, then using a pointed screw to tighten it against the outer barrel of the Sten would help immensely. Indeed, the user could go one step further and drill a shallow hole into the outer barrel itself for the tip of the screw, which would eliminate the front sight shifting altogether, and with minimal modification to the base gun.
The barrel band, meanwhile, I would most certainly improve by chemical or oil blacking, rather than painting. This will allow it to resist the worst of the wearing the sling attachment subjects it to, and means I won’t have to keep repainting the bloody thing!

I have been let down by certain individuals in this line of work in the past – sometimes criminally so. I am very pleased to report that my experience with both individual and product in this case has been overwhelmingly positive. It’s safe to say I have put the MkV kit through its paces from day one, and it has rarely let me down, with Dom always on hand with troubleshooting should I need it.
Truly though, in a hobby dominated by yet more M4 derivatives and Multicam FAST helmets, nothing beats attacking an objective in full British airborne kit with a proper MkV Sten in your hands. I have Vintage Airsoft to thank for that that one.”


I have reproduced Kendo’s full review here, unedited for full disclosure! Feedback like this is really appreciated and we’ll be improving our product accordingly by oil blacking the foregrip band and tapping the foresight mounting. This sort of feedback can only be gained after the sort of heavy use Kendo has subjected it to!


You can buy our Sten MkV kit and many other items from our Etsy store.


A big thanks to Syfer Airsoft Photography for use of their fantastic photographs. Check out their page for great kit and action photos.

The MP28 in context

Custom builds, MP28, Products, Sub Machine-guns, Weapons, WWI, WWII

Yesterday, the owner of the MP28 came to collect his new gun and kindly brought his WW1-era Sturmtruppen impression for some photographs! The whole impression is mildly terrifying and it’s fair to say you wouldn’t want him appearing in front of you on a dark night…
_DSC5517

Although the MP28 isn’t a small fire-arm, it is very compact compared to the standard German service rifle, the G98 and even compares favourably to the K98a then in service with  advance units. Add in that the rate of fire is significantly higher than any bolt-action rifle and you have a fearsome new weapon for trench raiding.

_DSC5520

Jim has made and modified much of this uniform himself.

_DSC5526

Particularly noteworthy is the gas mask, in which he has replaced the glass vision ports with  mesh.

_DSC5528

He hand-painted his Stahlhelm based on photographs of originals, that distinctive block-camouflage was used by both sides in various forms, sometimes including unexpected colours like vivid yellows and sky blues.

_DSC5530

And of course, a vital part of any Sturmtruppen’s outfit, the spade:

“But the bayonet has practically lost its importance. It is usually the fashion now to charge with bombs and spades only. The sharpened spade is a more handy and many-sided weapon; not only can it be used for jabbing a man under the chin, but it is much better for striking with because of its greater weight; and if one hits between the neck and shoulder it easily cleaves as far down as the chest”

Eric Maria Remarque, All Quiet on the Western Front.

_DSC5533


You can follow the long process of building the MP28 here. This version has both a safety catch and a select-fire system built in with elevation and windage-adjustable rear sight.

If this replica firearm is of interest to you, please do get in touch at: enquiries.vintageairsoft@gmail.com or join us on our Facebook page. Don’t forget you can buy many of our complete products via Etsy, though builds like this are made to order.

Gewehr ’98: Part 1

Custom builds, G98, Rifles, Weapons, WWI, WWII

Another custom build, another load of laser cuttings! Part of the brief for this build is to replace as many of the pot metal parts with steel as possible, so I have a lot of cosmetic work to do on this.

_DSF7232

First up is the fore-end, incorporating the bayonet lug.

_DSF7235

Bending the fore-end sleeve into place, using a couple of steel tubes and as a wooden die. I then welded the three parts together.

_DSF7305

I could then remove the back of the butt stock where it fills the K98k buttstock.

_DSF7315

And fit the flat steel replacement butt plate.

_DSF7316

I then glued two pieces of straight-grained ash together and planed both to flat.

_DSF7322

I could then shape the bottom edge and run a rounded channel down the top for the barrel to sit in. This part will be the new fore-end, bringing the rifle up to the full length it is supposed to be.

_DSF7329

Inside the action, two buffers will suspend the inner barrel in the outer barrel.

_DSF7330

Next step is to bend the middle band, ends first.

_DSF7331

Then bending the rest of the shape around the woodwork.

_DSF7332 
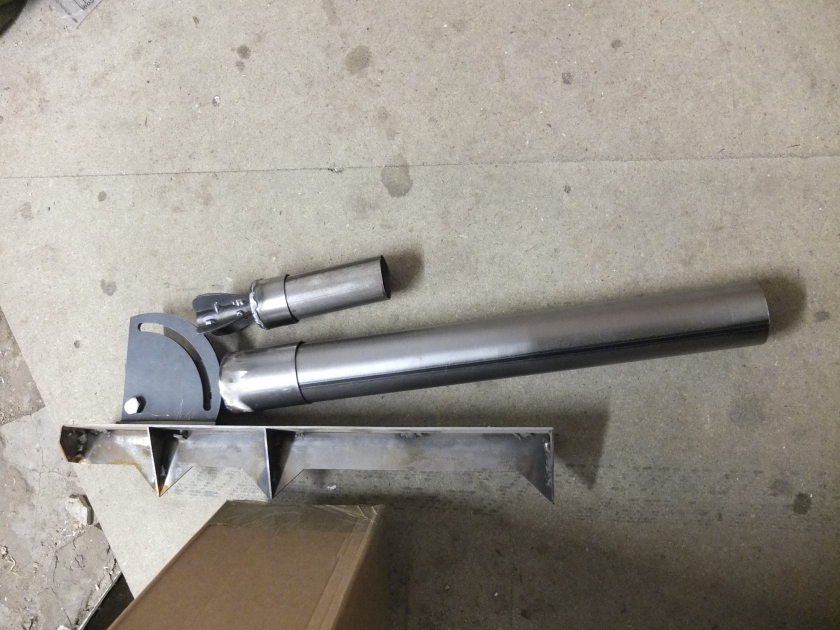
And the front band in position, minus the bayonet lug.
_DSF7337

So the next steps are: to attach the bayonet lug, fit the new full-length outer barrel, put a straight handle on the bolt, join the stock and fore-end and fill in the spaces on the stock.


If this build is of interest to you, please do get in touch at: enquiries.vintageairsoft@gmail.com or join us on our Facebook page. Don’t forget you can buy many of our complete products via Etsy.

Gewehr ’98: Introduction

Custom builds, G98, History, Rifles, Weapons, WWI

Where to start with the history of the G98… Well it’s a very long story of development and really starts in the 1880s, when the French scared the living heck out of pretty well everyone by introducing the Lebel 1886: the first repeating, smokeless cartridge, ‘small bore’ military issue rifle in the world.

Everyone had to catch up, the British quickly brought in the Lee-Metford, the Swiss Schmidt-Rubins, Mannlichers dominated Eastern Europe and Russia bravely (or foolishly) went their own way with the Mosin-Nagant. Germany however, had Mauser. To cover this topic thoroughly, I refer you to C&Rsenal: an awesome channel for those interested in firearms history. The first two videos are on the 1888 rifles, the third is on the G98 itself:

A quick breakdown though, the G98 served Germany through the Great War and into the interwar period until it was replaced by shorter service rifles such as the K98b and K98k. In WW2 is was apparently brought out from storage for Volksturm use.

So skipping on a bit a client has asked for a shell-ejecting G98 replica! A D-Boys K98k will be the donor gun. Modifications will be made to the stock, all the metal fittings that can be replaced will be replaced with steel and the massive and distinctive Vizier rear sight fitted. The bolt handle will be straight as per the original.

fd68c7d6f87fa46873b838d7fd01d1f6

Heavy weapons prototype special

Anti-Tank, Area effect, Area-effect, Cold War, LAW, PIAT, SMBL 2" mortar, War on Terror, Weapons, WWII

Nothing too in-depth today, just a short video showing off some of the prototypes we’ve been working on for over a year…

All of these are now available to order by email, we will be putting up pictures of the finished articles in the next few weeks.

If these products are of interest to you, please do get in touch at: enquiries.vintageairsoft@gmail.com or join us on our Facebook page. Don’t forget you can buy many of our complete products via Etsy.


British SMBL 2″ Mortar prototype

Area effect, Area-effect, Cold War, SMBL 2" mortar, Weapons, WWII

I’m afraid I have been somewhat remiss on photographing this build, but it’s quite a simple one in terms of components… The baseplate is an early war design which suits itself to precision rather than speed. The spiked arrangement on the bottom digs into soft ground to provide stability. The curved plate is your elevation control.
_DSF6051

The bottom of the barrel/chamber, shown just after welding. The main body of the barrel is easily removable to remove the shell if you need to.

_DSF6151

And the finished prototype! There will be a few modifications for production that allow the barrel to sit flatter for transport and the shell will have cutouts in the fins for lightness.

_DSF7247Something worth pointing out is that this is designed mainly for use with TAG shells to take out targets at long range or lay smoke screens, though you can put in any 40mm shells you like. During testing we did experiment with scatter shells and they were  effective at clearing a wide area ahead of the mortar.

Also, dropping the shell is unlikely to set it off. The firing mechanism is sat well inside the shell and will only be fired if activated by something goes that far into it. This makes it safer than just carrying moscarts which can go off when dropped on their base.


If this product is of interest to you, please do get in touch at: enquiries.vintageairsoft@gmail.com or join us on our Facebook page. Don’t forget you can buy our complete products via Etsy.

LAW M72 V0.2 and v0.3

Anti-Tank, Area effect, Cold War, LAW, War on Terror, Weapons

For those of you who have been following the blog for some time, you may remember the first rendition of the LAW M72 light anti-tank weapon built out of plastic tubing and fibreglass. Since then Vintage Airsoft has been working slowly in the background on several anti-tank weapons including an improved version of the LAW.

_DSF6011

When we say a while, we mean it. This is a photo of the new trigger mechanism housing being bent into shape in the old workshop.

_DSF6012

The housing in shape.

_DSF6515

When products are in development, they undergo a LOT of tweaking and changes in design, this photograph is a case in point. A dramatic change to the design of the shell meant that the original spacer would no longer fit, making it time for a gaffer-tape based solution.

_DSF6519

One of the modified trigger units straight after being brazed.

_DSF6518

This is the sear bar straight after being brazed. The protrusion nearest the camera is the sear, which is pushed down inside the tube above and allows the bar to slide forward under spring tension.

_DSF6533

The sear unit in position under the trigger mechanism housing. At the back is the wire that actuates the firing pin.

_DSF6566

Here you can see the firing pin (screw) and the actuator rod that the wire pulls to depress the pin. It certainly isn’t pretty but it did work. However this mechanism would be unsuitable for field use as it is unsafe to drop. However the principal can be applied to a more elegant system…

_DSF7265

The new trigger mechanism. The transfer bar is pulled forward by a tension spring and is controlled by a sear activated by the trigger.

_DSF7266

In place on the launcher, the tabs attached to the trigger unit can be welded down. The trigger unit can still be removed by undoing the screws and lifting straight out for servicing. There is also a tab that lines up with the hole in the cocking handle through which an R-clip or pin will be inserted as a safety catch.


And finally, painted up for testing! This will be painted green for production, but as it is a prototype the finish just needs to protect it from the elements.

_DSF7297

_DSF7300 _DSF7302

If this product is of interest to you, please do get in touch at: enquiries.vintageairsoft@gmail.com or join us on our Facebook page. Don’t forget you can buy our complete products via Etsy.


Oh, for those of you who want to see/hear the dry-firing….

Light Mortars: SMBL 2″ mortar

Area effect, Area-effect, Cold War, History, SMBL 2" mortar, Weapons, WWII

History

Mortars are artillery that fires at a steep trajectory, used originally in sieges to target buildings inside walled towns that would be unreachable by conventional artillery.

They have been used by armies ever since, though the modern mortar is a very different beast to its medieval counterpart. This pattern of man-portable mortar was developed in the Great War: when remaining in cover while targeting an enemy in cover was necessary to survive. This close-use artillery needed to be small enough to live in conventional trenches but provide greater firepower and range than rifle grenades.

Loading2inchMortarBalkanFront

The Stokes mortar was introduced by the British in 1915 and the design was widely modified and used by other countries. It is the grandfather of all modern mortars.

The Ordnance SMBL 2″

The 2″ mortar as used by the British Army in WW2 was developed from a Spanish 50mm mortar, though with modifications to make it suitable for British service. By the end of the war there had been eight marks with countless ‘*’ designations (used by the British at the time to denote small changes that did not add up to a full Mk).

595px-Men_of_1st_Royal_Ulster_Rifles,_1st_Airborne_Division,_demonstrate_the_2-inch_mortar,_29_August_1942._H23359

Originally the mortar was supplied with a collimating sight with spirit-levels and adjustment to allow for carefully aimed fire, however this was dropped on many of the marks, being replaced by a simple white line up the length of the barrel which was pointed at the enemy and fire adjusted until the bombs landed on target.


Vintage Airsoft have built a prototype mortar and will be demonstrating it very soon.

If this product would be of interest to you, please do get in touch at: enquiries.vintageairsoft@gmail.com or join us on our Facebook page. Don’t forget you can buy our complete products via Etsy.

Face protection: British WW1 Tank crew mask

Products, Protective items, WWI

My first remark on face protection in airsoft is that you don’t generally need it, especially in woodland/outdoor airsoft where you are usually at some kind of range. The exception I will make to this rule is in CQB (Close-Quarter Battle) sites. Sadly at my first CQB game I forgot my hat/balaclava and came home looking like this:

why you need face pro in CQB

The missus was not pleased and quite frankly, neither was I! So time for some suitable face protection for this CQB malarkey.

There are a few options, gas masks are an obvious choice but can be a pain for air circulation and temperature. However for the British there is another option, not strictly correct for WW2 but it fits in with the aesthetic of the era better than modern mesh and plastic.

Saint-Chamond-WWI-tank-crew-members

These spatter masks were worn by French and British tank crews during the Great War (1914-18). These hardened leather and steel masks had several narrow slits for viewing and chainmail lowers to prevent shrapnel caused by rifle fire from injuring the faces of the crew.


The build naturally started with some designing in Qcad, followed by some steel laser cuttings…

The first rendition had 2mm high slots for the eyes and the strap attached via broad hooks on the sides. However this didn’t feel secure enough for use in a skirmish.

_DSF6943

It did however give me chance to practice working the leather to fit this tricky shape…_DSF6945

With the leather in place:

_DSF6947

The second version featured square strap lugs built into the shape and holes to mark the position of the eyelets to hold the chainmail.The vision slots are also narrower at 1.2mm.

_DSF7231

I have lightly oil blued this with WD40 to remove the shine and lessen rust.

_DSF7233

With leather fitted.

_DSF7267

And with the chainmail piece as it came out of the envelope! This piece is slightly small but on the next version it will stretch from side to side.

Before attaching the chain mail to the mask I slightly heated the rings and sprayed with WD40 to take the shine off and help fight rust.

_DSF7281

With practice, I hope to get the leather closer fitting. Like in the first version.

_DSF7282

But overall I’m very happy with it! As with all mesh-type masks some BBs do fragment and pass through, but these will be sold with a pair of clear safety specs for people wishing to use them for airsoft.

_DSF7288 copy

If you are interested in buying a mask like this, do let us know on enquiries.vintageairsoft@gmail.com or contact us through our Facebook page. They will be for sale on our Etsy page if there is enough interest.