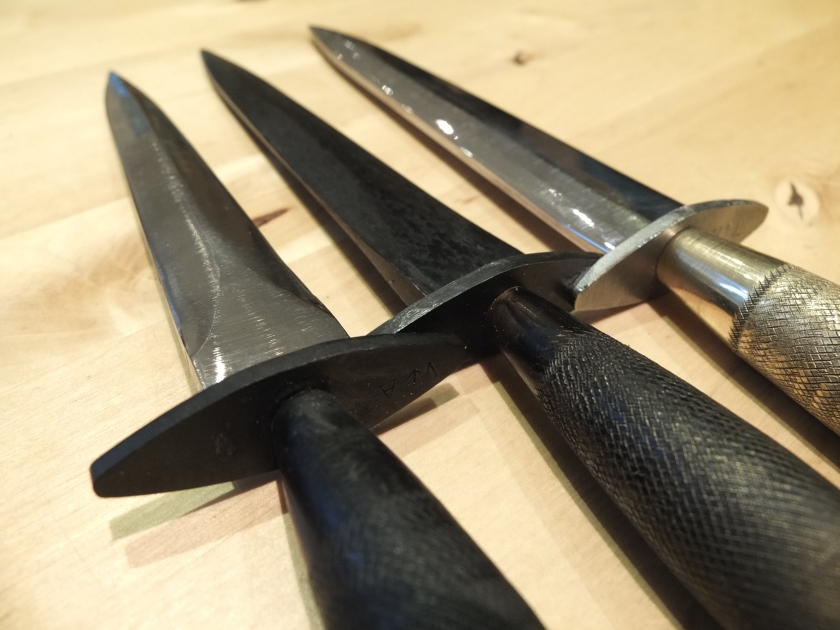
Over the whole production of F-S knives, there was huge variation. Include private purchase and commissioned blades and there are even more. At Vintage Airsoft we are now offering a selection of Second Pattern F-S knife replicas. These have no edge for safe carry as standard but can be sharpened when ordered.
Handle styles left to right: Mild steel, oil blacked; Brass, oil blacked; Brass, plain.
The handles are available in mild steel and brass, with plans to offer aluminium and stainless steel in the near future.
The blades are also available in several styles: polished and oil blacked.
These are marked on the cross guard with a subtle identifying marker.
And this slightly off-the-wall version, which is a sharpened model with a blued blade and polished brass handle. The handle on this particular one is more in line with the ‘fatman’ knives which were produced for men with larger hands who found the standard grip too small.
You can buy any of these knives through Etsy, if you want something specific outside of our standard knives then you can drop us a line on enquiries.vintageairsoft@gmail.com to discuss.
If you like this idea, find us on Facebook for more related content.
The AGM Sten comes with a hex head screw to attach the stock, which also contains the battery compartment.
This has three disadvantages:
It looks appalling
You require a tool to remove the stock/change the battery
It really looks diabolical
That’s right, it looks so bad it is worth mentioning twice. Fortunately this is easily fixed! The fix Vintage Airsoft offers also means that you can change the battery without any tools at all.
This piece is all-steel in construction. The edges are knurled for grip, meaning that the replacement screw can be fitted very tightly with just finger strength.
The corners are taken off for comfort of use.
The whole piece is oil blacked, which means it has an extremely wear-resistant finish that nicely matches the original painted surface of the gun.
If you like this idea, find us on Facebook for more related content. If you have an idea of your own you would like to see made, do drop us a line on enquiries.vintageairsoft@gmail.com to discuss.
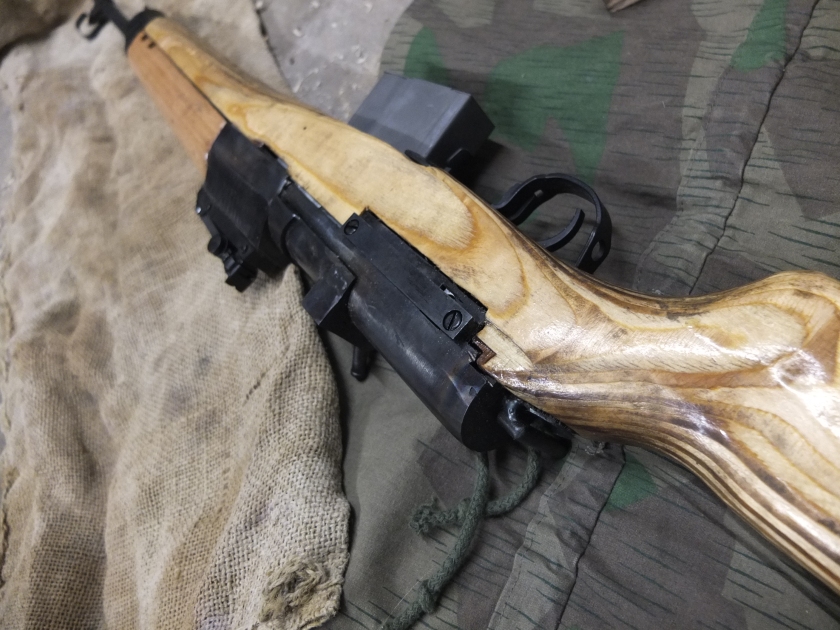
As promised, photographs of the finished G43 build. Remember, this was converted from an M14 AEG, so it isn’t a 100% accurate replica.
This is shown with the short M14 magazines, the standard M14 magazine is much longer but these are a pretty good stand-in for the original G43 mags.
Side view of the receiver, showing the scope rail.
And with scope mounted.
A close-up on the foresight. This wedge sight and full hood should make for fast and easy target acquisition.
The underside for those interested. Unfortunately due to the location of the battery compartment in this AEG, the classic German sling mounted through the side of the buttstock was unfeasible. As a result I have kept the original sling swivels.
This project has sparked a lot of interest so this model will be available as a kit and as a complete gun. If this post has inspired you to want a gun of your own, do drop us a line on enquiries.vintageairsoft@gmail.com to discuss or find us on Facebook. Remember, you can now buy our pre-made kits on Etsy.
The G43 was looking pretty close to finished at the end of the last post:
Since then, I’ve been working on a last few details. Firstly, the scope mount for this client as he wanted to be able to use this rifle as a DMR in modern skirmishing.
The scope mounts on the rail which was built into every G43 after the first couple of hundred. This mount just slides into position and can be removed and replaced in game. During the the Second World War snipers in most nations were taught to carry their weapons scopeless the majority of the time, carrying the optic in a special protective case, only attaching them when needed. A scope rail like this would allow a sharpshooter to maintain zero through removal and re-attachment.
I also wanted to work on the iron sights to make them more realistic and user-friendly. The rear sight leaf is adjustable for windage. A piece of folded steel supports the leaf and it is all brazed together. You can see the first stage of the elevation adjustment here as well
I turned two endcaps for the tube, one of which I drilled and tapped to take a screw. These could be brazed into position.
I then made a small screw with a knurled thumb nut to lock and unlock the elevation slide into place once the correct elevation was found.
The unit is now finished for functionality and just needs to be painted up. I’ll add some markings on the elevation slide to make it easier to track movements.
To help the markings last longer, I cut recesses for them with a fine file. I could then fill the space with off-white paint. I painted the rest of the sights, though I think if I do any more sights like these I will probably oil black them overall and just paint in the details.
As it’s an airsoft gun, I have left the range markings off, normally a rifle like this would have marking from around 200m to about 1200m. I’ll leave it to the client to mark in ranges that he wants with a chinagraph pencil.
Finished photographs of the whole gun will be going up in the next post!
This project has sparked a lot of interest so this model will be available as a kit and as a complete gun. If this post has inspired you to want a gun of your own, do drop us a line on enquiries.vintageairsoft@gmail.com to discuss or find us on Facebook.
Taking a different approach to an MP28 build here! Going to be brief and to the point.
Roughing out the stock: The overall shape is cut with a bandsaw using a template. I then take the corners off with a router where applicable. The timber I am using here is Walnut, a beautiful piece I acquired from a furniture maker’s near York.
I then cut out a recess for the catch and receiver, this is partway through cutting.
I can then remove materiel from the bottom where the trigger guard will protrude.
To get a really close fit between the metal and wooden components, I smeared a very thin layer of boot polish over the surfaces of the metal to be mated. This leaves an impression on the high points (or accents as some people call them) that can then be removed tiny bit by tiny bit with a sharp chisel or small file. Using this technique and going slooooowly you can get a very close fit as demonstrated below:
And with the receiver in position on its initial fitting. I have since adjusted the positioning slightly so it is a bit lower in the stock.
So, confession time: this is how that Sten receiver fits into that shaped stock. I took an angle grinder to the trigger mechanism housing and removed all the metal below the top of the trigger guard.
I could then weld on a flat plate of my own to seal the unit in. One of the really good things about the ASG Sten is that it is largely steel, not monkey metal like most airsoft guns! This means it is very easy to work with and I can MIG weld bits together as needed.
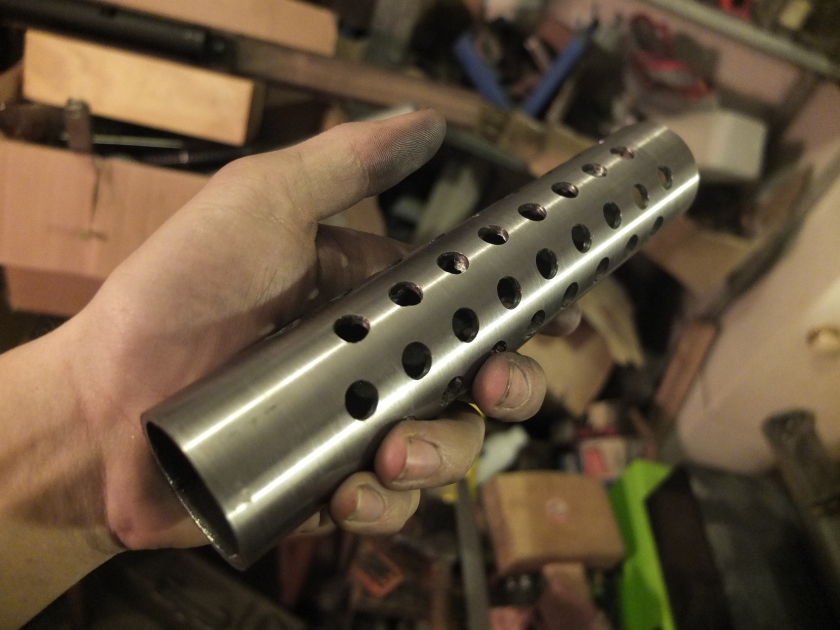
Now, 40mm mild steel tube is damned hard to find. As a result I ended up buying a piece of 42.4mm OD tube with a 4mm wall and turning it down on the lathe. The original tube is on the right, the turned piece is mounted on the lathe.
I could then mark out and punch where the holes needed to be:
Before drilling them out.
The front end of the Sten’s hop-up housing was then turned down to fit snugly inside the heat guard. You could also bore out the inside of the heat guard and leave this unaltered but life is short and this is easier!
Fitted in place. Worryingly I quite like the look of it in the white, in fact this whole gun looks good with bright steel parts!
I brazed on the foresight for two reasons: 1. my welder has broken down and is out for repair. 2. It produced a really neat little joint that looked right.
I could then heat up the entire piece with the propane torch until bright red, the end nearest the camera was topped up with a MAPP torch to get it to temperature.
I’ll attach a video as well, I thought this looked pretty cool! You will also see in the vid how I rolled the piece over several times to get even heat distribution, which is vital to an even finish.
Dipping this large part in oil, I decided to take a prolonged lunch break and avoid the cancer.
I allow parts to cool off in the oil pretty much, then allow them to drip as much excess as possible back into the trough, sometimes reheating slightly to ensure maximum removal. I can then rub the piece down with a rag to show the finish. I’m pretty pleased!
I can then fit the endcap and outer barrel unit, which is one brazed piece.
And dry fit it to the gun to see the effect!
Again, because of the broken welder, I brazed the rest of the magwell (the top and sides having been welded earlier). I used a piece of steel tube as the magwell band.
And in place on the gun, the receiver is also polished ready to be re-finished.
The rear sight base mounted in place.
Due to the shape of the magwell, it is necessary to have a bit of an extension to the feed tube in place so that it can open the magazine. I turned this on the lathe in nylon, which should be resilient but not harsh on the magazines that will have to be pushed up against it time and again.
During disassembly, this extension will have to be removed to remove the mag well. It is easily replaced with a pair of long nosed pliers and a finger.
Everything oil blacked:
And fitted into the stock, which still requires finishing. I want to get the fire select working before I finish the stock.
Some of you follow the Facebook page, and you will have seen pictures of random bits of odd-looking wiring. Those are being used for this: the select fire system. Unfortunately, whoever produced the ASG Sten decided not to use a gearbox with a select fire mechanism built in, so I am having to mess about with a MOSFET in order to make this select fire.
Having played about with the setup in this configuration, I can make the gun safe and fire in automatic. Just not in semi! Back to the drawing board, but I think I know what needs doing.
More next time!
If this post has inspired you to want a gun of your own, do drop us a line on enquiries.vintageairsoft@gmail.com to discuss or find us on Facebook to look at more related content.


 And with scope mounted.