MG08/15: The last furlong?

Custom builds, Imperial Era, Inter-War (1918-1939), Machine-Guns, MG08/15, Weapons

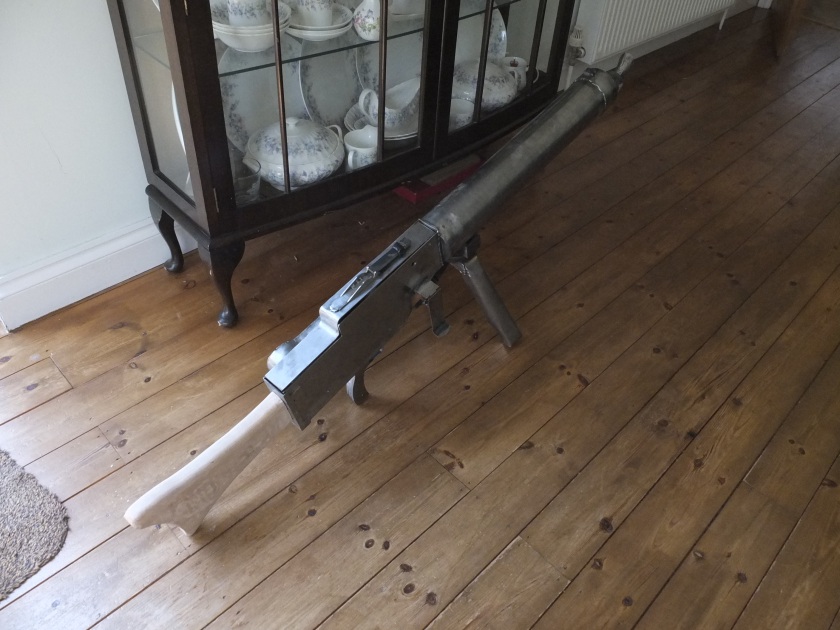
Thos of you who have followed Vintage Airsoft for some time will recognise this and be like: “Is he STILL working on that?”. Well, yes. I swear if something could go wrong on this build, it did. At least once. 

So, here’s hoping this is the last build post at long last!

One of the problems was the air seal between the gearbox and the hop unit. This it turned out was caused by flex between these parts, resulting in variation from shot to shot.


In the end, I re-designed the mounting plate to feature a hop-up ‘vise’ to hold the unit in place really solidly. There isn’t any wobble in this sod. 

_dsf8416

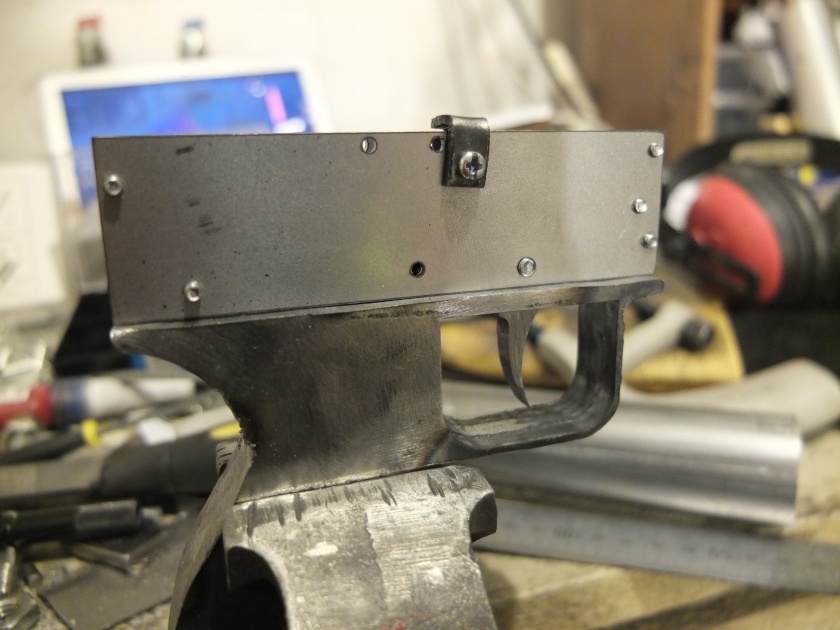
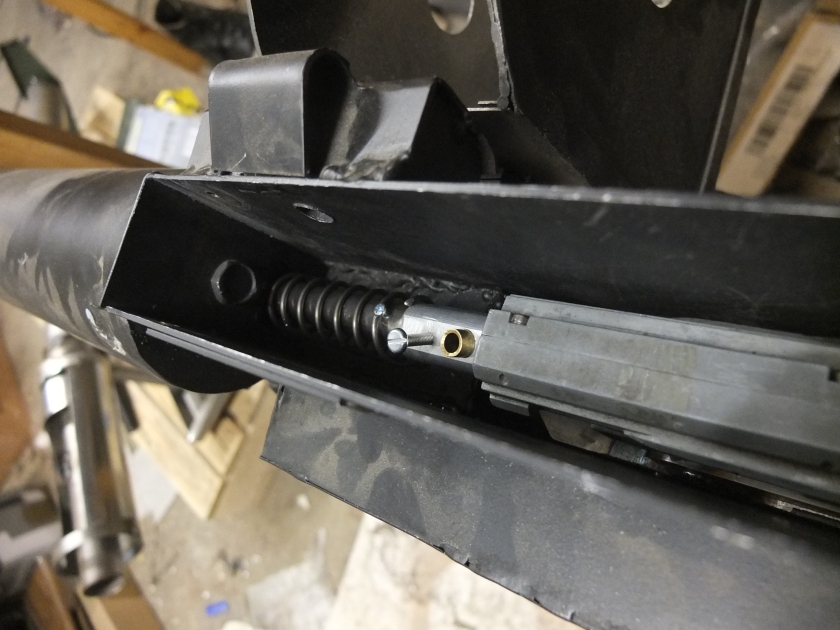
I had to make a few mods to the trigger unit design and the bottom of the baseplate to work together, but now the trigger raises a sear which sets off the microswitch in the gearbox itself.

_dsf8466

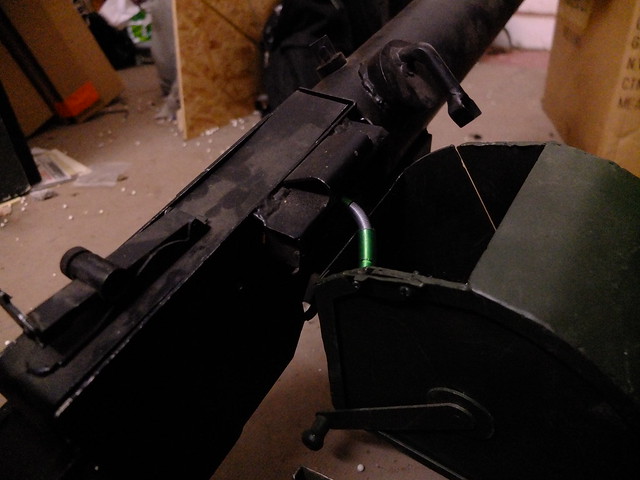
In place, clamped down! I’m still using the same feed system as before. 

_DSF8684

The feed tube comes out to meet the magazines.

_DSF9120

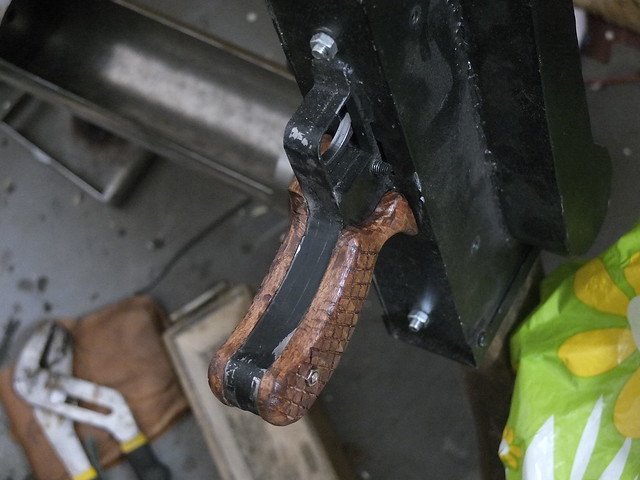
Oh yes, new grips. I wasn’t happy with the old ones, one wasn’t quite spot on, but as with all things the second attempt was much better. I’ve used hardwood this time (as opposed to laminate) and cut in cross-hatching for grip.

_DSF9140

Topping up the paintwork. 

_DSF9161

I’m really looking forward to having the finished photos on this at last.


If you are interested in this project or have an idea of your own, drop us a line on enquiries.vintageairsoft@gmail.com to discuss. ‘Like’ our Facebook page or follow the blog to get regular updates on projects and interesting videos and articles. 

Don’t forget you can buy our complete products via Etsy.

MG08/15: Improved internals

Custom builds, Machine-Guns, MG08/15, Weapons, WWI, WWII

When I went to test the MG08/15 the other day out of the workshop I had one of those frustrating moments when something that worked fine in the workshop didn’t! The gun was firing groups like a shotgun at hopelessly low FPS.

I decided the issue was in a poor BB transition from the chamber to the barrel so a fix was in order to smooth this out.

Instead of one screw locking the barrel in place, which offset it slightly, I added another two screws to hold it centrally. This eliminates the step the BB was having to take to get into the barrel, causing that appalling firing pattern.

_DSF7498

A quick test run at my local indoor site proves satisfactory! Just a little tweak to the hop nub should have this beauty field ready in no time.

If this post has inspired you to want a gun of your own, do drop us a line on enquiries.vintageairsoft@gmail.com to discuss or find us on Facebook.

You can buy the face mask I was wearing in the second video in our Etsy store.

MG08/15: Upgraded internals

Custom builds, Machine-Guns, MG08/15, Products, Weapons, WWI, WWII

A quick video to show you what this gun shot like prior to a couple of improvements!

It was a little inconsistent, though bear in mind that this is without the hop set at all. There are several improvements that have been made since then to improve consistency and power.

Firstly, a large, stiff spring holds both the outer barrel and the hop unit in place against the gearbox.

_DSF7323

At this point, it became apparent that having quick-replacement magazines is a bit pointless as any magazine for this gun will be a high-capacity one. As a result I dropped this idea and went for the far more secure (and better feeding) fixed version.

_DSF7350

This can still be swapped between an electronic hi-cap (stored in an MG42 ammunition box, as used in WW2 with the MG08/15) and a smaller hi-cap that can be stored in the drum itself.

_DSF7353

A drum magazine lock was added to stop the drum from opening unexpectedly. The crank handle on the original was used to wind in the cloth bullet belt. It is fixed on this and the sides of the spindle hold the magazine in place.

_DSF7370

The details on the water tank, filling cap and steam hose connector.

_DSF7371

The small magazine attachment for the drum magazine. This attaches to the top of an M14 magazine.

_DSF7372

A top-up of paint to get it pretty before testing!

_DSF7374

Ready to go!

_DSF7382

The elevation adjustment and rear sight.
_DSF7387


If this post has inspired you to want a gun of your own, do drop us a line on enquiries.vintageairsoft@gmail.com to discuss or find us on Facebook.

MG08/15: Internals

Custom builds, Machine-Guns, MG08/15, Weapons, WWI, WWII

Some of my followers will remember that I have had many, many issues with my lathe. Recently I have managed (with not a little help) to get it back into working order! There were quite a few jobs waiting for this, one of which was the MG08/15.

This required a hop-up chamber. I turned this from a piece of 20mm aluminium. One hole drilled through the centre all the way kept everything aligned as I bored out the front and back to their appropriate diameters to take the nozzle and barrel.

_DSF6235

I then filed down the top create a flat surface, then drilled a feed hole to allow BBs to feed into the chamber and another hole that was tapped to adjust the hop-up. A second screw holds the barrel stable.

_DSF6242

I attached two barrel spacers to the barrel to centre it in the outer barrel. This done I attached the gearbox to it. I could line up the gearbox mounting plate with the holes used to attach it to the frame and marked out their locations.

_DSF6246

These could then be drilled and fitted permanently.

More to follow soon! If this post has inspired you to want a gun of your own, do drop us a line on enquiries.vintageairsoft@gmail.com to discuss or find us on Facebook.

MG08/15: Bipod and woodwork

Custom builds, Machine-Guns, MG08/15, Weapons, WWI, WWII

_DSF5437

So, this is what the MG08/15 looks like now! As you can see there are a few changes. The main development of importance as far as I am concerned is the addition of the bipod. This gun finally stands up on its own!

_DSF5431

A close-up of the bipod mount in progress. A series of disks keeps friction to a minimum. I was thinking of using 6mm bearings but it runs smoothly as-is. Given the gun will be used in (very dusty) South Africa I reckoned on simpler being better.

_DSF5434The bipod itself is folded 2mm steel sheet. Designed in CAD and laser cut, I folded it by hand. I’ve never been so hot in the workshop! This was then welded to the bottom of the pivot mechanism.

_DSF5425
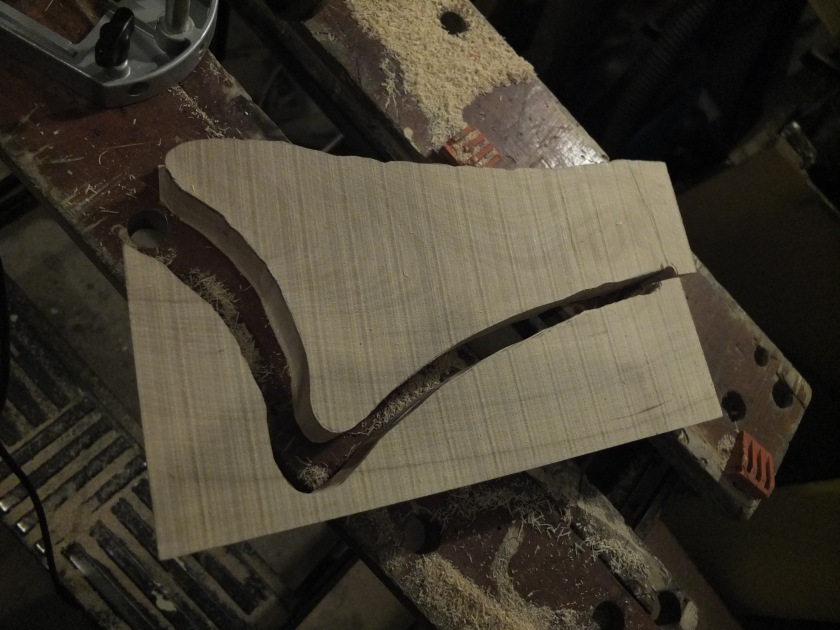
Woodwork is the other obvious development. Took delivery of some lovely Trend router bits that I have had my eye on for some time and set to work on the buttstock (rough cut above).  Using the convex curve of a Roman Ogee bit I rounded off the faces other than the front and back.

_DSF5436

Curved faces and Roman Ogee bit in the router.

_DSF5435

Another treat in the delivery: These rubber sanding drums fit in a standard drill chuck. A left hand thread puts pressure on the rubber to hold the sanding cylinders in place. Once you get used to setting them up, these are really effective for sanding large curved faces and even small flat faces.

_DSF5329
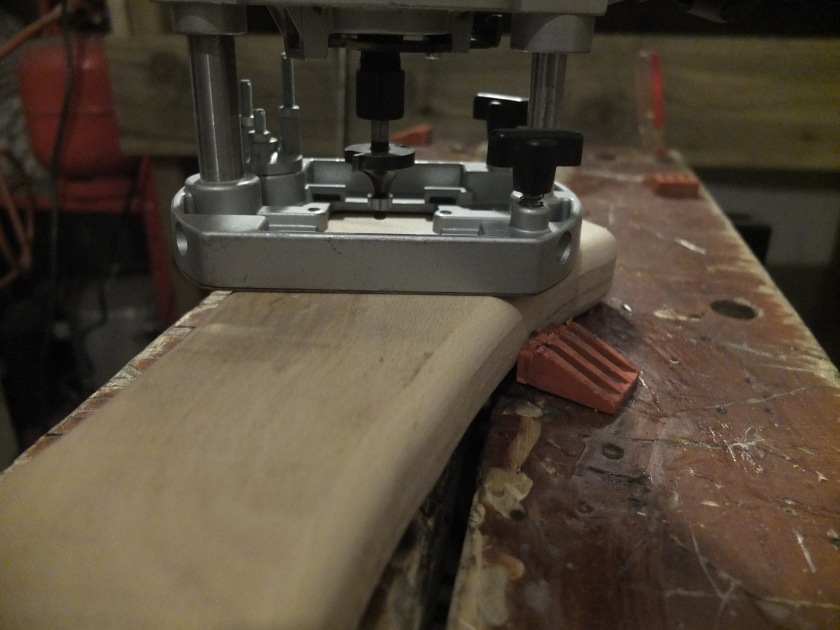
Now I just need to get the finished buttstock to match the staining job on the pistol grip covers!

Still to go: I need to fix up the feed mechanism. All the components exist, they just need fettling to get them all working together smoothly. Then attach the ports (in and ejection). With that it will be painting and testing!


If this has inspired you to want a gun of your own, let me know! Drop me a line on: enquiries.vintageairsoft@gmail.com, I’d love to hear from you!

MG08/15 shell

Custom builds, Machine-Guns, MG08/15, Weapons, WWI, WWII

Yes, you read the title correctly, more progress on the MG08/15!

External parts this time, the whole build  is really starting to come together now. It’s best expressed in photographs so I shall let them do the talking…

_DSF5327

Right side of receiver soon after welding the grip. On the right of the picture you can see the magazine mounting for the portable 100 round ‘snail’ magazine (technically it isn’t a snail magazine, it is a belt box, I refer to it as a snail to differentiate between it and the box magazine I am building for fixed positions).

_DSF5328

A slightly soft-focus shot of the left side after tinkering with the safety switch mounting.

_DSF5326
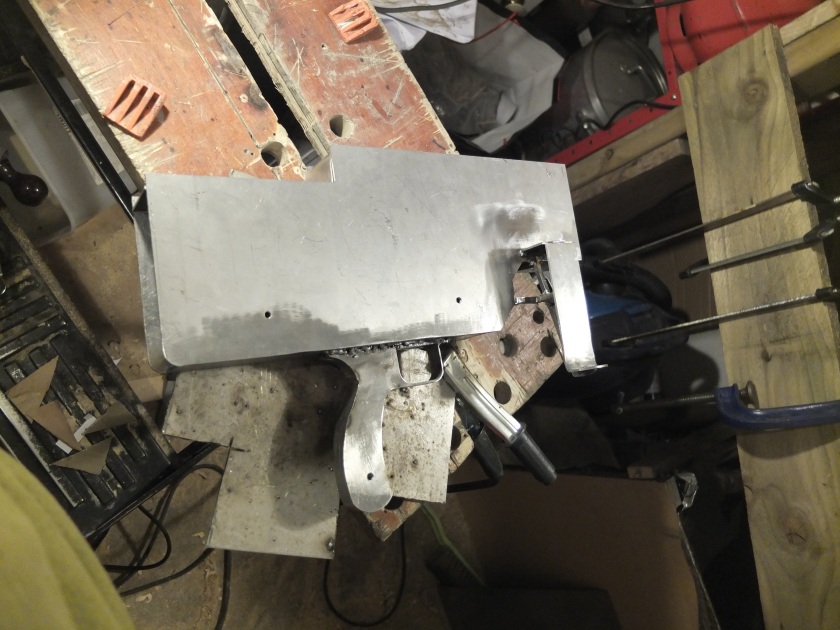
Close-up of the pistol grip. This shows the back where you can see the screw used to attach the trigger mechanism inside the gun.

_DSF5329

The first bit of woodwork for the gun, carefully shaped grips. This wood is ash stained with a blend of dyes to pick out the details. I’ll be needing to order in a special piece for the buttstock as the pieces I have are fractionally too small.

_DSF5318

Flash hider, carefully hand-cut and hammered into shape.

_DSF5331

Flash hider so far. The cone has been welded to a piece of tube that supports this component. The bulk of the rest of this part will be polymorph (the large black part here) which is still undergoing some shaping.

_DSF5333

And finally for this update, the cooling jacket. This close-up shot of the back-end shows the cover plate that attaches to the front of the gun and the hole through which the inner barrel will run.


As ever, if this post has inspired you, do drop us a line at enquiries.vintageairsoft@gmail.com!

MG08/15 trigger, hop and wiring

Custom builds, Machine-Guns, MG08/15, Weapons, WWI, WWII

It has been a while since I have written anything on the MG08/15 build as I have been slowly working on several small parts that in their own rights don’t make for a very interesting article!

The first of these to be completed is the motor plate. This unit houses the motor and the custom hop unit that I have made especially for this build. The original hop unit would only feed from the bottom left, entirely unsuitable of course for a gun that feeds from the top right!

_DSF5278

Motor plate with gearbox, hop and barrel.

So I designed a unit that would feed from the top, this has a feed tube that runs to the feed tray where the ammunition enters the gun.

Close-up of hop unit. The screw sets the hop, the feed tube sits just behind this.

Close-up of hop unit. The screw sets the hop, the feed tube sits just behind this.

The next part to be finished is the trigger. The trigger block sits just above the pistol grip and is secured by one M4 screw at the back. This screw is set into the grip, meaning that it doesn’t intrude on the use or look of the gun but the trigger block can be removed with relative ease. It also means that I can weld the pistol grip into place, meaning that this potential weak spot will be pretty solid!

Trigger unit and pistol grip out of situ.

Trigger unit and pistol grip out of situ.

Trigger housing and safety slot. The safety engages with the second sear.

Trigger housing and safety slot. The safety engages with the second sear.

Also, the wiring has been completed. Having run a test everything works fine, though I will be finding a stronger spring to reset the second sear to make trigger response sharper.

Where the magic happens...

Where the magic happens…

The next step is to assemble the rest of the outer shell and add the detailing. Then we can run a functionality test.

If this post has piqued your interest at all and you would like something similar of your own, do just let us know! Drop us a line on enquiries.vintageairsoft@gmail.com.

MG08/15 Motor plate and further designs

Custom builds, Machine-Guns, MG08/15, Weapons, WWI, WWII

So far I have built the main body of the MG08/15 (see here). The next step was to build the plate that supports the gearbox unit and hop. This bit isn’t pretty but it will be functional!

DSCF5107

Top view, plate installed inside shell.

Two bolts secure the plate fore and aft. At present I have left the heads on for ease of dismantling but these will be filed down for finishing so as to be more discrete.

DSCF5105

Side view, plate installed. The green line shows the level of the motor plate.

I also installed the top cover, a piece of 2mm sheet formed to the shape of the top. This is hinged at the front, I’ll have to create a catch at the back to hold it in place.

The hop is a custom-designed one in order to fit the space and feed from a place that is suitable for the magazine (the top as it happens).

DSCF5108

Space between motor plate and the bottom of the shell.

In this space the trigger mechanism will be going! That is the next stage….

Screen Shot 2015-03-31 at 19.44.08

Trigger mechanism.

The tricky part of designing the trigger mechanism for this was getting the safety switch to operate the correct way around. A reasonable bit of re-jigging was required but I got there eventually! Again, the components will be laser cut.


As ever, if this post has inspired you at all for your own project or custom build let me know! Drop us a line to discuss it on: enquiries.vintageairsoft@gmail.com

MG08/15 laser cuttings

Custom builds, Machine-Guns, MG08/15, WWI, WWII

Last week the laser cuttings arrived so after a delightful holiday in the New Forest and attending the Battle of Aachen (at Combat South) I decided to start marking the pieces up for welding.

DSCF5048
Having designed the parts some time ago it’s quite a challenge trying to remember what goes where sometimes! As a result I thought it would be good to match up and have opportunity to check everything before welding it permanently.

DSCF5049

Above: Receiver unit: left panel and associated parts.

Below: Back panel and buttstock holder.

DSCF5050

More to come when some welding has been done!

As ever, if this has inspired you to want a project of your own drop me a line on the usual email address! enquiries.vintageirsoft@gmail.com