The Webley review

Customer Reviews, Imperial Era, pistol, Weapons, webley, WWI, WWII

I thought it was about time that I took a look at the new Well Webley. Having owned a Wingun for some time and having seen the incredibly low price point of the Well I had to see what it was like.

_dsf8560

First impressions:

Side by side, these two guns look very similar in shape. It’s clear that the Well is a plain clone of the Wingun, differing in a few small details, other than the obvious differing finish. Although the Wingun is available in a black finish, I’ve never had one to compare to this.

_dsf8563

The Well finish is thick, when you first get it it needs breaking in a bit to make the action smooth both in the hammer, trigger and break-action.

The Well lacks the detail of trademarks, but in use these are not things you will realistically notice. It does however have some seamlines which would need filing off for the optimal aesthetics.

Weight-wise they are very similar, with similar heft and balance. On the scales, there is only 10g between them. It is quite clear that the Well is a direct clone on the basis of this. Aside from the finish and trades, the only clear identifier of the Well is the screw that controls the cylinder lock. This is a Phillips head rather than a flat head. I have no idea why they chose to do this as they use flat head screws elsewhere.


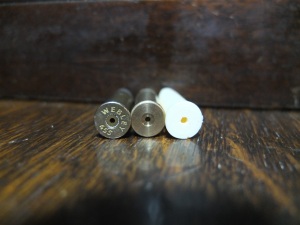
The shells appear to be interchangeable (however see below for more detail on this), I can drop Wingun and Well shells into each revolver with both cycling absolutely fine. The Wingun shells are better fitted and finished, with the heads of the Well shells being a little more rough and a little softer. The Wingun shells also have ‘Webley .455’ written on the back, which may seem to make them more authentic at first glance, this is disregarding the diameter of the shells being .38.

_dsf8512 _dsf8511

In terms of feel, both are pretty much identical. The Wingun is perhaps a little smoother, but to be fair it has seen heavy use ever since I bought it, meaning any rough edges have long since worn off. The break action is slightly easier on the Wingun, which isn’t necessarily a good thing. I have had this revolver open on me in the field: resulting in either spilt shells or a delay while I close it in order to fire. The Well appears to have a little nodule on the action lock which gives a slightly more positive lock-up.

The Well, on first opening the revolver, had a very loose fitting cylinder. The cylinder lock does not work like the original (which is very well replicated on the Wingun), but appears to be entirely reliant on the two screws that hold the locking piece itself. These were initially far too loose, meaning that the locking piece did not grip the cylinder. On tightening, the cylinder no longer fell out, however it became unreliable to cycle in double action. Loosening the cylinder lock slightly allowed the cylinder to remain locked in place and cycle fairly reliably.

The auto eject works well on both guns. The Well is perhaps a little heavier, but again this could be due to wear on the older Wingun. The barrels, on all airsoft revolvers I have experience of, move forwards and backwards with an attachment that interfaces with the cylinder to provide a seal and reduce gas loss. On the Wingun, this is aluminium. On the Well it is some kind of rubber. I’m yet to see if it actually makes any difference in wear over time but it does seem to make single action use slightly heavier for the Well. Not so much that you would notice in anything other than a precision shooting environment, which these replicas are really not designed for.

On the note of precision, the Well has a feature the Wingun is seriously lacking. The Well comes with a fixed hop pre-installed in the barrel. Although it is not a majorly difficult feat to install a fixed hop using either the o-ring method or a flat hop, it is nice to be saved a job, especially given it would not have been a difficult thing for the original manufacturers to do.

Testing

Conditions of testing:

Chronoing and accuracy testing will be with .25g BBs. The Wingun is not in stock configuration, it has had an o-ring hop added. The temperature outside hovered around 1 degree Centigrade. It was probably colder in the workshop.


Time for the fun bit. Firstly, I loaded a new CO2 cartridge into each gun, fired off 12 shots from each to take the edge off (good practice when you are shooting at people!) and loaded the shells. I started with the manufacturer provided shells, then shot some of the Vintage Airsoft single and shot shells

The results were… interesting and somewhat unexpected. To the point where I will probably retest at a later date. It was VERY cold in the workshop which will account for some of the results but not the inconsistency.

screen-shot-2017-01-22-at-16-42-42

After firing off a couple of batches of shells it felt like the Well was low on power, so I put it aside to run the same tests on the Wingun. When I finished two Wingun tests, I picked the Well up to continue testing and it was back up to strength. Interestingly it seems like the Well suffered from cooldown much more than the Wingun, which considering their build is near-identical is surprising.

Accuracy:


Accuracy tested at 5m, obviously you will generally be further than this. I may come back and do further testing on this at a later date.

On these Huns head targets, the bull is 30mm, the second ring is 70mm.

The Well:

well

The Wingun:

wingun

In this test, the Wingun produced a significantly smaller group. In fact the first Well group was largely not on the paper. Further testing is definitely required.

Notes on use:

The extractor of the Wingun is a a bit more positive. The Well sometimes fits the shells and sometimes does not. It seems random as to when it does or does not, I presume this is due to cylinder movement as described in the first part of this review.
It is hard to see the spacing issue with the VA shells due to their being white, in the picture below you can see that the rims sit proud of the cylinder. It’s no more than a millimetre but it prevents rotation and even lockup.

_dsf8539

How it should look:

_dsf8542

Also, when loading the CO2, the Well grip panel did not click back into place easily. I had to bend the spring clip a few times to try and get the correct angle for it to fit into the lock and hold the grip in place properly.

Another issue I had with the Well was that it did not always cycle reliably, the hand would push the cylinder but not push it all the way around somehow.


After using the Well for a bit, this happened:

_dsf8545

The extractor snapped. Hence having to come back later.

Summary

In summary… if these revolver were the same price, from my experience of these two samples, I would say the Wingun edges it. It is more consistently reliable and hasn’t broken in my extensive use of it whereas the Well example I have broke in the testing phase.

The Well does have a more positive lockup, which is nice. Also the ready-fitted hop is a good thing, though when firing the shot shells it appeared to have very similarly tight groupings to the Wingun with its o-ring hop.

So the difficult bit is that they are not the same price point. The Well is, at the time of writing, 1/3rd of the price of the Wingun (on a good day). It is hard to say that you should spend so much more even when out of the box reliability is such an issue.


I am sure that the Well could be made reliable, but it will require time and effort. The Wingun is a pick up and play gun with minimal maintenance required to keep it going.


If this content interests you, subscribe to the blog or join us on Facebook. Don’t forget you can buy some of our ready-made products on Etsy, including our own Webley shells.

So, you like airsoft? Part Two A: Eyepro

Advice columns, Customer Reviews, Get into airsoft series, Products, Protective items

Preface:

This is intended as an introduction to airsoft, it is a general guide to airsoft in the UK, though many of the points here will be the same abroad. Any advice regarding the law is intended as a rough guide only and you should research further or consult a lawyer on points in detail if you wish to.

Vintage Airsoft is not responsible for any action you take regarding this advice!

 Part One, a really basic starting point is HERE

This is Part Two A and will look in detail at eye protection, Part Two B at equipment and Part Two C at guns finally!

Part Three will look at specific airsoft genres.


So, you’ve tried airsoft and you like it!

That’s great, I don’t blame you! So you’ll want to start assembling your gear. Before I get to the fun stuff, here’s the important bits:

Eyepro

There are quite a few options for eye protection. Some eyepro is airsoft specific, some is general. I’ll not go into specific requirements for eye protection standards but will show some pros and cons of each type.


Safety specs.

These aren’t really designed for airsoft, though they are used. These usually (but not always) meet the minimum safety requirements for airsoft but you should always test them before relying on them for protection.

These are usually inexpensive, and the most discrete to wear. However some goggles do have a gap around the edge, which can leave you vulnerable to BBs getting through this gap.

All clear eye protection fogs from time to time, with warmth and sweat or moisture in the air. Safety specs do have an advantage over other forms of eyepro in that you can reach into them to clean dirt and moisture in the field without taking them off. If you get fogging then you can wiggle them up and down to clear them in a few seconds.

Because of their low profile, they are popular with themed airsoft games such as WWII and Vietnam. They are also a good choice for snipers as you are unlikely to get lit up at close range so the reduced protection is less of an issue, but the ability to clear them is vital and they don’t get in the way of a scope or clunk on the buttstock.

You can get larger lab specs that go over spectacles, but these have large gaps around the bottom typically so be wary of them.

51-g6nGyPlL._SL1000_

Safety goggles.

These are the next step up. A good pair of safety goggles wrap all round the eyes and it will be pretty well impossible for a BB to get past them. As far as safety is concerned, these are the safest eye protection.

However due to the reduced capacity for air flow, these are likely to fog and are harder to clean in the field, but this can be done with practice. Some higher end goggles have fans built in to improve this, other use a thermal lens to keep mist at bay. Some less expensive goggles may distort your view at the edges. Any large goggles can get in the way of rifle stocks for aiming, which can be an issue with using sniping scopes. However if you wear spectacles, these are a valid option.

$(KGrHqJ,!jYFJtP8vh-QBSe4-7YBwg~~_32

Mesh.

There are two main types, large goggles and small ones. Large ones protect the full eye area, small ones just cover the eyes themselves. These have the profound advantage of not misting up or getting smeared.

AS2541

However, cheap mesh goggles do have their drawbacks. Cheap BBs can shatter on impact and small fragments can get through. The large goggles can get in the way of aiming on some guns, but some thin glasses can be worn beneath them. In bright sunlight, the light can dazzle through the holes, which is distracting!

large-mesh-goggle-in-black-acm-3131-p

Full face protection.

It is also possible to get eyepro built into full face protection, either in mesh or clear form.

While this provides a pretty seamless level of protection across the whole face, if you use clear eyepro in this format it will still mist up and cleaning it is nigh-on impossible in the field. However some versions do have built in fans or thermal lenses to help offset this. If you wear glasses with these, both the lens and the glasses themselves may fog and you won’t be able to clean either! Some face protection can cause issues with aiming certain guns.

BC-ST11-2B-lg

You can also get themed full facepro if you have a specific load out you’re aiming towards. For example, I make the WWI tank crew spatter mask for this purpose, but you can also get gas masks, horror masks, replica faces and so on!

Prescription eyepro

If you decide to take you airsoft seriously and need glasses, you can get safety specs and goggles that take prescription lenses. They are usually better than the average safety specs and of course allow you to see very clearly. As ever with clear eyepro, they will still mist up from time to time.

4996498531_87a92644b0_b

Some final eyepro tips:

1. In an ideal world, shoot any eyepro you have to test it before you use it. If it’s a pair of inexpensive safety specs, get two pairs and test one. Use a 350fps gun in full auto at close range, test the frame and the glasses themselves. Any signs of cracking or splintering then do not use them. If you have access to a DMR or sniper rifle (450 to 550fps in the UK) then it is also worth testing with them to simulate a worst case scenario. When you have tested your first pair, use the second as impacts can degrade the protection. 

When testing eyepro like this, WEAR EYEPRO. Just in case you forgot that BBs can take your eye out…

2. There are dozens of different standards for impact ratings, but not all are suitable for airsoft. This is why I recommend the above test before any skirmish use.

3. Anti-mist for clear eyepro is a constant debate. Honestly, I think mist is nearly unavoidable and when I remember, wash my goggles and specs in a detergent solution which largely keeps it at bay. Carry some clean blue tissue around with you for a cheeky wipe in the field if needed, most sites have a stock.

4. DO NOT USE SKI GOGGLES. These and other related forms of eye protection are not designed to protect against impacts. They will shatter and send splinters into your eyes.


Sorry for such a long post on this, but there is a lot to cover! Next time we will look at webbing, helmets and other more exciting equipment.


If you liked this content and want to see more like this, why not follow the blog or join us on Facebook?

You can buy many of our finished products in our Etsy store.

‘Fabricators’ Luger P04 holster: Review

Customer Reviews, Luger P04, pistol

Having finished my P04 Naval Luger, I had been tucking it into my belt for a few weeks and needed a better carrying solution. There are a few holsters about and I picked this one up from Ebay from a seller based in India called ‘Fabricators’.

_DSF7849

At £27, free postage I thought it was worth a punt. If it was truly dreadful I could send it back or sell it on easily enough!

_DSF7850

On the back, there are two loops to hang it on a belt. There is no way to stop it moving on said belt, but that is the way of German webbing. British webbing kind of spoils you !

_DSF7852

The quality of the stitching is very good overall, there are no places where I am anxious about it coming loose.

_DSF7854

Down the side, there is a space for a cleaning rod. This is one aspect I was nervous of: in the picture on Ebay the Sam Browne stud was not well fitted. In the example I received it was however and the slot to close the flap well sized, not too tight or loose.

_DSF7856

Inside the flap of the holster, there is a pouch for the disassembly tool.

_DSF7857

And as a rather nice touch, it came with the disassembly tool! The pistol is a good fit, it sits deeply in the holster.

_DSF7860

On the side there is a tab, which you pull to lift the pistol and grab the grip.

_DSF7861

So, the downsides. The quality of the finish of the leather is not the best. It is painted on and not deep set within the material. In the picture above you can see a line above the cleaning rod pouch where it has flaked a bit, which is how it came rather than wear. Also, there are a few spots where glue has been slightly misplaced.

_DSF7863

However, for a hard leather holster for an unusual pistol I am pleased with it for the price. My main kit is British, so it will only be used when I fancy a change or when I’m playing CQB and am not using the Webley.


I’m not going to score items when I review, the numbers are subjective and meaningless. Instead, I judge items by whether a) I would buy it again if I needed another and b) whether I would recommend it to a friend. In this case, the answer is the same to both: Yes.


This may not be the best quality bit of kit out there, but it is a very fair price for what it is. To get better, you would have to spend a good deal more money-if you could even find one for this particular pistol.


If you liked this content and want to see more like this, why not follow the blog or join us on Facebook?

You can buy many of our finished products in our Etsy store.

The Sten MkV kit in action

Add-on kits, Customer Reviews, Products, Sten, Sub Machine-guns, Weapons, WWII

Many of VA’s followers are also on the UK WW2 Airsoft forum and will know regular contributor Ken by his handle ‘Kendo’. Ken was one of the first people to buy one of my ready-designed kits and has been using it heavily for well over a year now. I caught up with him recently to get some feedback:

“I was first made aware of Vintage Airsoft’s MkV Sten kit through the WW2 Airsoft forums, perhaps better known to some as ‘Comrades in Arms’. Dom had posted his prototype MkV build, and was looking to put together some more kits for those of us stuck with the perhaps not-entirely-accurate MkII Sten, especially for the many folks like me that portray the iconic late-war British paratroopers!
The idea was inspired: a hand-built, wooden stock, comprising a mounting bracket and pistol grip, that slotted directly onto the receiver of the AGM Sten, replacing the standard T-stock; the kit would be complete with a wooden foregrip that bolted to the Sten barrel shroud, and topped off with a metal front sight that slipped over the outer barrel. As if that wasn’t enough, the wooden stock was hollowed out and wired, meaning the Sten was no longer bound to tiny batteries. All of that for a fraction of the price of a full custom gun, and you could swap back to the old MkII components without any permanent modifications.

0_A3_O4412

I jumped at the chance, and I’m pleased to say after a solid year of near constant use in all weather, the kit has held up admirably. It’s been dropped, fell on, submerged in nasty bog water, and survived me crashing through foliage in full combat kit, with the only appreciable outcome being a slight looseness at the stock mounting (which was subsequently fixed with the liberal application of B&Q’s finest super glue). I’ve found it to be a very comfortable weapon to hold – a far cry from the plumber’s nightmare that was the MkII – and the battery compartment in the stock is truly a godsend; battery switches can be done in a flicker of the time, and without dismantling the gun to boot.

Now, being a drop-in kit, as it were, all of the pieces are obviously made to be easily installed or removed without modifications to the base gun, and there are some drawbacks to this. The front sight, for example, was initially held on by friction, meaning that knocks and bumps to the gun would frequently misalign it with the rear sight. I also found that the paintwork of the metal band that fits around the barrel shroud would wear away very easily, due to the steel fitting of the sling rubbing against it with use. The nature of the kit also means that certain aspects of the real MkV cannot be replicated – the rear pistol grip sits further back, most tellingly, although this is a small price to pay in my opinion.

13130983_495867643943213_1781590228028683325_o

The front sight issue can be easily solved: boring and tapping a small hole through the underside, then using a pointed screw to tighten it against the outer barrel of the Sten would help immensely. Indeed, the user could go one step further and drill a shallow hole into the outer barrel itself for the tip of the screw, which would eliminate the front sight shifting altogether, and with minimal modification to the base gun.
The barrel band, meanwhile, I would most certainly improve by chemical or oil blacking, rather than painting. This will allow it to resist the worst of the wearing the sling attachment subjects it to, and means I won’t have to keep repainting the bloody thing!

I have been let down by certain individuals in this line of work in the past – sometimes criminally so. I am very pleased to report that my experience with both individual and product in this case has been overwhelmingly positive. It’s safe to say I have put the MkV kit through its paces from day one, and it has rarely let me down, with Dom always on hand with troubleshooting should I need it.
Truly though, in a hobby dominated by yet more M4 derivatives and Multicam FAST helmets, nothing beats attacking an objective in full British airborne kit with a proper MkV Sten in your hands. I have Vintage Airsoft to thank for that that one.”


I have reproduced Kendo’s full review here, unedited for full disclosure! Feedback like this is really appreciated and we’ll be improving our product accordingly by oil blacking the foregrip band and tapping the foresight mounting. This sort of feedback can only be gained after the sort of heavy use Kendo has subjected it to!


You can buy our Sten MkV kit and many other items from our Etsy store.


A big thanks to Syfer Airsoft Photography for use of their fantastic photographs. Check out their page for great kit and action photos.