PIAT: Part Two

Anti-Tank, Area-effect, PIAT, Weapons, WWII

PIAT Part One was quite a while ago now and the project had to take a bit of a back seat for a while. Since then it has undergone a few changes to improve it and get it working!

Firstly, the shell holder is now welded onto the receiver for strength and simplicity. The whole unit now strips from the back.
_DSF6891

The back now uses a bayonet locking lug system to hold the internals in place.

_DSF6892 The trigger mechanism is now also smaller and smoother to operate, so it now looks like this:
_DSF7051

With the prototype shell in place! The production shells will be much more authentic in shape, this is just a proof of concept at this stage.

_DSF7090

Time for a first coat of paint. Panzer green will do to prevent rust for now, though surviving examples are painted everything from a forest green to a chocolate brown.

_DSF7092

Time for a bit of bang:

If you like the look of this piece and would like a build of your own or want to support this project please do get in touch! Email us on enquiries.vintageairsoft@gmail.com or get in touch via our Facebook page.

Don’t forget to visit our Etsy page HERE.

Sten MkI/MkI* : Complete

Add-on kits, Complete builds, Products, Sten, Sub Machine-guns, Weapons, WWII

Some images of the completed Sten MkI and MkI*. Firstly a picture of AN original for comparison. I should point out that you can find differences between nearly every surviving example so this isn’t definitive:

tumblr_mky4fuYlFr1s57vgxo1_1280

The main issue with this replica is that the safety catch is at the top of the operating handle slot (as this is based on the AGM Sten MkII). The only way to adequately redo this is to make a whole new receiver unit. Maybe a project for the future…

_DSF7039

A close up of the receiver. The new operating handle and bolt also feature the Sten safety switch kit. You can also just make out the Sten MkI stampings on the magazine housing.

_DSF7040

The foresight on this is very comfortable to acquire, at least in the confines of the workshop where I have tested it so far! This will be going out in the field at the weekend.

_DSF7042

The stock is very comfortable compared to the MkII T-stock. That said clutching a thistle is an improvement over the T-stock… But in all seriousness this is a great alternative and is fast becoming a personal favourite.

_DSF7043

One final feature worth noting is the battery compartment. Accessible from the rear, it can just about fit the standard stick battery in it, though a stick lipo would be a far easier fit.

_DSF7045

And in the Sten MkI* configuration, once it had been optimised by the Singer company for serial production:

_DSF7044

This kit will be for sale on our Etsy page HERE in due course. If you like the look of this gun and would like a build of your own that we don’t currently offer please do get in touch! Email us on enquiries.vintageairsoft@gmail.com or get in touch via our Facebook page.

Webley shells-Finished products

Add-on kits, Area effect, Imperial Era, pistol, Products, Weapons, WWI, WWII

Recently we put up a piece on our replacement Webley shells, now we have a video on their performance! The tests compare the standard Webley shells, our single shot reproductions and our new SHOTshells to enhance your firepower.

The really juicy bit is at 3m 43s: 12 shot shells fired in quick succession.

We really want to make the same products for the standard Dan Wesson revolver shells. Let us know if you are interested.

You can now buy these shells HERE.


And don’t forget to ‘like’ us on Facebook!

The Sten MkI/MkI*

Add-on kits, History, Sten, Sub Machine-guns, Weapons, WWII

History

After the swift and brutal defeat of the British Expeditionary Force and their allies in the Battle of France and the retreat from Dunkirk across the channel, Britain was desperate for equipment and armament. All heavy weapons, vehicles and most small arms were left behind.

Dunkirk_26-29_May_1940_NYP68075

As a result there was a huge push to re-arm as quickly as possible. As well as all of Britain’s manufacturing being turned to the war effort, the War Office bought every Thompson sub-machine gun the USA could build. The US couldn’t keep up with demand however and with losses to U-boats in the Atlantic Britain needed to produce their own sub-machine gun.

churchill_decides_to_fight_on

The result of this was the Sten Machine Carbine. The prototype was a complex piece of engineering, requiring a multitude of machining actions to produce. When handed over to the Singer company to produce, a host of improvements were made to make the gun suitable for mass production.

tumblr_mky4fuYlFr1s57vgxo1_1280

I wanted to develop a kit to temporarily modify the AGM Sten MkII to a MkI/MkI* for early war impressions and, frankly, for an interesting regular game gun.

The build

Step one was to build the flash hider/muzzle rise compensator. This large scoop is formed from a piece of steel cut to shape and beaten on a former.

_DSF5319

This could then be welded shut and a short piece of tube welded on the back to mount it. The sling loop is a piece of thick wire, welded shut. I turned a piece of nylon bar to size to fit round the mounting tube and inside the heat sleeve.

_DSF6353

This can then be slid into the heat sleeve. The photograph below shows the front sight mounted. This is mild steel, laser cut to shape and bent by hand.

_DSF6991

To create the buttstock, I needed to bend steel tube to shape. As I don’t have a tube bending jig and a spring bending system would produce too shallow a bend. Cutting out a section like this, bending to shape and welding closed makes for a neat, controlled bend.

_DSF6976

This could be welded onto the backplate and buttplate. The top tube also functions as the battery tube and the plan is to have the battery accessed from the back.

_DSF6985

At this point, this is pretty well what the MkI* looked like (as far as one can tell, photographic evidence is limited) as it has all the woodwork removed for simpler manufacture.

_DSF6984

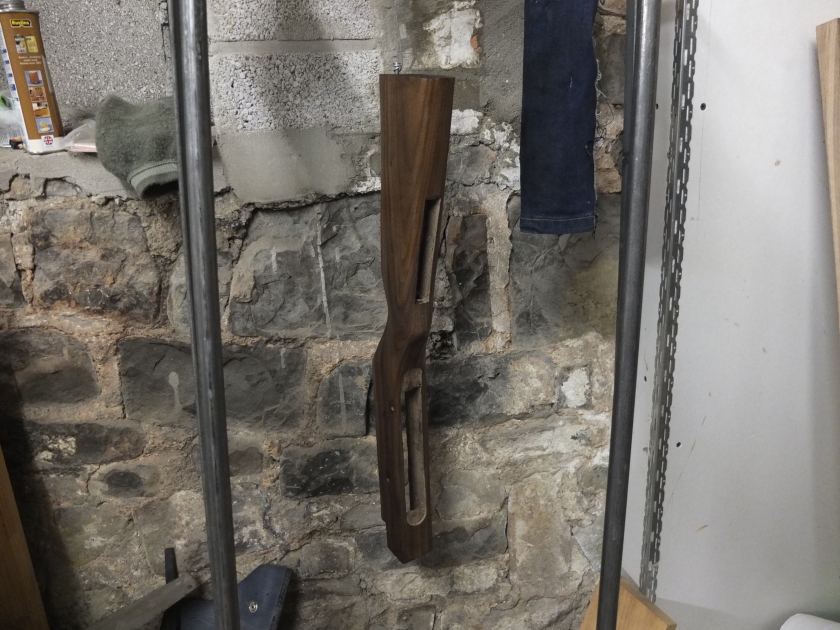
Woodwork is needed to complete the MkI of course, the foregrip being an important part of the design that was sadly deleted on later models until the introduction of the MkV.

I made this woodwork right back at the beginning on Vintage Airsoft at the end of 2014, it has been sitting waiting for me to finish this project all this time!

_DSF6988

_DSF6987

There are a few last bits to finish, namely removing the MkII fore-sight and stamping the magazine well with the correct information. The only major inaccuracy will be the safety catch location. On the MkI Sten this was actually below the operating handle slot but was moved to the top on all later models.

More photographs to follow with the completion of the build!

Like the look of this build? Why not email us on enquiries.vintageairsoft@gmail.com to find out more. While you’re in a gun mood, check out our Etsy page where we have ready-made kits and accessories.

P.S.: I am looking for any original images of the Sten MkI or MkI* in use by soldiers. These seem to be almost non-existent so if any readers have such images please do send them in.

P.P.S.: For more information on the development of the Sten Machine Carbine and some beautiful pictures of an original Sten MkI, see here.
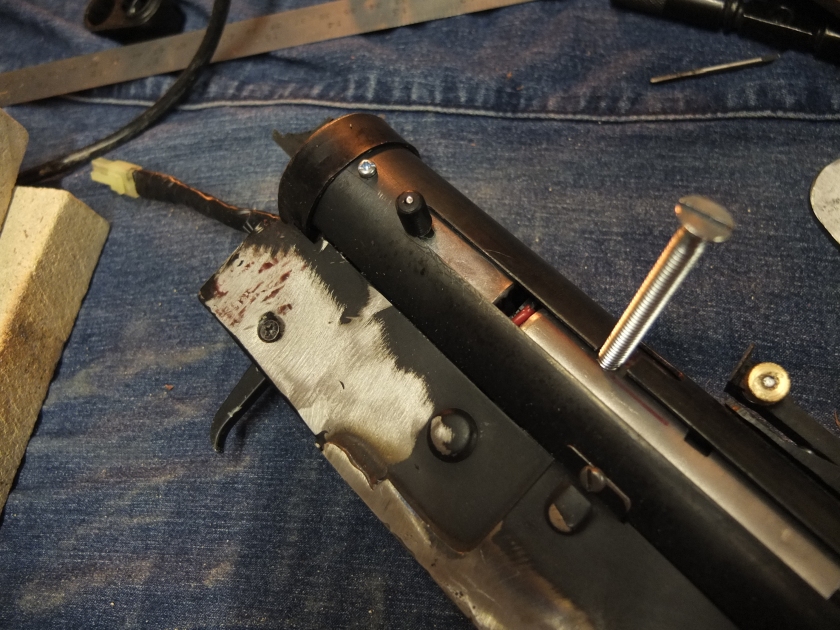
Webley Shells

Add-on kits, pistol, Products, Weapons, WWI, WWII

The Webley MkVI is probably my favourite airsoft gun. The only downside is that the shells are easily lost in the heat of battle if they get ejected so a solution is needed. I believe it comes in the form of this block of rubber:

_DSF6734

Remove the blu-tac and…

_DSF6735

A row of shells are embedded in it.

_DSF6736

I removed these and could start casting.

_DSF6737

There is going to be a bit of experimentation in the material used for these, first up a silicone rubber:

_DSF6738

And the shells:

_DSF6744

Then a plastic resin for a harder shell.

_DSF6747

When these have been removed, I could clean of the flashing and drill the port through the centre.

_DSF6749

These chrono’ed at 280fps with .20s, though obviously drilling a larger hole could be used to increase the fps. The rubber bullets chrono’ed the same but are a bit more tread-proof, though don’t eject as well.

_DSF6830

Being white they are easy to see when ejected. In future I may spray the backs with a gold paint so that they look better when the gun is closed.

_DSF6833

If you are interested in buying these do let us know on enquiries.vintageairsoft@gmail.com or contact us through our Facebook page. They will be for sale on our Etsy page if there is enough interest.


UPDATE: 16/3/2016: These shells are now available on our Etsy page.

MP28 Sten build Part 2

Custom builds, MP28, Sub Machine-guns, Weapons, WWI, WWII

At the end of the last piece on the MP28, I was doing battle with the fire select mechanism. I found a solution in cutting off the automatic mode altogether, not just one of the wires. Below is my original (functional) test rig.

_DSF6714

And built into a usable switch.

_DSF6754

This can be mounted into the Sten body with a screw. I have placed it at the back of the operation handle channel where it will be both accessible and discrete.

_DSF6772

One oil finished knob later and the fire select is complete. You’ll note the rather ugly M6 screw which is temporarily filling the role of op handle until one is made.

_DSF6776

Next job is to replace the trigger. The original was too short once it was set into the wooden stock. I simply cut around the top to keep the shape and improved the size and shape of the trigger blade itself.

_DSF6777 _DSF6778 _DSF6779

I fitted the battery compartment cover, this gun will take LiPo batteries which keeps the battery compartment size down.

_DSF6794

Closely fitting the buttplate before applying the finish to both parts.

_DSF6796

Several coats of Danish oil darkened up the stock and brought out the natural colouring nicely.

_DSF6807

I could then fit the oil blued buttplate with two oil-finished screws to blend in.

_DSF6814

And apply several coats of a new finish I am experimenting with that should produce a hard, wear resistant and semi-gloss surface.

_DSF6816

The bottom of the gun just after fitting the blacked trigger guard plate and battery compartment cover.

_DSF6865

The extending wire that links the battery compartment to the mechanism.

_DSF6867

Another view of the extending wire. The catch is screwed down with machine screws rather than woodscrews as it may need to be removed and this will reduce wear on the stock.

_DSF6868

And finally… with the mechanism in place.

_DSF6869

More photos and video to follow when test firing is complete!

_DSF6871


Like this gun? Why not email us on enquiries.vintageairsoft@gmail.com to find out more. Also, why not check out our Etsy page where we have ready-made kits and accessories?