Preparing 3D prints

Advice columns, Tools

As I use quite a few 3D printed parts in my builds now and have started to sell 3D printed parts kits, I reckoned it was time to share with you how I prepare my 3D printed parts for use.

_DSF9950

You need:

  • A set of small files, ideally of the 3″ kind, second and fine cut
    • as a minimum, one half round, one round, but it helps to have a flat and a square
  • Wet and dry paper: 800 grit and 1200 grit. You can go finer if you want to see your face in it but I personally find that overkill for my purposes
  • Acryllic model paints: I use Revell Aquacolor
  • Baking powder, the fine type rather than the coarse type
  • Paintbrushes, a mixing surface, paper towels and water
_DSF9955

For those not familiar with files, from left to right: Flat, half round, round and square.

Some people use coarse grit wet and dry to get started. I personally don’t bother, it’s messy and slow, so use files to take off the highest points and work out which areas need filling.

_DSF9957

Once I’ve established a smooth top surface, I work up to wet and dry until the overall impression of the surface is smooth except for the inevitable low points that come with 3D printing.

_DSF9962
Low points can’t be eradicated entirely without risking cutting through the outer skin of the part or wrecking the tolerances. I fill these by mixing my acrylic paint with baking powder or fine plastic dust saved from the previous steps. I dip my brush in the paint, dip it in a container of the powder so that the paint is covered and mix it together either on a mixing surface or on the part itself if suitable. A flat brush is better for this purpose as you can apply a fairly smooth finish straight off the bat.

_DSF9963

If using this technique, you may wish to cover the majority of the model part in a thin layer of the paint/powder mix. This is so that when you’ve finished filling, you can take your finer grades of wet and dry and give the part a last wet run over to get a smooth and consistent finish.


You can now paint up the model in your finishing colour if the filler coat was not of that type. You may also want to consider a varnish to give it a suitable finish in gloss, matte or satin and add a bit more durability to the finish.


If you have an idea for a project of your own, drop us a line on: enquiries.vintageairsoft@gmail.com to discuss. If you found this article helpful, why not ‘Like’ our Facebook page or follow the blog to get regular updates on projects and interesting videos and articles?


Don’t forget you can buy our smaller items via Etsy. Our larger items can be found here.

Creating an impression: British Infantry, Temperate Climates 1969-1985

Cold War, Creating an impression

First things first, this uniform is an approximation for airsoft purposes, it’s still a working progress (as any impression should be). It is absolutely not the typical British soldier in several respects, which I will detail.

My reason for putting this load out together was to have something which complimented my M16A1, which really didn’t work well with my WWII British Battledress and 37 Pattern Webbing. I’ll refer to the M16 from this point on as ‘Armalite’, as this was how it was largely referred to by the British at this time.

Also, there is no magazine in the rifle. I know this, I was in the safe zone, hence no magazine in the gun!

Research

Contrary to expectation, British forces have used the Armalite rifle since pretty early on. While the Self-Loading Rifle (SLR)* is the iconic British service rifle of the Cold War, there have been roles where the Armalite has been used as an alternative. These fall into two categories:

  1. Where a lighter rifle with lighter ammunition is required
  2. Where select fire is needed to provide automatic fire where a light machine gun would be unsuitable

The majority of the former situation applied only really to Special Forces units, the SAS, SBS and Pathfinders for example. I’ll do these as separate impressions as there are many variations between operations.

14291797_10205456373328271_8751738197624849664_n

The latter situation applied in a couple of places, Northern Ireland and the Falklands. Although not in every case, some units were given an Armalite for every ‘brick’ (which was the term used for a group of around four men). This was typically carried by the section commander as a little extra firepower, one supposes as an upgrade on the Sterling SMG, which by all accounts was not popular.

Brit_solja

Northern Ireland, as a Corporal, this chap was probably in charge of a brick, hence the Armalite.

The picture above is pretty typical of urban Northern Ireland in the 1970s, at a later date I shall came back and do this load out as well.

Although Trousers, Lightweight (plain, Olive Drab/OD and DPM 68 pattern smocks were commonly mixed, soldiers also wore matching 68 Ptn Jackets and Trousers, along with mashups including but not limited to: wooly knitted pullovers, trops (tropical issue trousers), flak jackets, private purchase para smocks, not to mention an assortment of water and wind proofs.

PA-1703356-1024x850

Lieut. General Sir Harry Tuzo, GOC Northern Ireland, (centre) with a Military Police escort in Newry.

Headgear varied depending on the conditions. Berets were common headgear, comfortable and fairly warm. When patrolling through streets on peacekeeping operations these were seen as more ‘normal’ and approachable than a steel helmet, and certainly more comfortable to wear for prolonged periods.

Steel helmets were often worn with nets and heavily scrimmed, as you can see below, however they were worn without scrim during riots,  replaced with a visor.

BRITISH ARMED FORCES IN GERMANY 1945 - 1975

On the feet and ankles, DMS (Direct Moulded Sole) boots were the norm, though private purchase boots were sometimes worn. DMS boots were just to the ankle, so puttees were worn as extra support and theoretically sealing boots against dirt ingress (apparently this is effective against sand). During Second World War, puttees were largely replaced with anklet gaiters, which were much quicker to put on and take off and did not require careful tying. For reasons best know to the higher-ups, after the war the army went back to puttees.


*For those outside the UK, you would better recognise the SLR as the FN-FAL, though locked to semi-automatic only.


The Impression

This is an approximation for an infantryman not in a frontline role where combat was imminently expected.

On my head, I have a black beret with General Service Corps badge. This is sufficient for now until I decide what regiment to portray. If I wanted to add camouflage to this, loosely folding a scrim scarf over it to cover the colour and break up the outline is historically valid.

_DSF9596

The General Service shirt should, for other ranks, be worn over the collar of the combat jacket.

_DSF9597

The webbing setup is a light belt kit, as used in Northern Ireland where patrols were not usually longer than a day and threats were within a fairly limited scope. This belt did have a First Field Dressing (FFD) attached with electrical tape for fast access near the buckle. Most of this is 58 pattern, with a few exceptions.

The pouches visible in the photo below are from left to right: Left ammunition pouch (with loops for bayonet), compass pouch, 37 pattern ammunition pouch and holster for .455 Webley (this is of course not standard issue, but when running a sniper rifle in airsoft it is  good manners to carry a sidearm). This will be replaced in time with a Browning Hi-power and suitable 58 pattern holster. On the right is a later-issue S6 gas mask bag. When skirmishing I use this to carry my scrim scarf as a gas attack is unlikely, and it is more comfortable to fall on than an S6.

_DSF9598

The trousers are the 68 pattern type. Until you have worn these, it’s not obvious to someone who is used to more modern equipment why ‘lightweights’ were so named. These are more closely related to the Battledress trousers of the last war than to modern issue, they are very thick and heavy, supported by braces and high-waisted. An FFD pocket is stitched on the front like battledress.

_DSF9599

The TRF is a fictitious one, just to complete the look. Under this are corporal stripes that came with the jacket.

In use, this setup is very comfortable in cool, wet conditions. When moving through thick brush and thorns, the jacket and trousers provide very good protection. Even running around quite a lot, I found the clothing breathable and fast drying. I’m yet to try it on a hot day.

_DSF9600

Personally, I am quite fond of the puttees. They provide a little extra support, even with the high-ankle boots. However the trousers do pull out easily, though this may just be that they are on the short side.

With the webbing, it is quick to get magazines out but hard to close in a hurry. I’m producing a set of reproduction M16 pouches to play with to see if they are an improvement.

_DSF9601


Equipment and sources

Most of this equipment is not available as reproduction.

Webbing

In the UK, it is easy to find sets of 58 pattern webbing for next to nothing. Not so long ago people struggled to give it away, but now you can buy sets online easily for £10-25 in worn condition. Silvermans usually has some, and if you want them in brand new they have those too… at a price. They also have some rare trials versions produced in nylon, which was one attempt to make it more suitable for use in NBC warfare.

If you shop around on eBay and collectors groups, you may find it for less.


Berets

Berets used in the 60s-80s are much more like modern berets than those used in WWII. A modern one is pretty close, though if you can find a beret with a slightly large crown it’ll look better. With cap badges, make sure they are for a unit/regiment that existed, there have been many amalgamations since the end of WWII.

Helmet

If you wish to wear a helmet, the MkIV turtle helmet is your best option. You can find them in various conditions from £25-40. A helmet net and scrim is used for anything outside of fighting in built up areas.

Puttees

For puttees you want the short, ankle type rather than the long, knee-length ones. You can find these on eBay for £10-15 a pair. If you are buying used ones, make sure the ribbons you tie them with are intact. They should be about 70cm long ideally.

Boots

DMS boots are easily had, for £15-20 used if you shop around. If you want to buy new, Soldier of Fortune have them for £40.

Clothing

GS shirts are available very cheaply, even the most expensive used ones are £7 or so in the UK. At Varusteleka they had some selling for £3 each a while ago. If you can’t find some for some reason, you can also legitimately use ‘Shirt, man’s, combat’ (known as the Hairy Mary), which is a green wool collared shirt. Itchy as buggery, but warm. Nice when you get used to it.

Some soldiers also replaced their issued shirts with US-made ones.

The 68 Pattern outer layers will be the most difficult to find. Looking on eBay will be your best bet, expect to pay £15-30 for trousers and about the same for a jacket. Absolutely DO NOT FORGET to buy a pair of braces. Grey elastic and leather braces as issued can be found for £5-10. Beware of retailers selling items as 68 Pattern when they are not, later patterns of DPM are darker and with chunkier splotches. You can avoid wasted funds by comparing the offerings to the patterns on Camopedia.

Scrim scarves of this era are two-coloured, a sort of weak green-black or green-brown, almost blue-tinted. They are found on eBay, Web-Tex make a good version.

Weapons

Your options for a typical British Soldier are reasonably broad for this era.

L1A1-10

The SLR

Ares produce an L1A1 SLR replica which I’ve heard many good things about. You can get it with a wood stock for early impressions and it comes with black plastic as standard.

L1A1-11

The Armalite

There are of course countless AEG M16A1s that would be suitable and endlessly modifiable. My M16 is a WE gas blow-back, with modified nozzle to remove the locking lugs (which cause no end of problems) and flat hop.

The Sterling

If you want a sub-machine gun, the Sterling was widely used by those in support and command roles. It was also widely detested. Airsoft versions seem to have a custom gearbox so be prepared to modify standard parts for repairs.

The L42A1


This was the standard sniper rifle of the Army from 1970, taking over from the No.4 (T). It was a re-chambered No.4 to 7.62 with a new magazine and the No. 32 scope modified for the new cartridge. You can see the progress of the L42A1 being made here at VA.

Side-arms

Side-arms were not issued as standard to British forces, they were for support, command and special forces types. However for Airsoft it’s considered good manners to carry a side-arm if you have a rifle running above 350fps. You can carry a Browning Hi-power in a 58 pattern holster or a revolver as I have. Privately purchased pistols were carried, though frowned upon, bans being enforced more or less depending on circumstances.


If you enjoy this content, ‘Like’ our Facebook page or follow the blog to get regular updates on projects and interesting videos and articles. 

Don’t forget you can buy our complete products via Etsy.

American Civil War Airsoft: A treatise on the test day

Game write-up, Get into airsoft series, Imperial Era


When I talk to people about the idea of 19th Century Airsoft, the overriding response I get is: “Why would I want to stand in a line, in a field, and be shot at?” This is not an unreasonable question. This would be a very tedious day of airsoft.

It is also completely unlike the day of play we had. This game day was one of the most dynamic and varied I’ve ever had. I won’t give an in-depth blow-by-blow account of the day, but I hope to give some idea of why this style of play is worthwhile and highly enjoyable.

When it comes to historical airsoft, one major concern is that if you turn up to an event you’ll not have the right kit and be looked down on. The group shot we took at the start of the day will give you an idea of the level we’re aiming to start off with. We had no-one with 100%, truly authentic historical repro kit. What we did have was a bunch of guys who did the best they could with the kit they had.ACW Photo Day-6028

On the Union side, we had a mix of jeans and decorator’s trousers with blue shirts and tops.

On the Confederate side, a couple of the guys wore WWI/II German trousers, one a pair of green civvies and I wore a pair of British 49 pattern BDs. For the top I wore a cotton khaki shirt, the other guys wore either old grey uniform jackets/shirts and even a red cheque. We used a mix of satchels/belts and leather pouches to carry ammunition. The only period-specific equipment we had were the Kepis, which are pretty inexpensive to buy. I made my own Kepi from canvas, I’ll be making another from felt and may even offer a sew-your-own Kepi kit.

Airsoft gun wise, most of us used bolt-action rifles. Several guys used the stock, basic, unadulterated VSR knockoffs that sell for about £50-60 on the continent. They got kills with them too, using iron sights at the ranges we were playing at (typically 20-80 yards) they are perfectly usable. There are also rules for AEGs and gas guns, but if you are able to buy or borrow a bolt-action I would recommend it as it is a much nicer way to play.

ACW Photo Day-6111

Enough on kit for now. Let’s talk about game play. We headed off to the first game start point. It was a simple attack-defend points game, the Union had two spawns, Confederates had one.

ACW Photo Day-6040

The Confederate spawn was slightly uphill. The Union forces pushed through the trees, while we Confederates went further uphill and took the ridge. We put fire into their flank, taking out a couple of guys. At this point I was killed, but being in the middle of the battle area I could watch the events quite well. The Union took our spawn, pushing round our left. However their spawns had been left entirely unguarded and a couple our guys came round their rear, took the spawns and shot the Union out from behind.

ACW Photo Day-6064

We then played a couple of games running through the village. On the face of it, the defenders should have the advantage when they have cover and the attackers are covering open ground to assault them. In reality, due to the controlled rates of fire, the attackers can fire and move from cover to cover with a minimal chance of being hit. In the meantime the defenders can only hold a certain position. For some time, I was in the building in the picture below duelling the guys in the next picture.

ACW Photo Day-6163

These guys (Ryan, left and Kim, right) kept me pinned for several minutes. Another of my team was going in on their left while two others were taking a spawn behind them. In the end, their undoing was Ryan advancing on my position, taking a couple of shots from close range in cover before being forced back and shot in the back as he retreated. At this point Kim was left on his own, with 3-4 guys coming at him from all sides all firing at his building and he attempted a retreat to the next building, which had more open ground around it so would have been harder to attack. Unfortunately for him, 2/3rds of the way across I let a BB fly and it curved beautifully into his hand.

ACW Photo Day-6164

That’s the beauty of this style of gameplay. If you want to hold a position, you need to stick together and work together. There’s no chance a single person can keep a whole team pinned with a flurry of automatic fire in about the right direction every now and then. Fire and manoeuvre is needed and actually has a chance of working without the unlimited ammunition and rates of fire in a normal skirmish.

The next game was a sort of collapsing defence game. The Confederate objective was to push through and clear a corridor of Union Spawn points. Once a spawn was taken, it could not be retaken, but the Union were able to advance as far forward as they liked.

ACW Photo Day-6177

The result of this was that although the Confederacy took each spawn, we were brutally flanked and taken from behind a couple of spawn points in.

ACW Photo Day-6180

This series of pictures really drives home what’s special about this gameplay. It is not staged. I had charged, noisily round the left of the fort to draw fire and attention away from my Confederate buddies.

ACW Photo Day-6186

I reached the fort and found it still quite occupied. Two of the nearest Union boys shot at me and missed.

ACW Photo Day-6187

I shot at them and missed. In normal airsoft play at this point one player or the other would sprint straight at the wall and hose over it on full auto.

ACW Photo Day-6190

Instead, there was a brief consideration of whether or not to reload, before deciding that at this range, let’s just go in with the steel. I only just managed to land a stab on Aidan, at which point I ducked back down to reload.

ACW Photo Day-6192

At this stage, my distraction had served its purpose and my team had pushed up and shot one of the others. We didn’t realise there was a third hidden away in the corner, who had to be dealt with as we climbed in.

ACW Photo Day-6193

Once in the fort, it was a case of attempting to repeat the flanking action on the next group of buildings. This proved much harder as they had several angles to fire from and each flank covered. We had to take them in a certain order, so couldn’t just come in round the back.

ACW Photo Day-6194

Now, with regards to marching in line and standing in a field; have I persuaded anyone yet that there’s much more to this type of play than just being a target? Because that isn’t exciting for anyone.

Now let’s talk about line fighting. ‘Cause this is exciting, even if it doesn’t sound like it would be.

ACW Photo Day-6118

For normal airsoft, advancing across open ground and firing in lines would be useless and painful to boot. With two opposing lines of even numbers, the chances of one side wiping the other out in shooting at range is unlikely. You have to get close to increase the chance of hits, even then there’s no guarantee and when BBs are coming in at near 400fps at close range the pressure is on to reload. Reloading under that sort of pressure is surprisingly hard!

ACW Photo Day-6114

If the attacking force do so with determination and vigour, using a little work on the flanks, they can get to grips ‘properly’. Melee is not just a nice addition to this type of fighting, it is a necessity.

ACW Photo Day-6145

The artillery is a nice touch too, advancing into it is unnerving. The only time the Confederates had to take it on was over relatively covered ground, but with the shells coming in around you and not being able to tell where they were coming from or landing was distracting. TAGs make a very, very loud bang by airsoft paper pyro standards. I’m told that advancing toward it over open ground is also unpleasant.

ACW Photo Day-6104

There’s a great deal of satisfaction in this type of game. Because of the higher-powered rifles there is more of an adrenaline rush when playing close up, the pressure to reload or charge is intense. The lack of automatic fire means you have to pick your shots, pick your targets. It means you can move from cover to cover without being pasted.

ACW Photo Day-6184

If you think this type of game could be your bag, I would wholeheartedly encourage you to give it a go.


You can join the British 19th Century Airsoft Association Facebook group for reports and updates on the battles and events being held and to meet the community (top blokes all). You can get first word on events on the organisation page here.


Commentary on the American Civil War test day at C3 Tactical in Monmouthshire, August 2017. Photo credits to Luna Chapman.

Creating an impression: 82nd Airborne, Italy 1943-44

Creating an impression, WWII

This is part of a new series, written by contributors outside of Vintage Airsoft itself (though I am sure I and some friends will have to do some of our own as well). Although I edit, pictures and words are from them and they have done their own research. Accreditation is at the bottom of the article.

82nd Airborne: Operation Avalanche

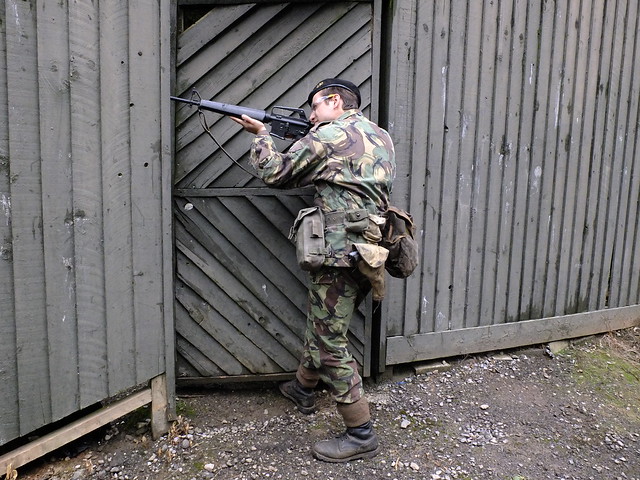
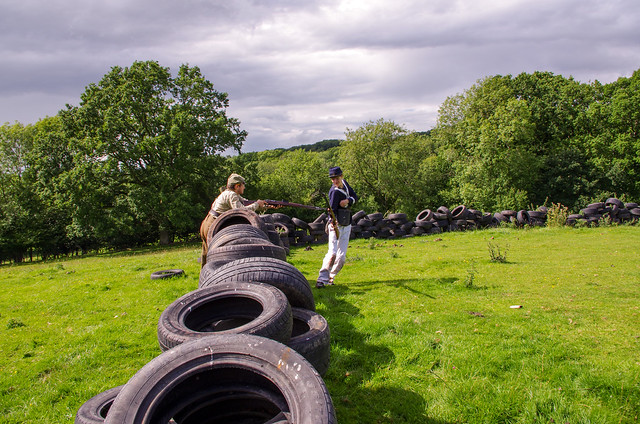
A less common impression in both the reenacting and airsofting community, as most loadouts are based on the Normandy Campaign.

The equipment pictured can be used for Operation Husky (Invasion of Sicily), Operation Avalanche (Invasion of Italy), or Operation Overlord (Invasion of Normandy). As the war progressed, the standard M42 jump uniform, as well as most of the equipment was phased out in favor of the M43 field uniform.

This is the one of the earliest variants of the U.S. airborne uniform that saw combat during WWII, with most jump uniforms being reinforced after the invasion of Italy in late 1943.

IMG_20170715_115645


Head

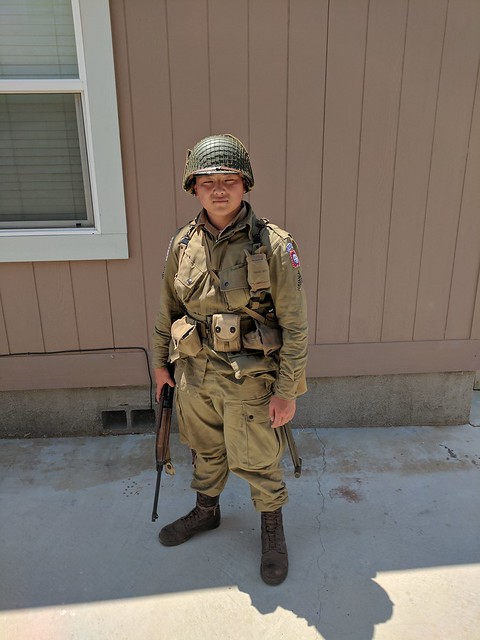
M1C/M2 Helmet: $99.99-345.00 (UK approx £200 from Soldier of Fortune)

The standard U.S. airborne helmet used throughout the war was the M2 “D bale” helmet. This helmet differs from the standard infantry helmet in that it uses curved fixed bales that resemble the letter “D.” This design was eventually decided to be inadequate as the bales that secured the chinstrap would often break in the field, necessitating constant repairs to helmets when returning from the field.

Due to large demands for airborne helmets, a number of standard M1 infantry helmets were converted with a jump liner and paratrooper straps to meet the demands for M2 helmets.

Eventually the M1C jump helmet was introduced to replace the M2, and added swivel bales to the helmet to prevent the bales from snapping off; however, they were not common until late 1944.

All versions of the jump helmet usually also had an airborne jump liner, which was a standard infantry liner with the addition of “A yokes” to hold the leather chinstrap. This chinstrap was used to secure the helmet to the paratrooper when jumping from aircraft.

The helmet pictured was compiled from various auctions on eBay, full M2s or M1Cs can be found at: At the Front, Jmurray and Soldier of Fortune

IMG_20170715_115650

Uniform

M42 Jump Uniform: $150

The M42 jump uniform was the standard uniform for paratroopers during 1943. The uniform was later upgraded with reinforcements at the knees and elbows, and later replaced by the M43 uniform.

The uniforms are common, however At the Front has the most durable and accurate for their price.


Khaki summer shirt: $50

The khaki summer shirt was often worn by airborne and infantry under the M42 jump uniform during the summer months. While technically not permitted, this was a common practice due to the hot climate of Italy in late summer.

What Price Glory is one of the few vendors to still sell khaki summer uniforms. (the one pictured is an original)

1937 wool shirt: $50

The standard regulation shirt (not pictured) was worn under the m42 jump uniform. This is the same shirt used under the M41 jacket by infantry; however, there are several photos of paratroopers wearing khaki shirts under their M42s instead of the wool shirt.

At the Front, What Price Glory, and other vendors have reproduction wool shirts, and originals are still plentiful.


Insignia

Sewing patches: Each paratrooper was to sew on their own insignia to their uniforms, this lead to a variety in the manner in which the patches were affixed to the uniform. Some would spend time meticulously sewing intricate patterns for their insignia, like the cross stitching pictured, while others would attempt to quickly sew insignia to the uniform, creating a sloppier look to the uniform. Others, especially units like the 509th parachute infantry regiment chose not to sew on a unit insignia.

IMG_20170715_115658

Divisional patches should be sewn onto the left shoulder, approximately the width of two fingers below the shoulder seam. American flags should also be sewn two finger widths below the right shoulder seam. Rank patches should be sewn approximately one finger width below the unit patch or halfway between the elbow and the bottom of the unit patch.

At the Front makes quality patches for uniforms, as original airborne patches are nearly impossible to find.

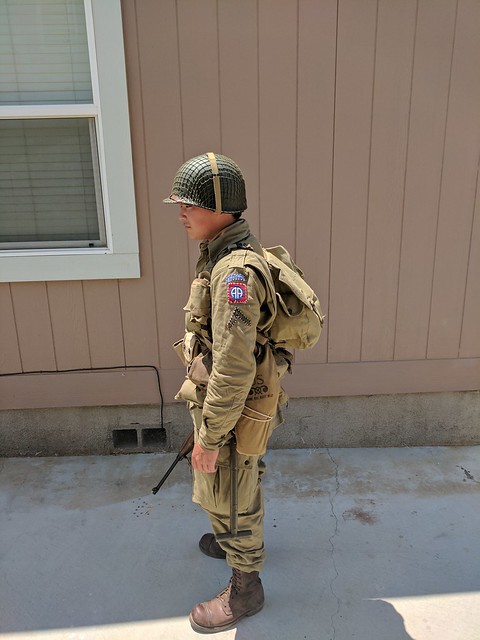
82nd Airborne Patch: $10
The 82nd Airborne was the first airborne division to see combat in the European theater in WWII. The division fought in Sicily, Italy, France, Holland, Belgium, and Germany.

PFC Stripes: $5
Private First Class stripes, added to denote rank of private first class.

48 Star American Flag: $5
American flags were commonly sewn on the arm of invasion forces, leading to several variants of patches or armbands to be attached to paratroopers. Often, these patches would be removed after landing, so their inclusion is not necessary.

Feet

Corcoran Jump Boots: $125-256
Jump boots were issued to U.S. paratroopers throughout WWII, and are still used today. These jump boots are taller than most other boots to secure them to the paratrooper when jumping. The boots should be polished to a shine, as this was a common sign of pride among paratroopers. WWII jump boots should be brown, and polished to a dark brown shine.

At the Front, Amazon, and most other WWII vendors sell brown Corocan Jump Boots.


Field Gear

For the invasion of Italy, all field gear should be OD3 (khaki), there should not be any OD7 (green) field gear, as OD7 was not common until D-Day.

Webbing set: (pistol belt, rigger pouches, canteen, entrenching tool) $175
The standard web gear for U.S. airborne in 1943 consisted of a 1936 pistol belt, rigger pouches which could hold four enbloc M1 Garand clips or five M1 Carbine 15 round magazines. The canteens should be stainless steel, as original aluminum canteens contain large amounts of aluminum oxide. The T-Handle entrenching tool allowed soldiers to dig foxholes, clear brush, and could be used as a weapon of last resort. In 1943, the standard T-Handle or shortened airborne T-Handle shovels would be appropriate.

Much of the web gear pictured are originals, the e-tool was from At the Front, and the rigger pouches were from Man the Line

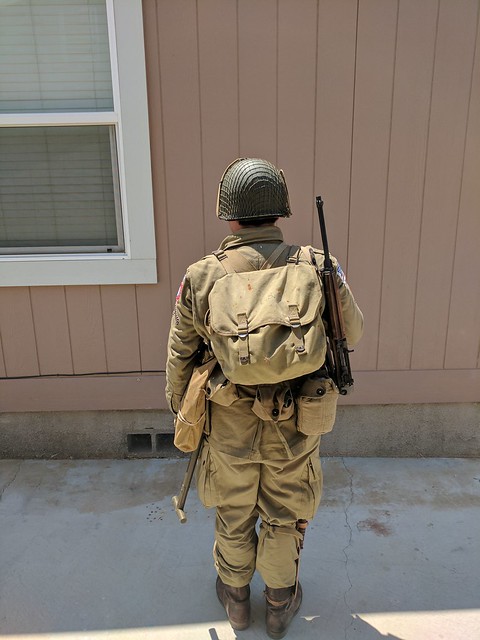
1936 pack system: $60
The 1936 Musette bag and suspenders are an important part of any airborne impression. The system allowed the paratrooper to be able to jump while carrying a pack, and was issued throughout the war to U.S. Airborne forces.

IMG_20170715_115702

The pack and suspenders pictured are both originals.

1916 holster: $30
The 1916 holster was designed to hold the 1911 handgun, and was issued to officers, machine gun crews, and other units who were not given an M1 Garand rifle. Additionally, U.S. paratroopers often acquired 1911s from various sources and were able to keep them for the Italy jump.

The holster pictured is an original.

Gas mask bag: $20
The 82nd Airborne jumped into Sicily and Italy still using their training gas masks. These were usually discarded soon after the jump upon the realization that the Germans were not using poison gas. These training masks were replaced by the M6 gas mask and M7 rubberized gas mask bag for the Normandy invasion.

Parachute first aid pack: $14
The parachute first aid pack was a small first aid kit for the individual’s use should they be wounded in action. Soldiers were also issued a separate bandage and pouch, however during the Italy invasion, the content of the second bandage pouch were often stuffed into the M42 jacket pockets.

The one pictured is an original.

At the Front, Man the Line, What Price Glory, World War Supply, and other vendors sell quality reproduction field gear. I would recommend against buying off eBay, as reproductions are often poorly made and poorly dyed.
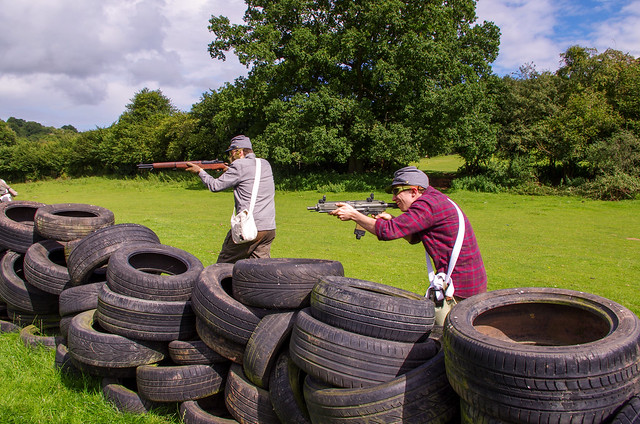
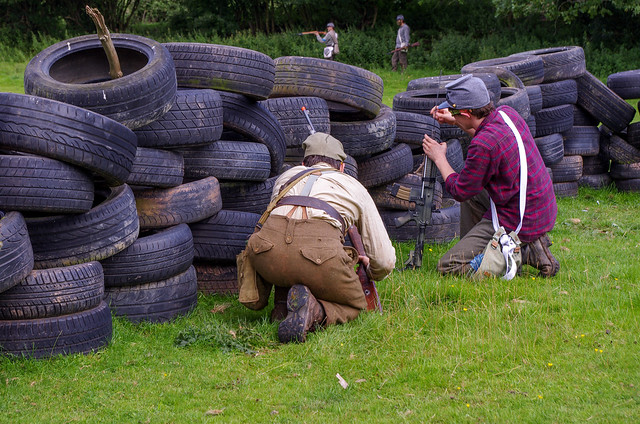
 

Weapon

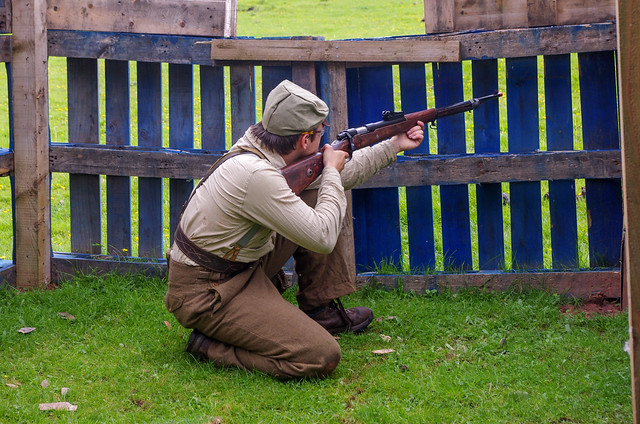
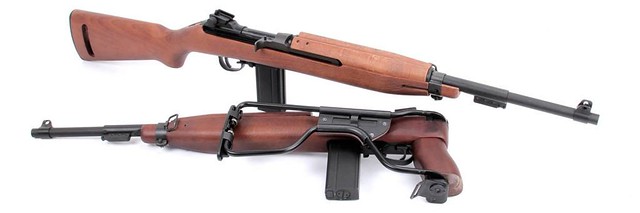
M1A1 Carbine (King Arms): $350
The M1A1 Carbine was a M1 carbine with a wire folding stock to allow easier use when jumping from aircraft. The rifle was folded and placed in a scabbard secured to the parachute, and unlike the M1 Garand, could be immediately used upon landing. Carbines were usually issued to machine gun crews, officers, and radiomen; however, there is evidence that some riflemen were issued carbines.

The King Arms M1A1 is CO2 powered, full metal and real wood, giving it a similar feel and weight to the real version. Unfortunately, King Arms did not base their model off the WWII version of the M1A1, and therefore the rifle needs modifications to bring it closer to WWII specifications. Additionally, the rifle shoots at 487fps using .2 bbs, making it difficult to use at normal fields.

KAAG127_3


1911 (WE Tech): $95
The Gen3 WE Tech 1911 GI model is an affordable, reliable sidearm. The handgun shoots reliably and possesses a 15 round magazine. A very capable sidearm, and one of the few 1911s made to WWII specification.

M3 Trench Knife: $50
The M3 trench knife was issued to U.S. soldiers who did not have an M1 Garand bayonet. This knife was used as both a fighting and utility knife from 1943-1945.

Rubber knives can be found on eBay for $40, while the M6 scabbard can be found on eBay separately for $20. 

Editor’s note: Other suitable main arms would of course include the M1 Garand, M1 or M1A1 Thompson. You can of course find some rubber knives in the Vintage Airsoft Etsy Store.


Vendors

There are a variety of vendors from which to source a U.S. Airborne impression, for simplicity’s sake, the links to quality vendors of reproduction equipment in the United States will be listed instead of the prices for individual items, which are subject to change at any time.

US: At the Front: www.atthefront.com 
World War Supply www.worldwarsupply.com
Man the Line www.mantheline.com

US/UK: What Price Glory www.whatpriceglory.com

UK: Soldier of Fortune www.sofmilitary.co.uk


As a rule of thumb, At the Front has the highest quality reproduction uniforms and field gear, however they are more expensive. Man the Line and World War Supply have some items that are of high quality, but others that tend to fall apart quickly. What Price Glory offers a larger selection of uniforms than At the Front, but often are lower quality.

Original items will vary in price greatly, and generally sell for approximately the same price of At the Front. USThey will be the highest quality, and most accurate, but due to age, they may not be as durable as good reproduction gear.

Editor’s note: Apart from strong items like helmets or garments not exposed to the elements such as shirts, I’d personally avoid using original items in the field as they are likely to succumb to wear or loss and it’s sad to lose a piece of history! That said I wear original uniforms for airsoft myself sometimes, just bear in mind historical value.

Text by Jacob Riley
Photos by Roger Harris

Edited by Dominic Evans

Make a good impression.

Advice columns, Creating an impression

I’m writing this as I’ve seen quite a few posts recently where someone has bought a load of gear and posted their shiny, new impression that they are thrilled with – only to be put down instantly and told everything is wrong.

Farbmuster

Just… no. German WWII camouflage was distinctive, there are very few post-war patterns that look even remotely like it.


Here’s my advice to create an historically valid impression using general rules that can be applied across eras. This is more aimed at historical accuracy rather than filmsim levels of accuracy, as those guidelines are a good bit more flexible.

At a later date I, or guest writers, may produce guides on specific impressions.

1. Use pictures.

If historical impressions interest you, looking through a tonne of original photographs isn’t a hardship. The more you look at, the more you learn about how people from your chosen era set up their clothes and equipment in real life as opposed to in the field manuals.

THE CAMPAIGN IN NORTH WEST EUROPE 1944-45

When looking through pictures, try and find photographs of the unit you are portraying. This isn’t always easy, but if you are familiar with the role your unit fulfilled you may be able to draw parallels from other similar units if they worked in the same theatre at the same time.

2efb7ea452742e5b42fe719f2b7f07b4

Yeah.. you can play airsoft shirtless. I wouldn’t recommend it though.

If you have a low quality image that  you don’t know the original source of, you can use Tineye reverse image search to potentially find more, higher quality versions and maybe even some context.


I have folders subdivided by units/forces/years with reference pictures in the hundreds. It sounds slightly anal when I say it like that, but if anyone questions the authenticity of something you can point to an original source and people can’t question those.

51YY9SN3VKL._SX258_BO1,204,203,200_

A sound all-rounder.

If you are starting completely from scratch, Osprey books are not a bad place to pick up some of the basics. They usually have an excellent selection of colour illustrations which are taken, more often than not, from original photographs. These are accompanied by commentary on the basic items and the peculiarities to the individual.  Some of their books are very general, say looking at soldiers from a particular century, but others go into much more detail on all sorts, even WWII Croatian Legionnaires.

osprey-nz-wars

As I said, Osprey get pretty darn specific….

By all means use modern kit guides. For specific airsoft ‘genres’, be they WWII, Vietnam or Cold War you will find good guides for basic impressions which are a great way to get started, but do a little of your own research and make the impression your own. I’ll include links to some of these at the bottom.


2. Remember dates.

Equipment changes and during times of intense war, weapons and gear can change either subtly or distinctly. As a general rule, if you use earlier equipment you can excuse it being used later. Yes, Pouch B may have been issued to replace Pouch A, but they were not all replaced overnight. There are limits to this of course, the British Army had stockpiles of 37 pattern webbing into the ’70s, that doesn’t mean it was being actively used!


3. Read original sources.

Military memoirs are often written with the warm glow of hindsight, sometimes looking to glorify or justify the writer. I would take them with a pinch of salt. They are however somewhat more reliable than accounts by historians if taken in context and contrasted with other sources of the same events. Let’s just say that no-one I know of used a 4.5mm pistol in WWII.

P1150031_large_image

Original sources are best. Just remember who wrote them and why!

With written sources, the closer they are written to the events they describe occurring, the more likely they are to be reliable. That said, beware of Unit War Diaries/logs. Promotions, demotions and bollockings could depend on these, so the people who wrote them made sure they and the people they needed to impress looked good.


I’ll include talking to veterans here as well. Remember that if someone is talking about events that happened decades ago, their recollections may not be 100% reliable but you’ll come away with a better ‘feel’ for the events that they experienced, which instil has value.


4. Balance the exception and the rule.

19694_10153367997531060_5890250514109522840_n

What a pair of farbs! Oh, wait, these guys are original WWII farbs. These chaps are definitely on the far end of the non-standard spectrum and turning up like this will probably get you shot by your own side as well as the enemy!

Some people are very strict on portraying only the most average soldier, using only the most average, issued equipment. I don’t have a problem with people doing this, but remember that real soldiers ≠ tin soldiers. Yes they would do as they were told and carry what they were issued, but if you had to traipse through North Africa and Italy from 1940-1944, you would use and do what worked for you if you could get away with it.

A really good example of this insert is the low-leg tanker holster for the .38 Webley. In WWII, these holsters were used to some extent by vehicle crews, but you will see quite a few other British impressions with them.

tumblr_mdz4bw9nbG1rcoy9ro1_500

There’s two pictures I know of where this happened (this and a man killed in the St Nazaire Raid), from which you may surmise a couple of people did it. However this was not the norm, it just appeals to people who like the idea of some WWII-tacticool. Not that there’s anything wrong with that, just don’t make every single item of your equipment simultaneously some kind of modified coolness you sourced from a dozen different soldiers.


5. Enjoy creating and using your impression.

Only start buying kit once you have the basics pinned down, whatever way you decide to do your research. There is a great deal of satisfaction in getting something well-researched and authentic put together and if you play with other, like-minded folks, they will notice and appreciate the effort you have put in.

1968patt

On the flip side, if you turn up to an historical event having put no effort in at all and looking like you have time-travelled in from 30-200 years in the future it’ll upset people and in a community like that you have to pull together to create an impression that makes it good for other people too. 

But remember it’s airsoft. If your magazines won’t fit in the correct mag pouches, you can either keep them in a satchel/pockets or you can find the next best pouches. The important thing is to put the effort in. Once you are familiar with a genre, keep any advice to newcomers friendly and positive!

If you enjoyed this content: ‘Like’ our Facebook page or follow the blog to get regular updates on projects as well as interesting videos and articles. 

Your can buy our products and support Vintage Airsoft through Etsy.


Links:

Osprey publishing (Men at Arms series)  Good starter books for impressions

Tineye reverse image search To find other versions of a reference image

Imperial War Museum collections Original photographs, artwork, films and objects. This website can be a bit clunky to find what you want, but worth perusing when you have time.

Bundersarchiv picture database I’ve not spent as much time on this as I would like, but loads of photographs to search through. Ideal for German impressions.

UK WWII Airsoft Kit guides for various countries including: German (Heer, Gebirgsjager, Falshirmjager, SS), Soviet, British (Infantry, Airborne, Commando, Mountain), US Infantry, Rangers, Airborne) and even a basic Japanese impression.

Cold War Airsoft have some simple kit guides for various period forces in the European theatre.

So, you like airsoft? Part Two B: Gear

Advice columns, Get into airsoft series, Protective items

Preface:

This is intended as an introduction to airsoft, it is a general guide to airsoft in the UK, though many of the points here will be the same abroad.

Part One is a really basic starting point

Part Two A looked in detail at eye protection

This is Part Two B looking at equipment

Part Two C  will look at guns finally!

Part Three will look at specific airsoft genres.

If you would like to read more about getting into airsoft you can find all of our articles HERE.

So, you’ve tried airsoft and you like it!

So, you’ve been to a couple of games, you have decided what eyepro is best for you and now you need to get the rest of your kit.

Facepro

Facepro (face protection) isn’t compulsory on most sites in the UK. Some people wear it all the time, others never wear it. If you don’t like being shot in the face, that’s pretty understandable! But don’t whine about it, wear protective gear or you only have yourself to blame. BBs have a magnetic attraction to bare flesh! If your local site is a CQB site, full face protection is highly advisable.

As mentioned in the previous article, you can get integral goggles and face protection, but re-read that section if this is what you are considering.

Most face protection is a shaped piece of mesh with padded edges that covers your lower face, most of your nose and the jaw. You wear this in conjunction with goggles and this is by far the most commonly used and allows you to easily switch between mesh and clear goggles between games if you need to. It offers pretty good protection all round but there are usually gaps around the ears, throat and sometimes between the goggles and the mask.

EAI-MA53-DWC1

It is possible to get extra protection for the ears, mesh cups that cover them to prevent some of the most uncomfortable hits in airsoft. These usually are suspended from the helmet/headgear. You can also get plates that mount onto fast helms.

It is possible to go an extra level and get all-in-one ear, face and throat protection. These look ludicrous but do have fewer gaps in for BBs to sneak past.

If you want to go ALL the way you may wish to get a whole head covering. This is essentially a mesh mask as described above but forming a ‘bubble’ around the whole head. You will end up looking like a martian, but at least you won’t get shot in the head!

b003d1f25651c7ef3ca6d08dd1db8bbc

Many airsofters don’t like wearing full facepro, finding it claustrophobic or stuffy, myself amongst them. I wear it for CQB and that is about it. There are, thankfully, other options available. Many airsofters wear a scarf, shemagh or similar that they can pull up around their face if they get too close for comfort. Although this takes the edge of shots that would otherwise sting or leave a mark, an unlucky shot in the teeth may still do damage. Without practice you may also find that the scarf slips down or moves around annoyingly. It also can cause your clear eyepro to steam up worse than usual.shemagh_lg

A major reason for face protection is to shield the teeth which can be chipped, knocked loose or out completely by an unlucky shot. Some players wear a gum shield to prevent this. Although effect at protecting the teeth, you cannot communicate clearly to your team mates and you may find yourself dribbling randomly during a game.


The latter two options are popular among airsofters who use a particular ‘loadout’. They are much more discrete and don’t clash with an historical outfit-nothing ruins a really good, old uniform like modern facepro! This is particularly important when playing games with high immersion value such as WWII, Vietnam or Filmsim/Milsim. If you do need to wear facepro for these games, try and keep it unobtrusive out of respect for the other players!


Gloves

There are so many options for gloves. They can add to a load-out if they look right for it and provide some hand protection. The right gloves also act as camouflage, as (especially white) bare skin stands out in woodland or open spaces and doubly so in the dark.

The most popular ones are ‘armoured’ tac-gloves. These are fairly thin fabric to allow easy weapon handling on the inside of the hand but have either hard foam or plastic panels on the back to take the edge off hand shots.

ka-glove-02-f

Woollen gloves. These are great for winter as they provide warmth as well as protection, however they don’t give you a great deal of grip.

Leather gloves. For me the best option, but the most expensive. If you shop around you can find a pair of unlined or very thinly lined leather gloves which take the edge off hand shots but don’t sacrifice dexterity or grip. You have to look after your leather gloves, keep them moisturised, clean and not dry them too quickly after a wet or muddy game day. Whatever you do, get the types without large, external seams as these cause issues interacting with the trigger and control surfaces.

13905833636_c9d09fe5dc_z

Fingerless gloves are available in all the above types. For wooden gloves they provide a much greater level of dexterity and grip than full length ones, and significantly improves this on a cheap pair of ‘armoured’ gloves. For leather gloves there isn’t so much point as a good-fitting pair acts as a second skin.

Headwear

With headwear, you have two main categories: Soft and Hard. Both protect to some extent against BB strikes which do hurt on unprotected scalp, but some have extra functionality.

Soft headwear: beanies, balaclavas, snoods etc… are great for winter wear. They are warm and protective. Balaclavas and snoods can also be used as impromptu facepro if needed. Caps, shemaghs and sunhats are great for summer as they are a little cooler. Some kinds of sun hats (with stiff brims) are also good for winter as they keep the worst of the rain/sleet/snow off your face. They can also be used in conjunction with a scrim scarf to break up the shape of your head and shoulders, which is a major visual indicator that is likely to give you away.

12604855_1007741655965288_5328561774178147646_o

Hard headwear or helmets stop you from feeling the BB directly. Fast helms are popular at the moment, a lightweight, round helmet that fits over the top and back of the head and can be had in a variety of colours and styles to suit your load out. They also have rails and mountings for accessories such as NVAs (Night Vision Aids), cameras, monoculars, glowlights or pretty much anything else you can imagine.

12794791_1027388464000607_3990892463818181993_o

This is a personal preference above all else. I use a British WWII-era MkII Brodie helmet with a hessian cover for my regular skirmishing, it keeps the sun out of my eyes, my head dry and the cover is now painted in drab colours to break up its distinctive outline. While protecting my head from BBs, it has a unique ‘ting’ noise it makes when shot so I still know when I am hit.

With helmets it is easy to make or buy a suitable camouflage cover for most models, some it is even possible to create a cover that breaks up the outline of your head and helmet, which is no bad thing for camouflage.

Load-carrying equipment

There are a few sub-categories of LCE. What you go for depends on both your personal preference and the airsoft gun you are using. If you are running a particular load out do some research into the webbing kit the originals use/d, but bear in mind that it won’t always be suitable for the airsoft version of the gun you are using. For example the US WWII rifle belt won’t take airsoft M1 Garand magazines, as they are about 4-5 times the size of a Garand en-bloc clip. Some WWII US  airsofters use Rigger pouches to get around this, the equipment maintains the look of the outfit and is more practical than wearing empty webbing, carrying all your ammunition in a satchel.

This aside, there are three main types of LCE:

Webbing

This is the traditional way of carrying your equipment, used in various forms since the introduction of firearms from the apostles of the early musketeers to recent times when it has been supplanted in Western military doctrine by plate carriers.

Generally, this consists of a belt, a pair of shoulder straps and an array of pouches that attach to the belt or shoulder straps to carry your equipment. Modern (1930s onwards) webbing allows you a reasonable degree of modularity, allowing you to customise your webbing kit for the gun/sidearm/equipment you carry and where items are located for ease of use.

37 pattern webbing

37 pattern webbing

In the UK, webbing pouches have gone through a phase of being fairly universal until recently. Both 37 and 58 pattern webbing has two large utility pouches at the centre of the equipment that can hold pretty well any magazines you can think of. You can then add supplementary pouches/holsters/packs to carry any other equipment you may need.

58 Pattern webbing in Northern Ireland.

58 Pattern webbing in Northern Ireland.

Although there were a couple of small-scale attempts to replace 58 pattern webbing, the only really successful one was with the 95 pattern, or PLCE (Personal Load-Carrying Equipment). This is a much more dedicated webbing set, designed to work around the L85 (SA80) weapon system. This webbing can be used for other rifles that take similarly designed magazines however.

95 Pattern/PLCE Webbing

95 Pattern/PLCE Webbing

Between 58 pattern and 95 pattern these are the two cheapest options for an entry-level webbing set in used condition. 58 Pattern in particular will cost £15-20 for a full set including poncho roll and large pack.

Chest Rigs/assault vests

The chest rig has never seen much use in western militaries, though they have been experimented with. In the Far East however they were ubiquitous in all the small, anti-communist wars, particularly favoured by groups such as the Vietcong. They are particularly popular for use with the AK-47 and its cousins.

AK47 chest rig as used in Vietnam.

AK47 chest rig as used in Vietnam.

The chest rig is typically (though not always) a pre-determined set of pouches for carrying ammunition for a certain firearm. It is much cheaper than modular webbing so is a popular choice for less well-off militaries who just need to equip as many people as possible for the least cash. It carries all the weight around the chest rather than at the waist like webbing.

An assault vest is the next step up, pre-set pouches mounted on a vest-like structure that covers the whole torso. Usually you have an array of magazine pouches for a specific weapon, some utility pouches and possibly pouches for grenades or communications equipment.

Plate carriers

The plate carrier is the standard today among well-off militaries. It combines a lot of advantages of the chest rig and webbing.

The base component is a body-armour plate carrier, traditionally a separate piece of equipment, on which are mounted rows of straps onto which pouches can be attached in any format the user desires. This is a popular choice among airsofters as it allows a great degree of modularity depending on your kit and provides a bit of protection from BBs.

T3_Geronimo_Fully_Loaded_Plate_Carrier_multicam4__35943.1449938103.1280.1280

What you go for depends on your load out to a great deal. If you just want a load out that works then just pick what you like! Personally I use 37 pattern webbing most of the time as it allows me to swap between my Sten and M14 easily without changing pouches, though having recently acquired a GBB (Gas Blow-Back) M16A1 this may need to change, as the magazines don’t fit very well in there!

By all means research what load-carrying gear you may need but wait until you have decided on your airsoft gun before deciding, you want to avoid having awkward to use webbing. Unsuitable webbing makes it very hard to play effectively!


Don’t forget, if you would like to read more about getting into airsoft you can find all of our articles HERE.


Don’t forget to ‘Like’ our Facebook page or follow the blog to get regular updates on our projects and interesting videos and articles.

You can also buy many of our finished products in our Etsy store.


So, you like airsoft? Part Two A: Eyepro

Advice columns, Customer Reviews, Get into airsoft series, Products, Protective items

Preface:

This is intended as an introduction to airsoft, it is a general guide to airsoft in the UK, though many of the points here will be the same abroad. Any advice regarding the law is intended as a rough guide only and you should research further or consult a lawyer on points in detail if you wish to.

Vintage Airsoft is not responsible for any action you take regarding this advice!

 Part One, a really basic starting point is HERE

This is Part Two A and will look in detail at eye protection, Part Two B at equipment and Part Two C at guns finally!

Part Three will look at specific airsoft genres.


So, you’ve tried airsoft and you like it!

That’s great, I don’t blame you! So you’ll want to start assembling your gear. Before I get to the fun stuff, here’s the important bits:

Eyepro

There are quite a few options for eye protection. Some eyepro is airsoft specific, some is general. I’ll not go into specific requirements for eye protection standards but will show some pros and cons of each type.


Safety specs.

These aren’t really designed for airsoft, though they are used. These usually (but not always) meet the minimum safety requirements for airsoft but you should always test them before relying on them for protection.

These are usually inexpensive, and the most discrete to wear. However some goggles do have a gap around the edge, which can leave you vulnerable to BBs getting through this gap.

All clear eye protection fogs from time to time, with warmth and sweat or moisture in the air. Safety specs do have an advantage over other forms of eyepro in that you can reach into them to clean dirt and moisture in the field without taking them off. If you get fogging then you can wiggle them up and down to clear them in a few seconds.

Because of their low profile, they are popular with themed airsoft games such as WWII and Vietnam. They are also a good choice for snipers as you are unlikely to get lit up at close range so the reduced protection is less of an issue, but the ability to clear them is vital and they don’t get in the way of a scope or clunk on the buttstock.

You can get larger lab specs that go over spectacles, but these have large gaps around the bottom typically so be wary of them.

51-g6nGyPlL._SL1000_

Safety goggles.

These are the next step up. A good pair of safety goggles wrap all round the eyes and it will be pretty well impossible for a BB to get past them. As far as safety is concerned, these are the safest eye protection.

However due to the reduced capacity for air flow, these are likely to fog and are harder to clean in the field, but this can be done with practice. Some higher end goggles have fans built in to improve this, other use a thermal lens to keep mist at bay. Some less expensive goggles may distort your view at the edges. Any large goggles can get in the way of rifle stocks for aiming, which can be an issue with using sniping scopes. However if you wear spectacles, these are a valid option.

$(KGrHqJ,!jYFJtP8vh-QBSe4-7YBwg~~_32

Mesh.

There are two main types, large goggles and small ones. Large ones protect the full eye area, small ones just cover the eyes themselves. These have the profound advantage of not misting up or getting smeared.

AS2541

However, cheap mesh goggles do have their drawbacks. Cheap BBs can shatter on impact and small fragments can get through. The large goggles can get in the way of aiming on some guns, but some thin glasses can be worn beneath them. In bright sunlight, the light can dazzle through the holes, which is distracting!

large-mesh-goggle-in-black-acm-3131-p

Full face protection.

It is also possible to get eyepro built into full face protection, either in mesh or clear form.

While this provides a pretty seamless level of protection across the whole face, if you use clear eyepro in this format it will still mist up and cleaning it is nigh-on impossible in the field. However some versions do have built in fans or thermal lenses to help offset this. If you wear glasses with these, both the lens and the glasses themselves may fog and you won’t be able to clean either! Some face protection can cause issues with aiming certain guns.

BC-ST11-2B-lg

You can also get themed full facepro if you have a specific load out you’re aiming towards. For example, I make the WWI tank crew spatter mask for this purpose, but you can also get gas masks, horror masks, replica faces and so on!

Prescription eyepro

If you decide to take you airsoft seriously and need glasses, you can get safety specs and goggles that take prescription lenses. They are usually better than the average safety specs and of course allow you to see very clearly. As ever with clear eyepro, they will still mist up from time to time.

4996498531_87a92644b0_b

Some final eyepro tips:

1. In an ideal world, shoot any eyepro you have to test it before you use it. If it’s a pair of inexpensive safety specs, get two pairs and test one. Use a 350fps gun in full auto at close range, test the frame and the glasses themselves. Any signs of cracking or splintering then do not use them. If you have access to a DMR or sniper rifle (450 to 550fps in the UK) then it is also worth testing with them to simulate a worst case scenario. When you have tested your first pair, use the second as impacts can degrade the protection. 

When testing eyepro like this, WEAR EYEPRO. Just in case you forgot that BBs can take your eye out…

2. There are dozens of different standards for impact ratings, but not all are suitable for airsoft. This is why I recommend the above test before any skirmish use.

3. Anti-mist for clear eyepro is a constant debate. Honestly, I think mist is nearly unavoidable and when I remember, wash my goggles and specs in a detergent solution which largely keeps it at bay. Carry some clean blue tissue around with you for a cheeky wipe in the field if needed, most sites have a stock.

4. DO NOT USE SKI GOGGLES. These and other related forms of eye protection are not designed to protect against impacts. They will shatter and send splinters into your eyes.


Sorry for such a long post on this, but there is a lot to cover! Next time we will look at webbing, helmets and other more exciting equipment.


If you liked this content and want to see more like this, why not follow the blog or join us on Facebook?

You can buy many of our finished products in our Etsy store.

So, you want to try airsoft? Part 1.

Advice columns, Game write-up, Get into airsoft series

Preface:

This is intended as a general introduction to airsoft for people who have never played before. It is a general guide to airsoft in the UK, though many of the points here will be the same abroad. Any advice regarding the law is intended as a rough guide only and you should research further or consult a lawyer on points in detail if you wish to. Vintage Airsoft is not responsible for any action you take regarding this advice!

This is Part One, a really basic starting point.

Part Two will look in more detail at guns and equipment.

Part Three will eventually look at specific airsoft genres.

So, if we are sitting comfortably, let us begin:


So, you want to try airsoft? Well, get yourself an airsoft gun and off you go then!

13929155614_4272d40163_z

Oh wait. Don’t do that.

If it was that simple I wouldn’t be writing this would I?

-Buying something that looks just like a real gun is illegal in the UK

-You have to be over 18 years old

-You don’t know what is worth buying yet

13929152314_d78011bea5_z

The VCRA or, how do I get a UKARA ‘license’?

The Violent Crime Reduction Act is a largely pointless bit of law that makes it illegal to sell, manufacture or import Realistic Imitation Firearms (RIFs) in the UK. There are ways around this however as the VCRA grants exemptions to permit their sale/creation, including Airsoft Skirmishing.

What this means is that you will have to prove to any retailer that you are a regular skirmisher. This hasn’t been defined in law and is, rather like the rest of the VCRA, a bit sketchy and vague. This is where UKARA comes in.

The United Kingdom Airsoft Retailers’ Association (UKARA) co-ordinate with many sites to keep a record of who is skirmishing regularly and therefore has a defence to buy RIFs. When you have played three times in two or more months, sites will allow you to fill in a form and pay to have the pleasure of easily buying RIFs online and in shops.

Let me get one thing straight:

UKARA IS NOT A LICENSE.

13905826762_a352611d06_z

UKARA is a scheme set up by retailers to cover their own backs, it is not government run, affiliated or even officially recognised. It has never been tested in a court of law. Nevertheless, among airsofters it is seen as the gold standard of defence and is by far the most widely recognised. Other schemes are available but not as widely recognised.

What about those bright blue/green/red/yellow/see through guns? What’s wrong with that?

These guns, or Two-Tones as they are often called, are Imitation Firearms (IFs) under the VCRA. The difference is that although they look just like the gun in every way, they are at least 50% brightly coloured or see-through to mark them out as not real. All you need to buy these is to be over 18.

guns

If you just intend to mess about with friends (on land with permission!) or shoot in the garden these are fine. For serious airsoft skirmishing they have a number of issues. Firstly, in woodland a bright pink gun is quite visible.

Secondly, many of the cheaper options on two tones are very low quality. They have plastic internals, plastic externals, low power and are generally a bit dismal. Many retailers do however offer a two-tone service on good quality guns for a token £15-20. That’s a lot of money to spend to make your gun less useful, but if you want a good airsoft gun without actually going skirmishing then that’s the way to go!

Yes, you can repaint it once you have a defence to the VCRA, but it will chip off and wear as you use it, revealing your lovely, vibrant undercoat once again.

And even after all of this, you may have bought a two-tone, gone airsofting, realised your gun is rubbish and all your new airsoft buddies may have to let you know there aren’t many good upgrade parts for that particular model. Then you are back to square one.

So, don’t get a gun! Yet.

Choose a site

There are airsoft sites all over the UK, they are roughly divided into to two major types: Woodland and CQB (Close-Quarter Battle).

For your first airsoft experience, I would wholeheartedly recommend woodland/outdoor sites. The chief reason is that most shooting happens at range, so when you get shot it hurts less. Yes, airsoft hurts, but 99% of shots in woodland sites sting for a moment to let you know you have been hit and fade off very quickly. It isn’t something you have to worry about unless you get in very close.

13905624222_80a40a3440_z

Outdoor airsoft is very much fieldcraft, movement and tactics based. Good camouflage, accuracy and unit tactics pay off here. Don’t worry about knowing everything about these subjects when you first turn up, in fact if you go in with a know-it-all attitude you will learn the hard way that it’s not quite like in the movies.

CQB is a very different beast. I recommend you play a few outdoor games first before trying this. CQB is intense, fast and painful. CQB will leave marks. Good CQB sites are strict about the power allowed and do not allow full automatic, which is unnecessary.

Why you need face pro in CQB. Don’t make my mistake! This did however lead to the happy creation of my WWI tank crew anti-spatter mask.

Your first concern is to find one local to you. If it’s convenient, you can get to more games and not have to set off at the crack of dawn or psych yourself up for a long drive home after a hard day’s skirmishing. If you have a few options, try them all out. You want a site with good prices for hiring kit, decent guns for you to use and a friendly bunch of local players for you to learn from. Ideally, the site owner/operator should have an interest in airsoft as the games will be better run and based on the abilities of airsoft guns as opposed to the limitations of paintball guns (which many sites also run).

13905729101_5cfb777b40_z

I’ve found the site I would like to try, what should I take?

Money. Cash is best as not all sites have card facilities. Enough to hire for the day and buy some more ammo, you will run out quickly until you learn which shots are worth taking!

Rough clothes. You can pick up an old pair of DPMs (the recently discontinued British combat uniform) and a jacket for a few quid and these are absolutely fine. You can also get MTP (Multi-Terrain Pattern), the current British uniform very readily now. They are lightweight, hardwearing and comfortable, as well as breathable in warm weather. Avoid denim, it is hot, stiff and gets very heavy and uncomfortable when wet.

A hat. This is one bit of protective gear sites don’t typically provide. Hits on the skull do hurt, so the more of your head that is covered the better. A beanie is fine.

Gloves. Hand strikes are a bit sore, in CQB these are vital as hands get hit a lot, in woodland they are nice to have. In winter they also make holding metal guns a lot more comfortable.

Footwear. Substantial, supportive footwear is a must, especially on woodland sites. At a minimum, hiking boots, or ideally high-ankle assault boots. You can get these easily in army surplus shops, it is worth trying on a few pairs to find ones that fit well. Also consider a thick pair of outer socks to prevent blisters.

A good sporting attitude and a good dose of honesty. If you don’t play honourably and take your hits you won’t make many friends and will probably get shot a lot to make up for it until you do. Regular airsofters hate cheating, they don’t take kindly to it. Listen to the marshals, they will give a safety briefing at the beginning and instructions during the game. They are there for your safety and enjoyment.

Everything else should be provided by the site, a basic webbing set, gun, ammo, batteries/gas, eye protection (eyepro) and face protection (facepro). Wear face protection for your first goes, at least until you know what it’s like getting hit.

13929063133_cc4a508c7c_z

Oh, three final bits of advice:

-If you’re not sure, ask a marshal. There’s no such thing as a stupid question, they know not everyone is familiar with guns and safety gear

Keep your eyepro on when you’re not in the safe area. You will get yelled at for taking it off, for you own good

-Take your time and enjoy yourself. You don’t have to be Andy McNab or Jason Bourne on your first day. No-one is.


The guns we build here at Vintage Airsoft are generally for the more experienced airsofter who has specialist needs. However we deal with all levels of players and are always happy to help build the gun of your dreams.

13929021655_9a1abee8fe_z

We’ll be covering in more detail the kit you may want to consider in the next post.

If you liked this content and want to see more like this, why not follow the blog or join us on Facebook?

You can buy many of our finished products in our Etsy store.