Airsoft G3: External upgrades and safe bayonet

Cold War, Complete builds, Custom builds, G3, G3 Bayonet, War on Terror, Weapons

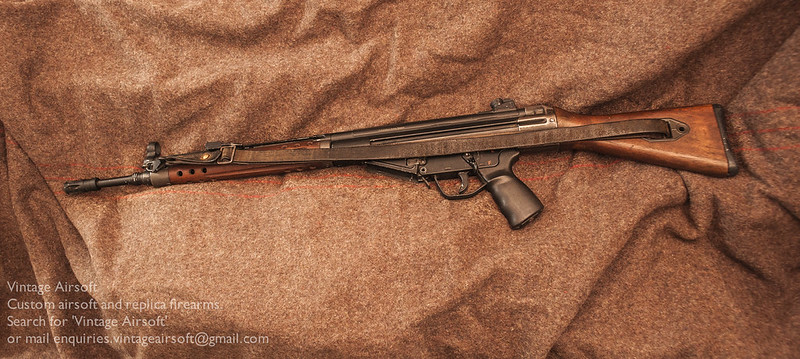
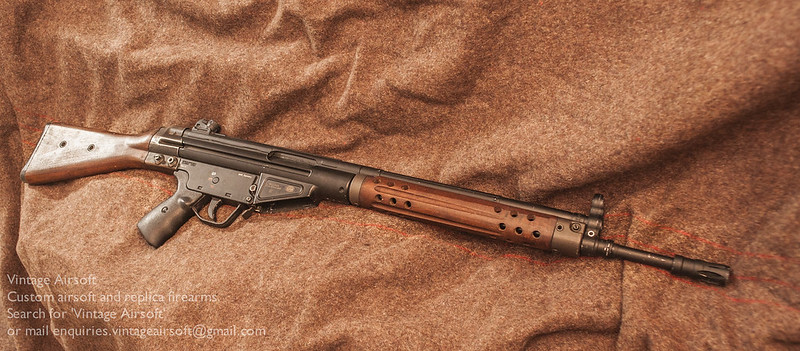
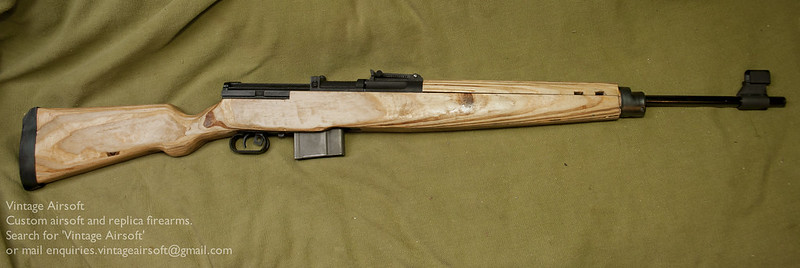
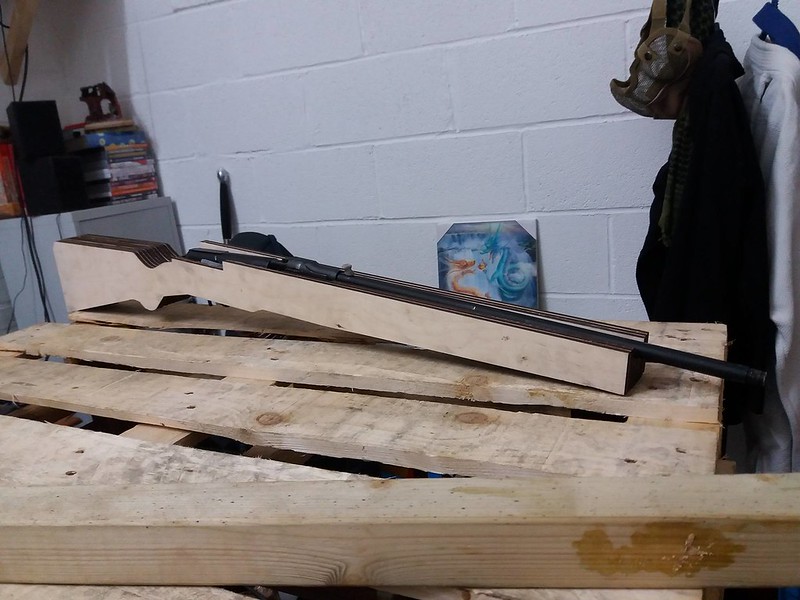
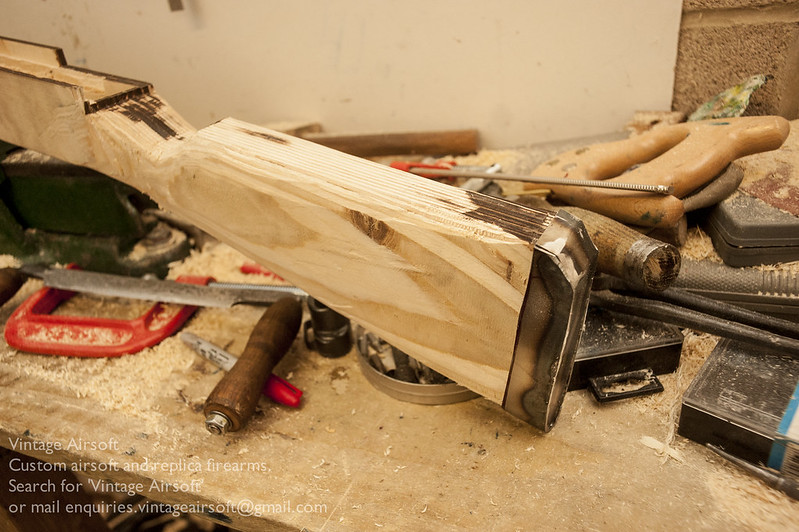
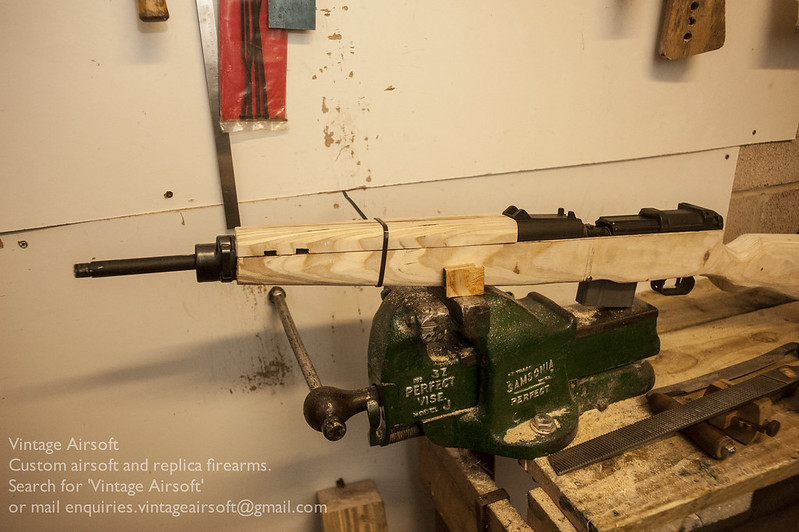
Most of this work I did a little while ago, a friend asked me to fit their wooden original furniture to their airsoft G3. This work was a lot of small, fine adjustments so I didn’t really photograph the process. You can however enjoy the end result!

_DSC8985

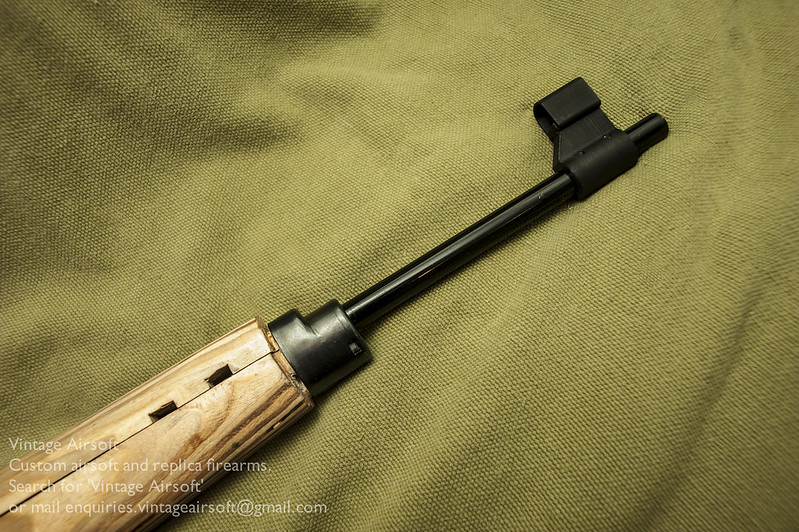
On the other side. If you look closely you can see that the thread for the front sling mount has been replaced with a steel nut as it had stripped out (threads in aluminium don’t last that well).

_DSC8988

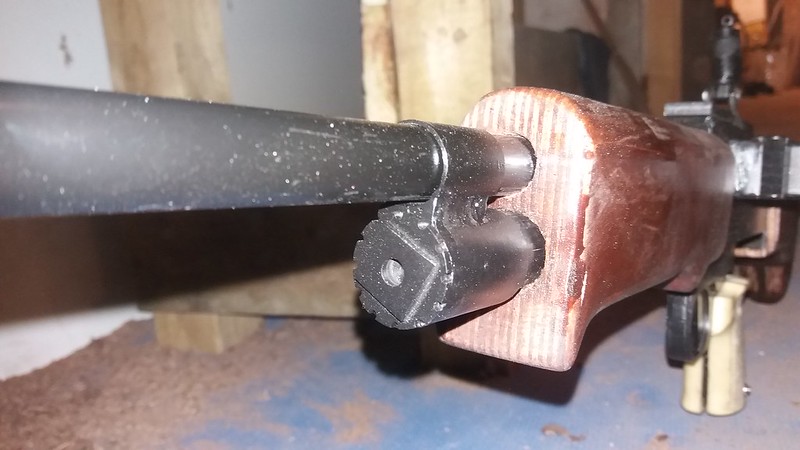
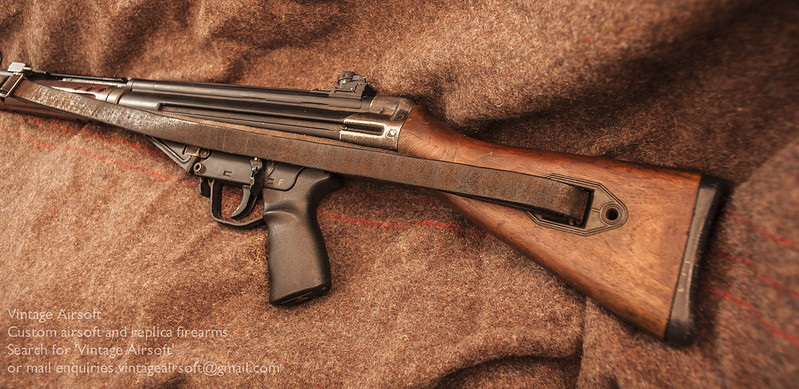
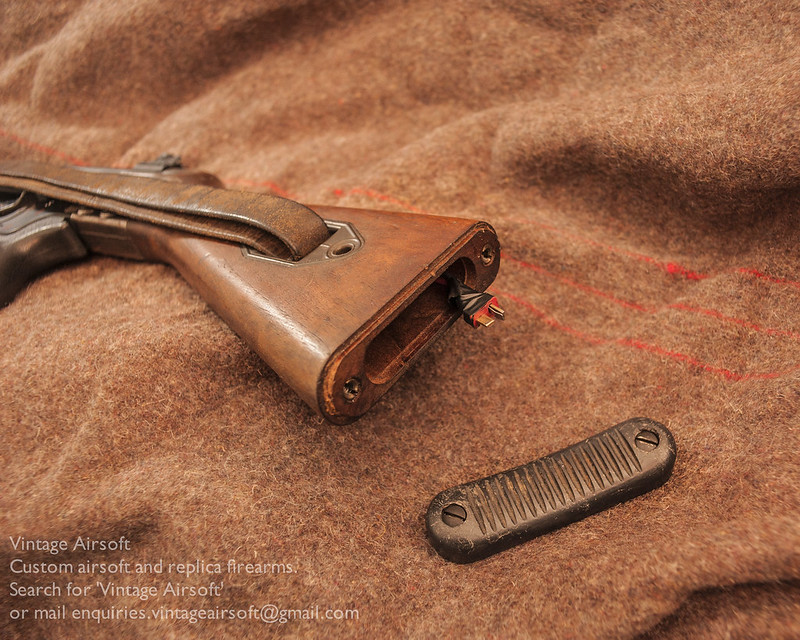
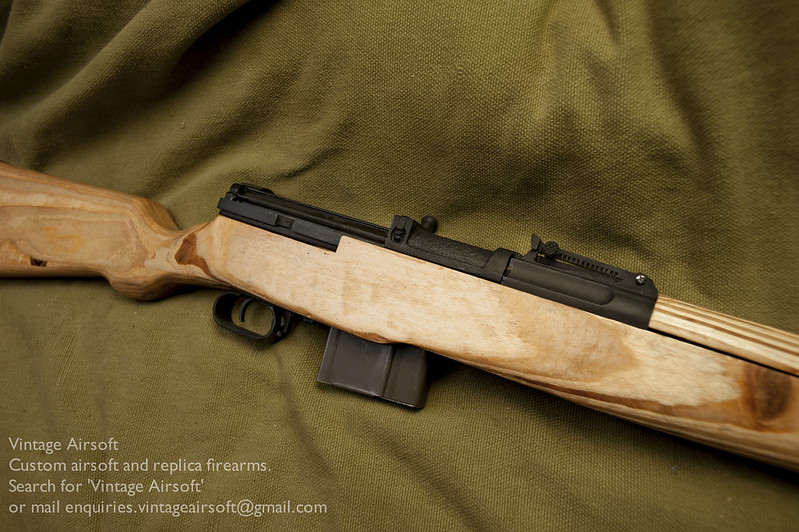
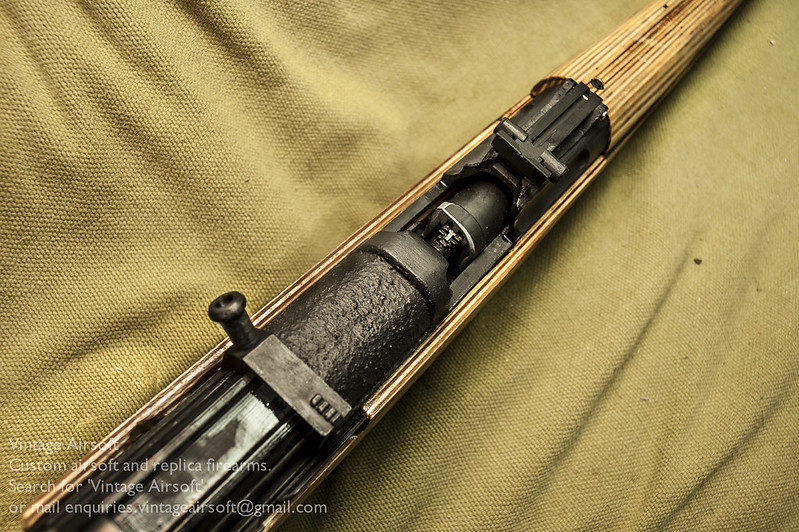
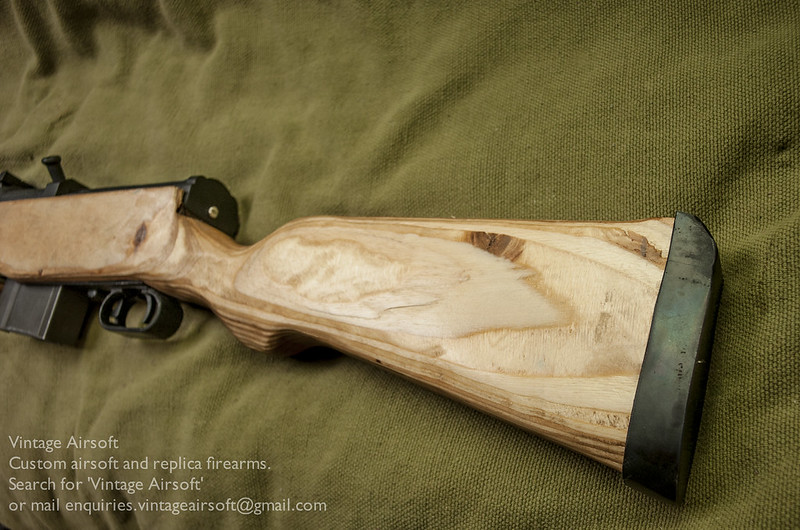
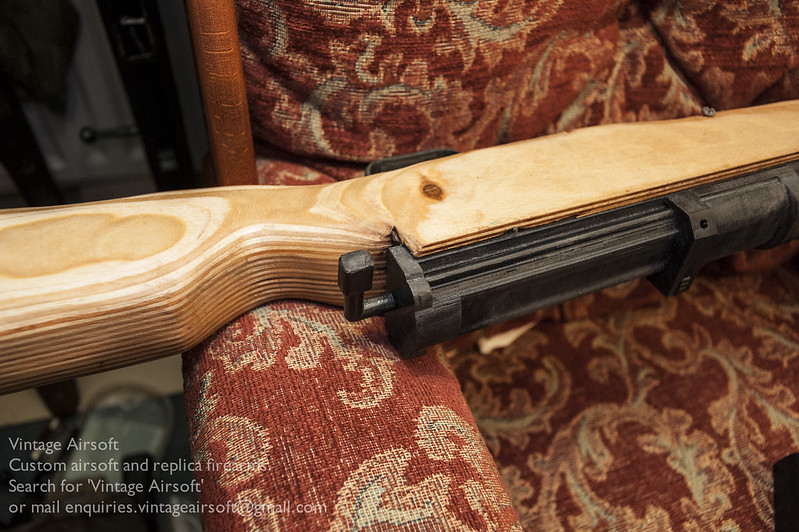
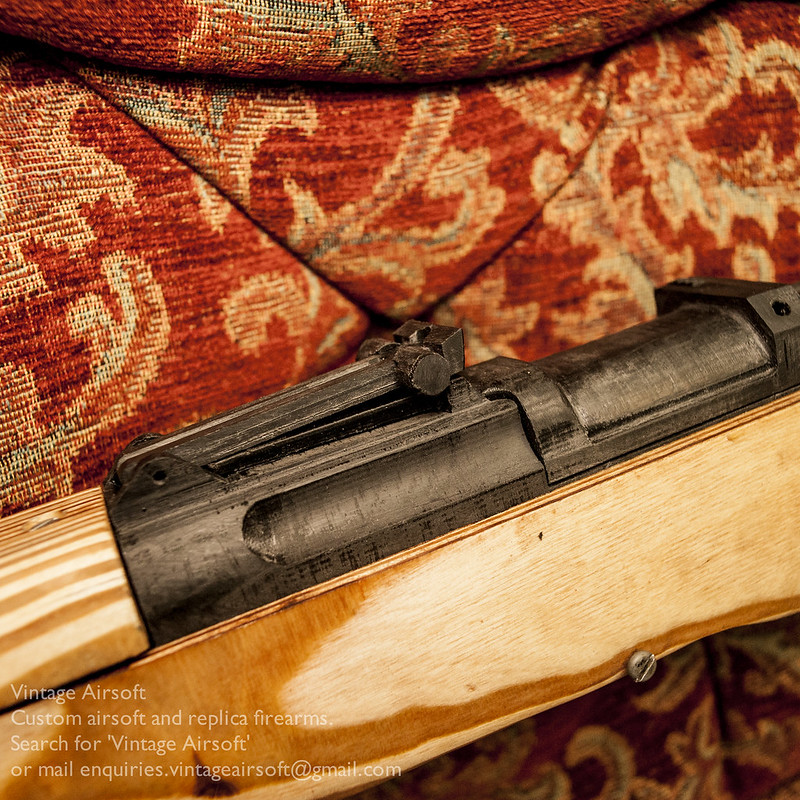
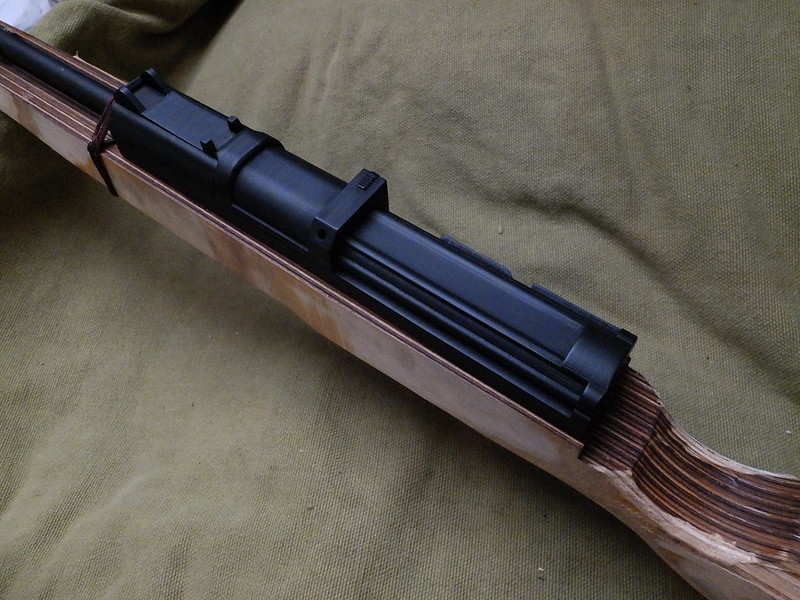
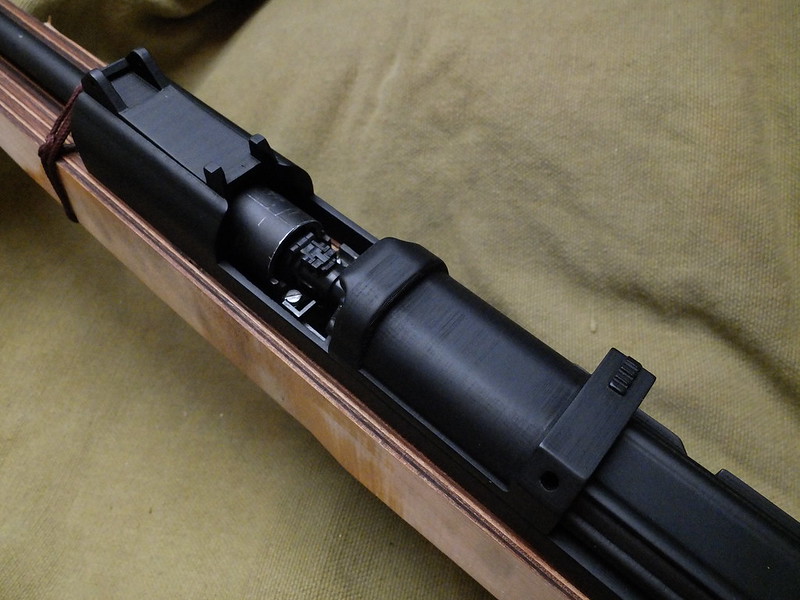
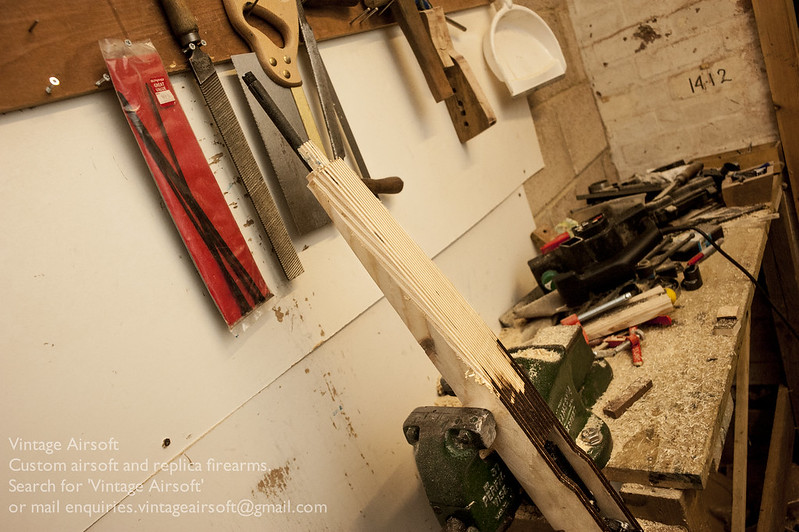
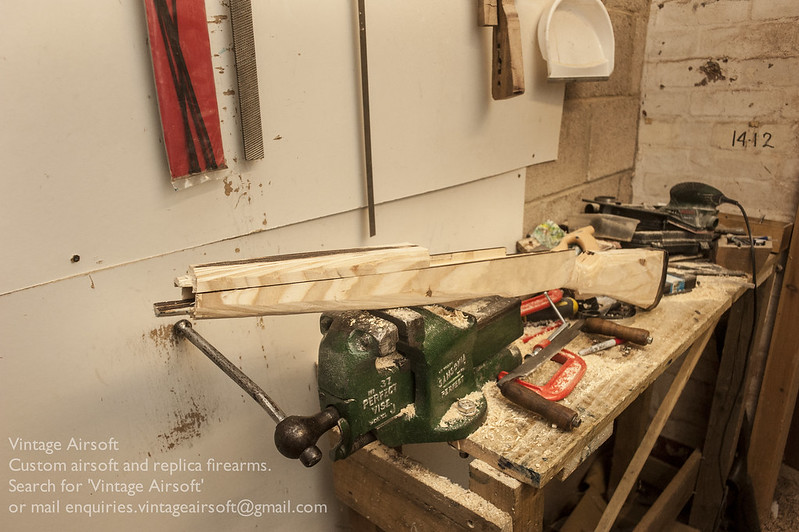
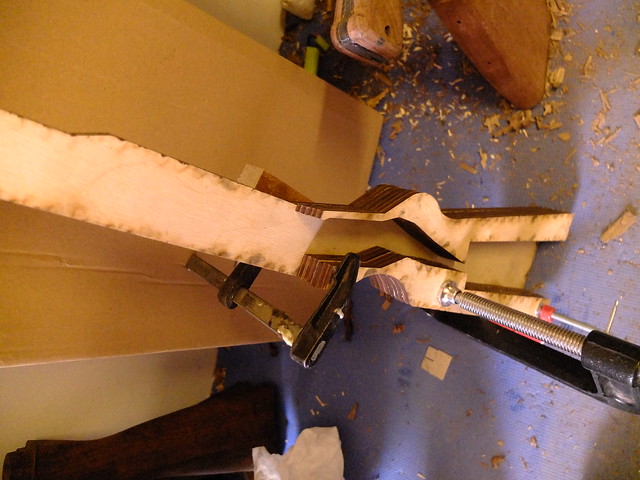
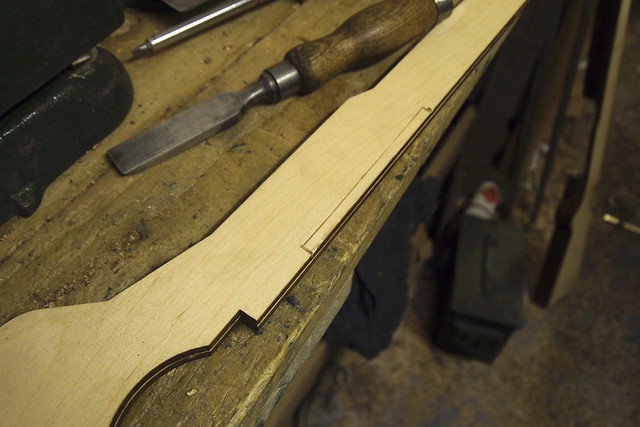
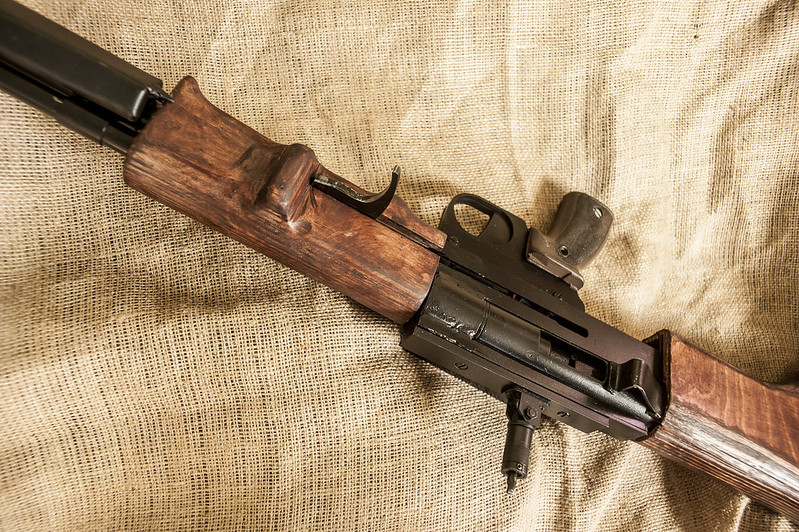
A closer view at the buttstock end. Although the receiver shape is about right, it needed thinning out in a few places to fit the stock.

_DSC8986

_DSC8991

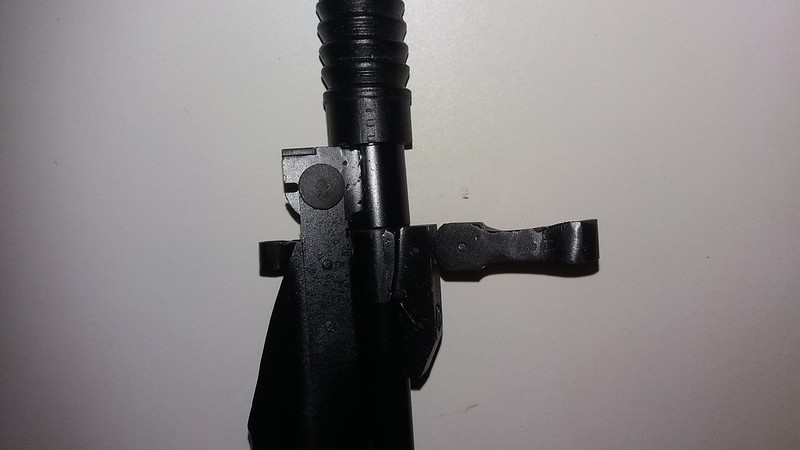
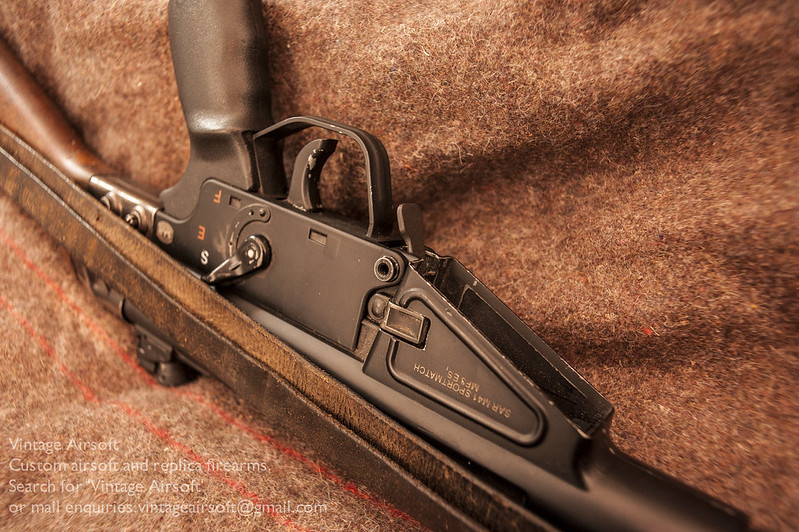
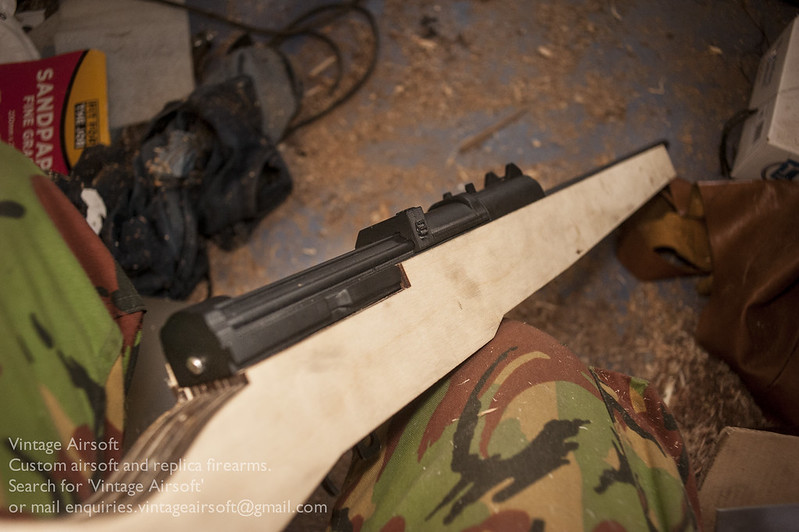
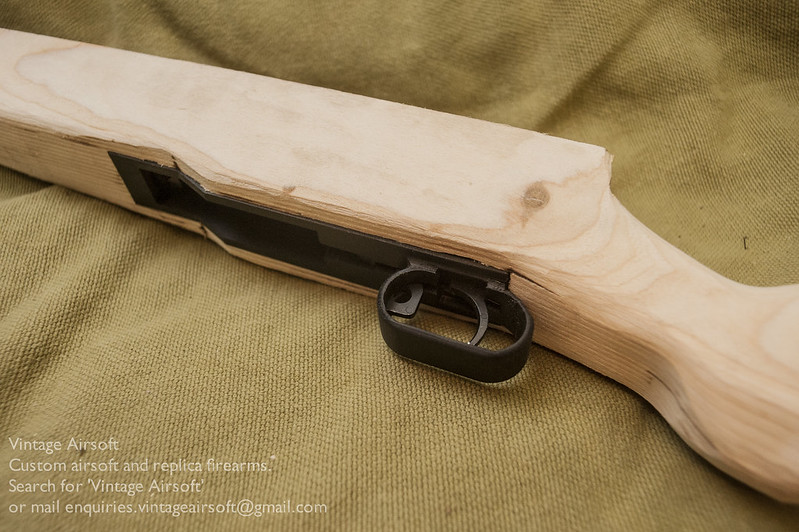
I added a real steel magazine catch, the AEG one was aluminium and quite fragile in my opinion. This steel one needed a collar machining so that the parts would move smoothly in the AEG trigger group.

_DSC8992

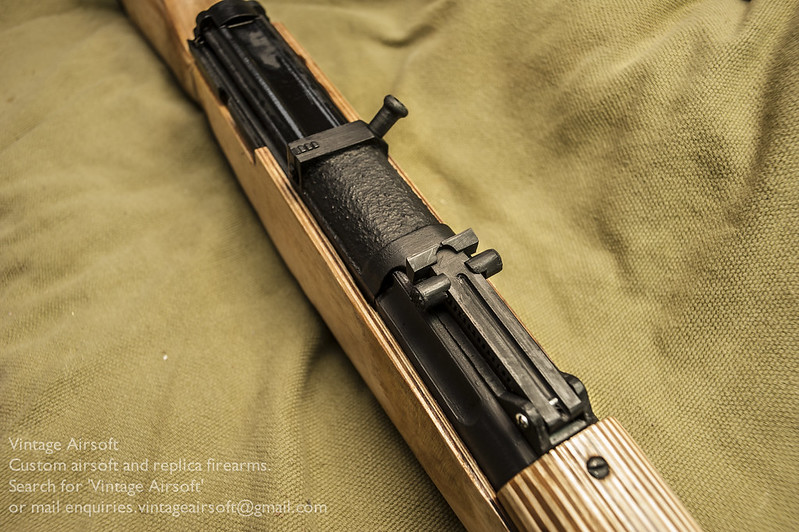
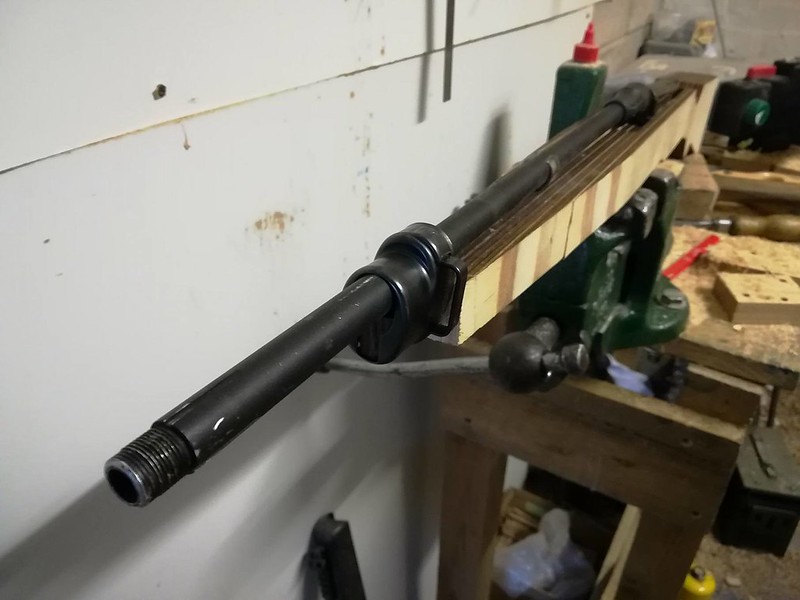
A closer look at the fore-end. Fitting the hand guard was mainly shaving away material at the top to fit around the barrel support.

_DSC8987

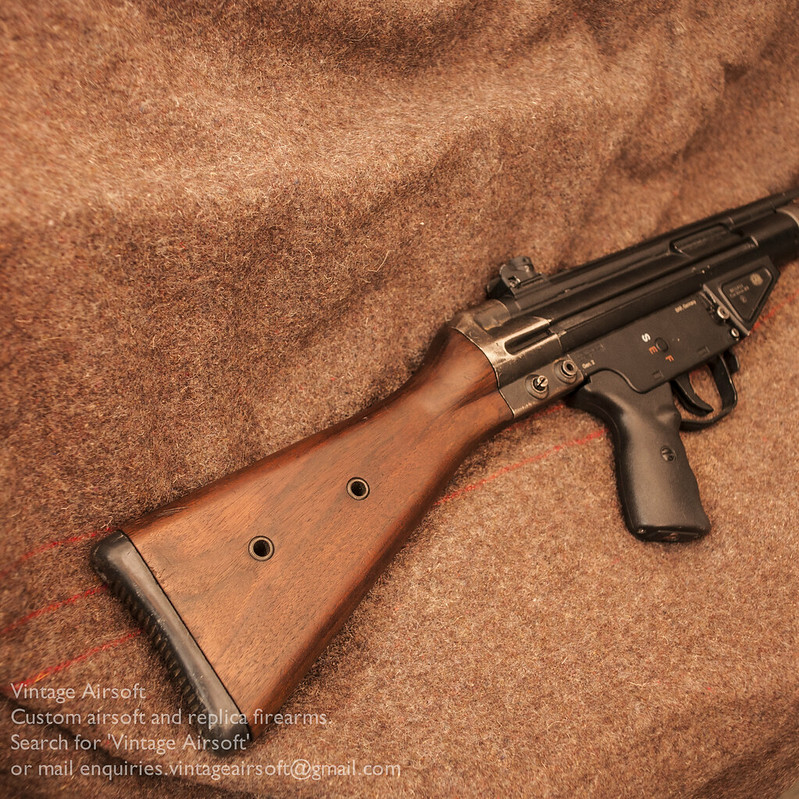
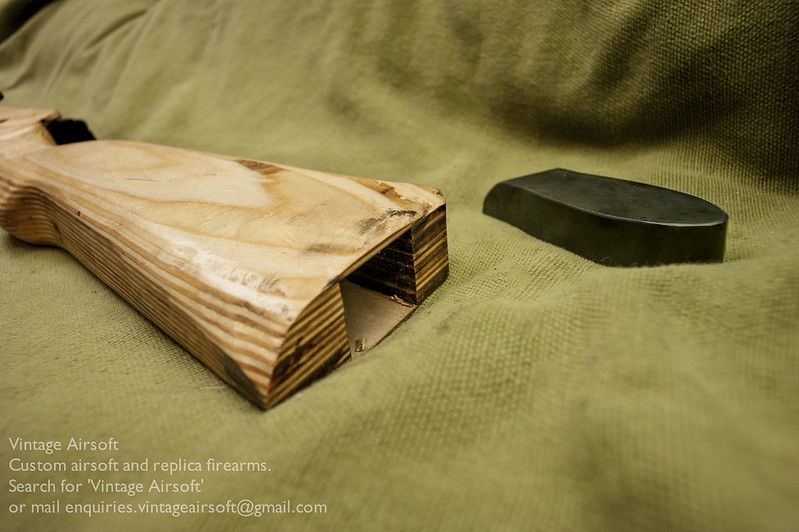
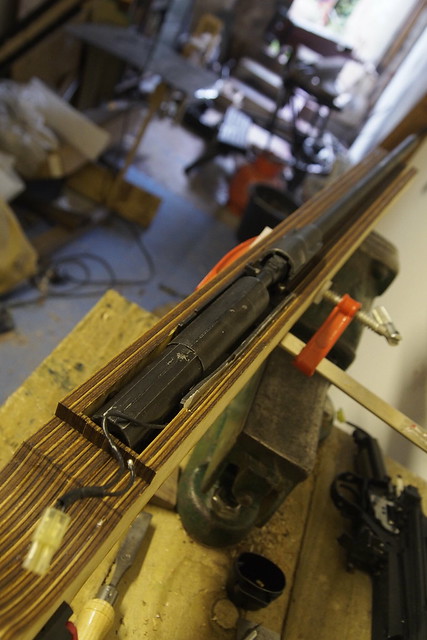
The buttstock is already hollow, to reduce weight I would imagine. This has the added bonus of allowing you to fit a LiPo battery inside. The cable runs from the gun, through the hole which the support column uses on the real thing (you may also be able to drill through this if you want to keep it).

_DSC8994

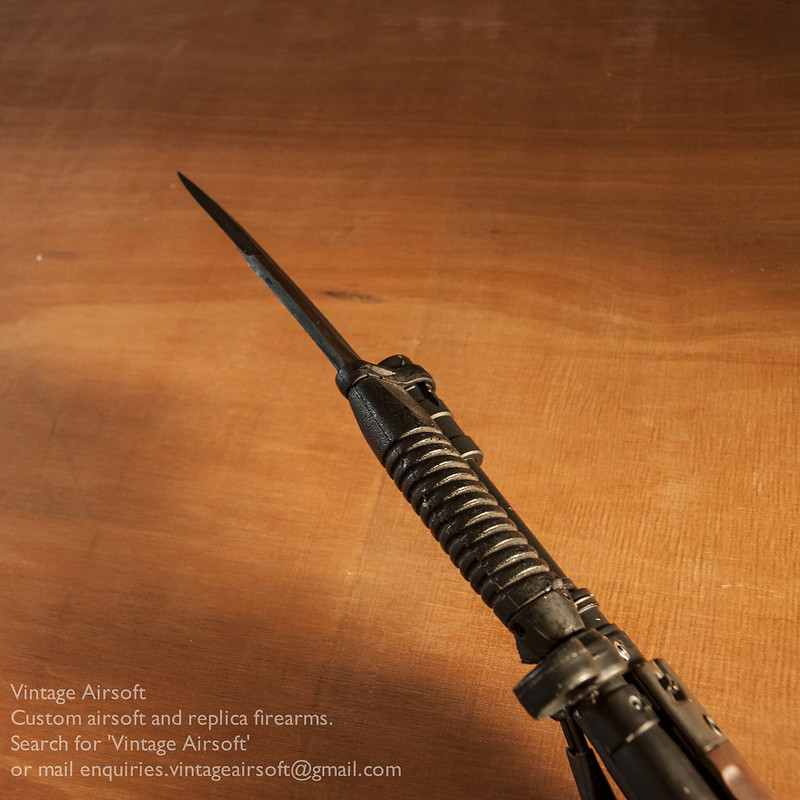
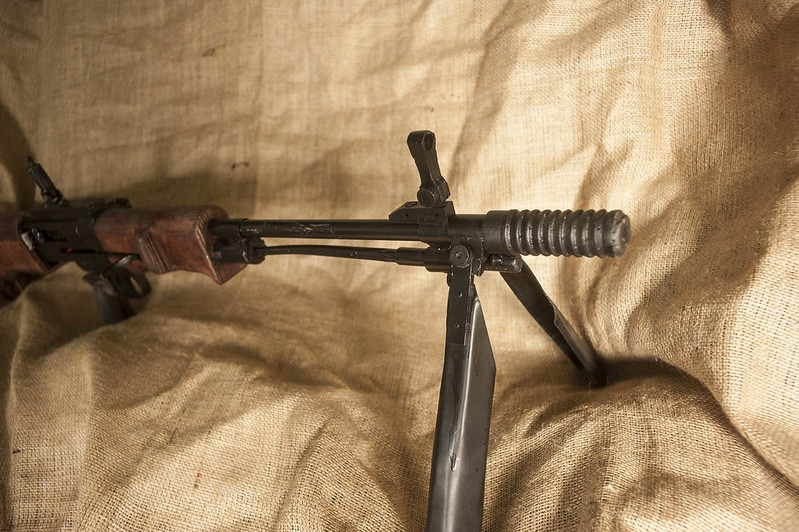
Now, the bayonet; a rifle really isn’t complete without one. This is cast from an original in hard rubber.

_DSC8963

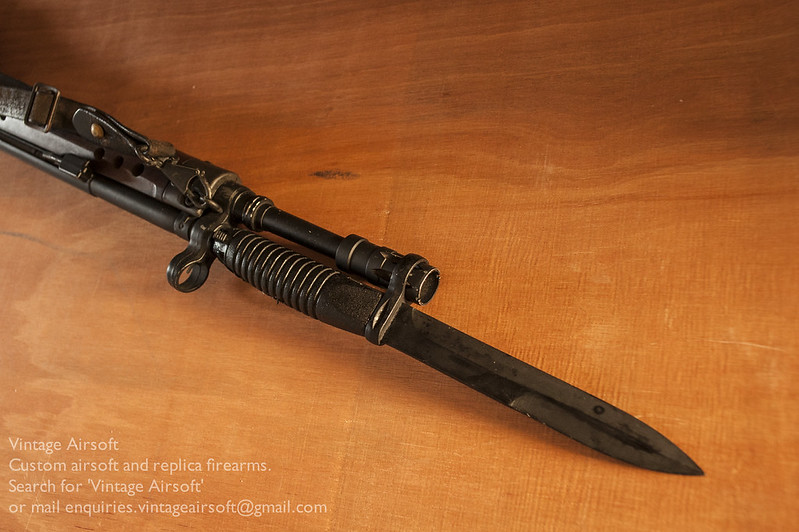
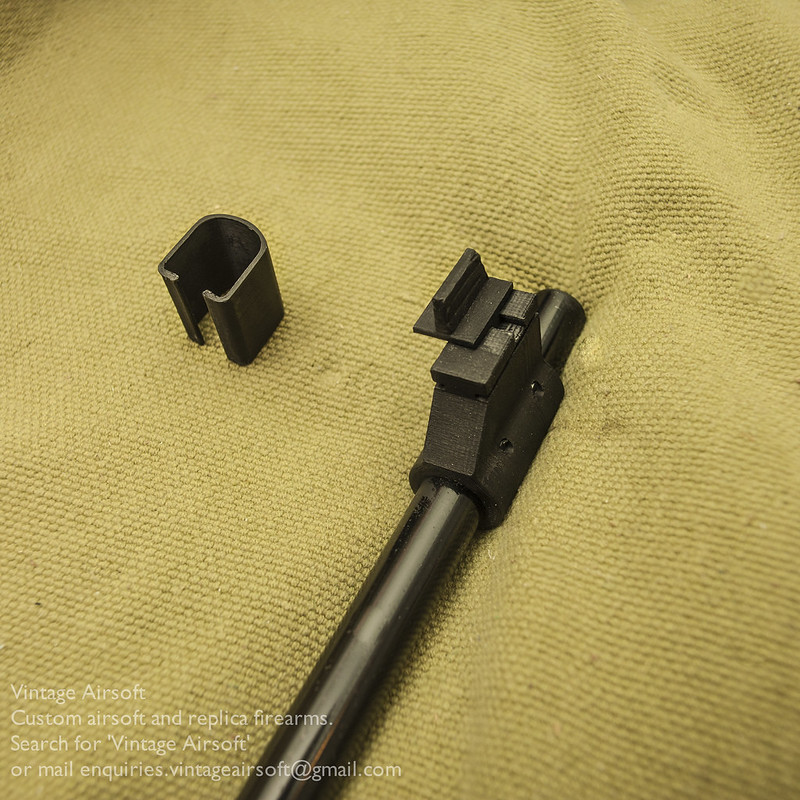
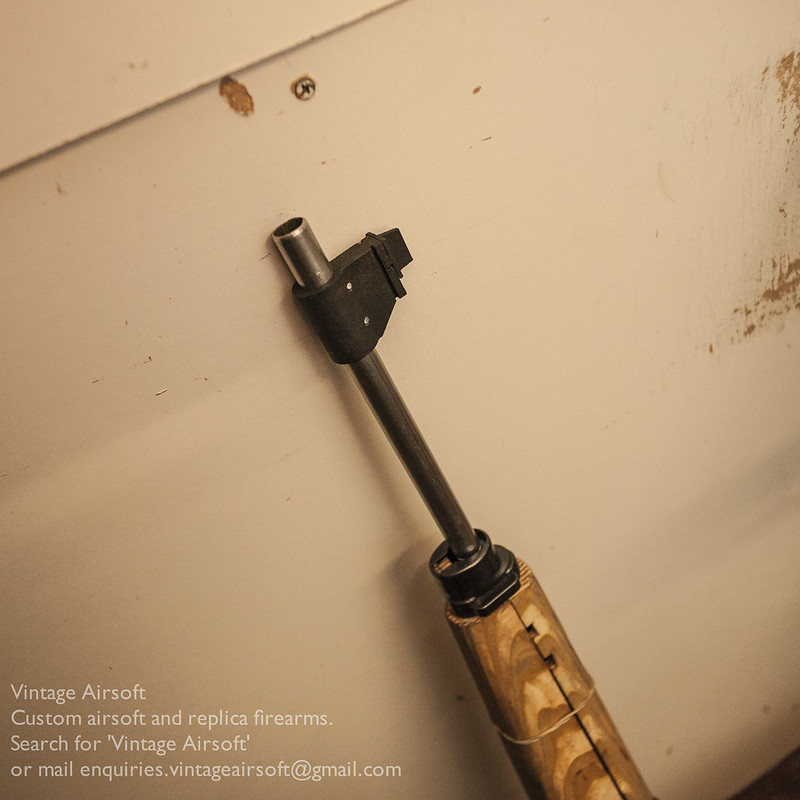
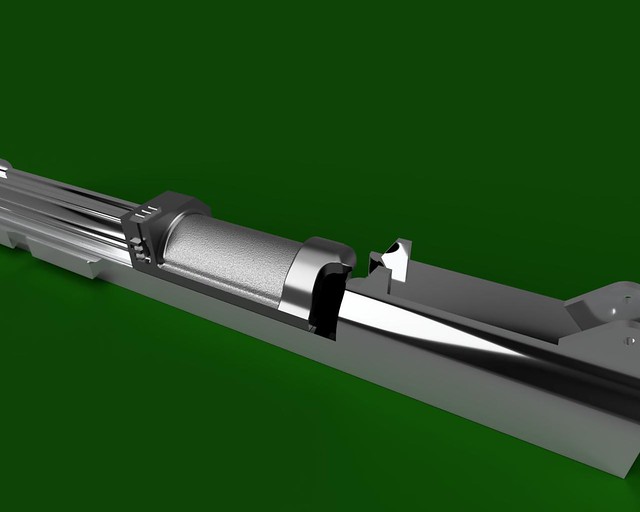
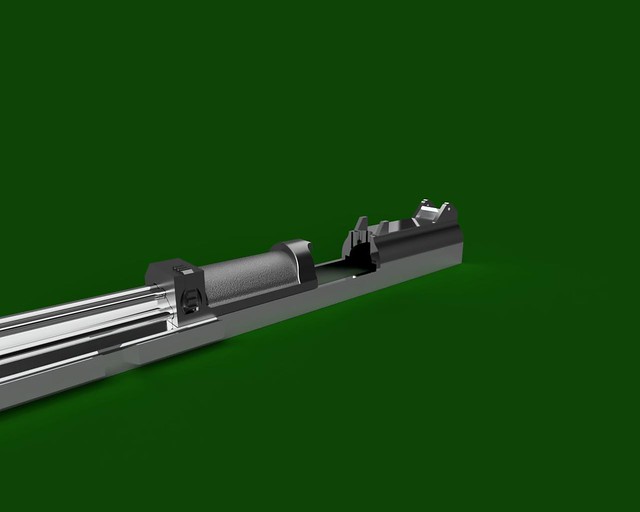
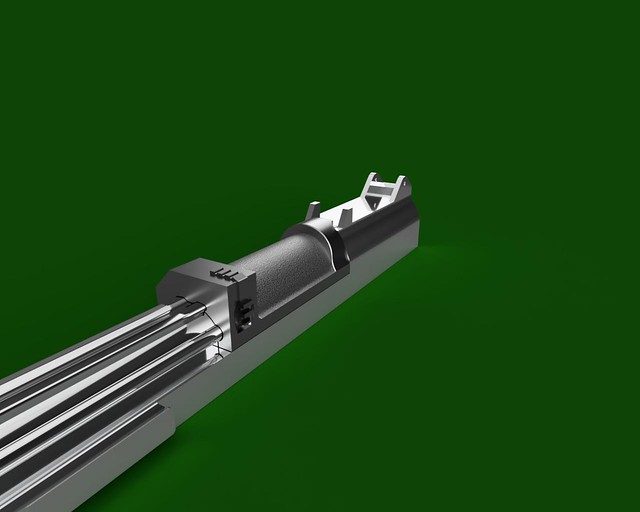
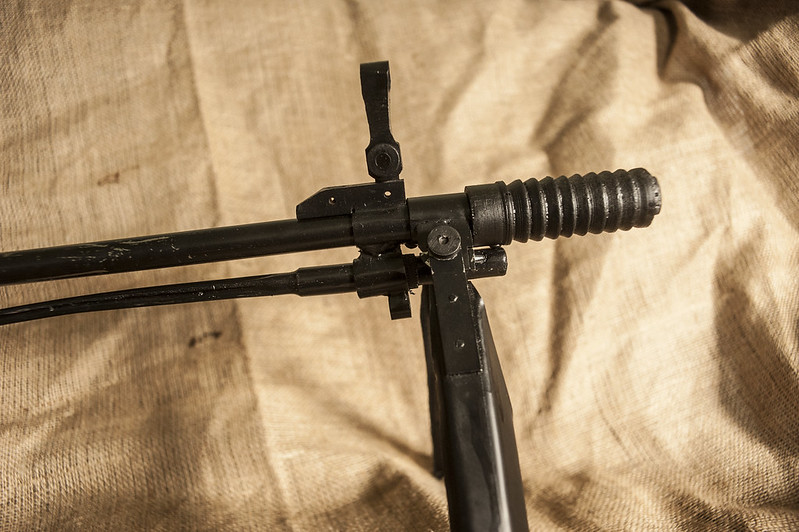
The gas plug needs drilling out to take the stem that locks the bayonet in place on this AEG.

_DSC8964

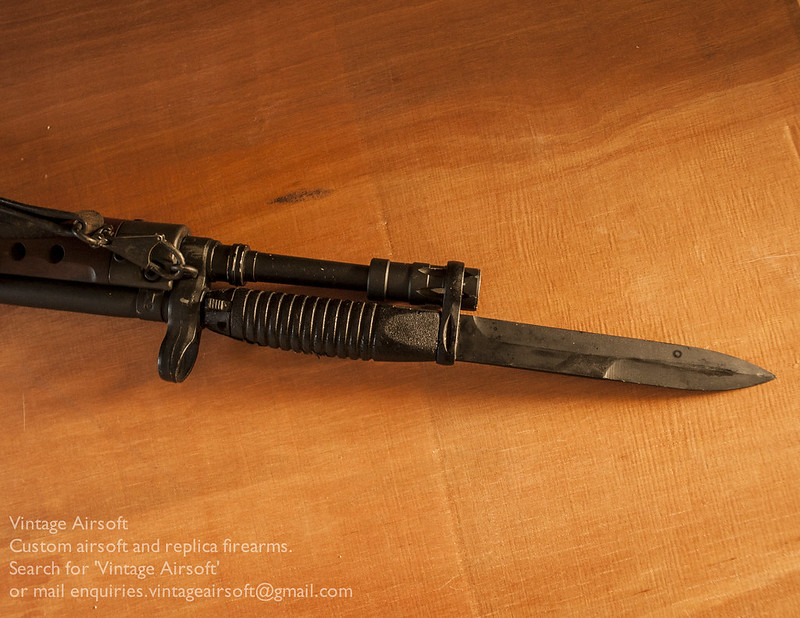
Unusually, the G3 bayonet sits above the barrel, just ahead of the foresight. On a rifle of this format I can see this providing better leverage for twisting out of a body. Not that this concerns us with airsoft/re-enacting of course…

_DSC8965

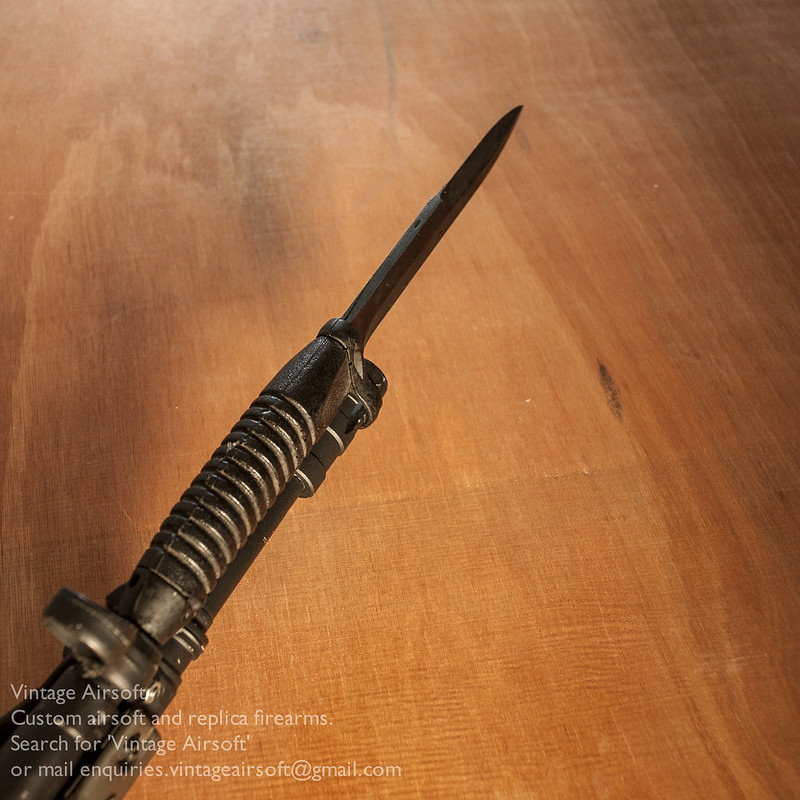
This photo has been taken with the rifle at a slight angle to show the natural flex of the bayonet blade.

_DSC8966


If you like this build you can see other complete projects here. If you have an idea of your own, drop us a line on enquiries.vintageairsoft@gmail.com to discuss. ‘Like’ our Facebook page or follow the blog to get regular updates on projects and interesting videos and articles.


Don’t forget you can buy our smaller items via Etsy. including this G3 bayonet. Our larger items can be found here.


G43 AEG Mk2: Complete

Battle Rifles, Complete builds, Custom builds, G43 MkII, G43/K43, Weapons, WWII

I know some people are quite excited about this project so let’s get straight stuck straight in with some pictures!

Left side:

_DSC7820

Right side:

_DSC7821

The 3D printed receiver.

_DSC7822

The rear sight, adjustable for elevation via the leaf. The rear sight adjustment is controlled by the bar across the leaf which is held in place by teeth and spring tension.

_DSC7823

The receiver open. You can now see the finishing touches to the slide, which has been painted up using a mix of acrylics and coarse sand. This simulates the rough cast surfaces left over that were not milled flat as a manufacturing expediency.

_DSC7827

The foresight unit, 3D printed and pinned in place. The blade is adjustable for windage once the hood is removed.

_DSC7825

The barrel is black painted. Production versions of this may be oil blacked, though the fore-end cap will likely be printed rather than metal.

_DSC7826

The magazine well and trigger guard. I may have to beef up the trigger guard in future versions. The magazine release is the small catch between the  magazine and the guard. Although not greatly ergonomic, the original was designed to be fed with stripper clips to be fair.

_DSC7828

A second view.

_DSC7833

The buttstock needs a bit more work for production, but it’s a satisfying result. For production I am going to try and put a sling mounting through it as per the original.

_DSC7829

The buttplate comes off to access the battery compartment.

_DSC7830

A quick view down the gun from the back.

_DSC7832

I’m very pleased with this build I must admit. It looks the part and has a nice heft to it. Of course there have had to be some dimensional changes to fit the airsoft internals, but they aren’t any worse than AEG M1 Garands and without a direct comparison it ought not stand out too much.

Finally WWII airsofters have an option for a rifle that isn’t a K98k or an STG44.


If you have enjoyed this project or have an idea of your own, drop us a line on enquiries.vintageairsoft@gmail.com to discuss. ‘Like’ our Facebook page or follow the blog to get regular updates on projects and interesting videos and articles.

Don’t forget you can buy our smaller items via Etsy. Our larger items can be found here.


G43 AEG Build 2: Part 3

Battle Rifles, G43 MkII, Weapons, WWII

The last leg of the G43 build are the details that will make it really look the part. First up: the rear sight leaf. This is adjustable for elevation, using a spring and teeth that engage on the right side of the leaf.

Screen Shot 2017-11-04 at 18.21.47

At the front, I’ve had a spring 3D printed. This slots into the nose cap provided by the client.

_DSC7418

At the back of the receiver, the new one has the disassembly lever.

_DSC7416

The rear sight in the flesh. It is kept down by the spring in the front of it.

_DSC7411

Eagle eyed viewers will notice that the receiver has changed a bit, there are now two scoops in the side up by the chamber. There are also stronger rails which had proven a little bit weak to stand up to repeated disassembly.

_DSC7402

The rear sight in place on the new receiver. 

_DSC7446

The foresight is pinned in place with two 3mm pins. The foresight blade is adjustable for windage, so with the rear sight elevation adjustable you have a good range of adjustment.

_DSC7448
 

Although this is now nominally all in place, I need to do some last bits of finishing. Although it is all there there is something missing to give it that ‘X-factor’. I expect it’ll all come together once the painting has been done.


If you are interested in this project or have an idea of your own, drop us a line on enquiries.vintageairsoft@gmail.com to discuss. ‘Like’ our Facebook page or follow the blog to get regular updates on projects and interesting videos and articles. 

Don’t forget you can buy our complete products via Etsy.


G43 AEG Build 2: Part 2

Battle Rifles, G43 MkII, G43/K43, Weapons, WWII

The first job for this part of the build was to modify my receiver design to fit the gearbox with comfortable space around it.

Screen Shot 2017-09-26 at 00.32.57

Effectively I added a slither of extra space down the middle to add width.

Screen Shot 2017-09-26 at 00.33.05

Once printed, it all fits quite nicely. The slide moves freely, needing only a slight tweak to put it in place.

_DSF9817

While there isn’t a function to the action opening, it’s one of those things that is nice to have.

_DSF9816

I decided at this stage to get the stock parts recut to improve the shape slightly.

22712793_10213000894729842_2029052712_o


The action now fits deeper inside  the stock and the receiver needs fitting into the woodwork rather than sitting on top.

22766334_10213000892009774_536645344_o

I routed out the top so that the receiver fitted snugly in. As before it hooks onto the back and screws down at the front.

_DSC7307

I routed out the top guard to fit the barrel and marked out cut lines.

_DSC7311

I marked out some of the shape for the top guard at the same time.

_DSC7314

Fitting the front cap provided by the client, the top guard is partly secured in place here and will be at the back as well.

_DSC7312
With this in place, I can rough shape the stock itself. The top and bottom are rounded off for comfort as far back as possible.

_DSC7317

Even at this stage the stock is developing a pattern quite pleasingly similar to the original!

_DSC7318

I welded up a buttplate, the battery compartment needs still more work to fit an original alas.

_DSC7319

With some careful design, the first version of the trigger guard and magwell just slots straight into the stock. Two screws in the front will hold it in place along with two lugs at the back.

_DSC7327

The build is now starting to look distinctly G43-ish.

_DSC7329

The magazine is a snug fit, but the catch engages nicely.

_DSC7331

A little test piece to see what the varnish/stain will do to the woodwork.

_DSC7338

Much of the rest of the work on this is painting and finishing work with just a few details to add.


If you are interested in this project or have an idea of your own, drop us a line on enquiries.vintageairsoft@gmail.com to discuss. ‘Like’ our Facebook page or follow the blog to get regular updates on projects and interesting videos and articles. 

Don’t forget you can buy our complete products via Etsy.

G43 AEG Build 2: Part 1

Battle Rifles, G43 MkII, G43/K43, Weapons, WWII

The aim of this build is twofold. In the previous G43 build it was a conversion from a wood-stocked M14. There were two problems with this:

  1. The M14 stock isn’t quite the right shape
  2. Wood-stocked M14s have become almost completely impossible to find

So as the G43 is one of my most asked-for builds I have finally come up with a solution. Making a stock from scratch is the simplest way to go, this one has taken a bit of time to get right but I now have a design I’m confident of.

Screen Shot 2017-07-26 at 23.14.34

Laser cut from ply, the parts are stuck together one layer at a time.

_DSF9293

Checking the fit, the ‘lightly’ modified M14 action slots in. At this stage my main concern was the motor space as it is snug by necessity for strength.

_DSF9332

Out of the second side, I have to cut a section to fit part of the M14 receiver. This is chiselled out and is invisible from the outside of the rifle.

_1010019

In situ, the only part out of place here is the rear-wiring, which would normally live inside the stock. However it needs re-soldering on the motor here and doesn’t go in easily as such. This will be solved easily enough though.

_1010020

The second side glued and clamped in place. I’ve put the battery transfer wire through from the battery compartment (in the buttstock) through to the motor housing. 

_1010022

The action fits in snugly, and I fit the repro front cap provided by the client.

22015636_10155935933208623_1262394515_o
Although the donor action looks weirdly bent, that is the shape of an M14 once you strip the receiver bits off. The nozzle goes up into the feed ramp at an angle. It’s weird, but it works.

22050766_10155935933123623_1511603968_o


The next step is to create the faux receiver. I designed it for 3D printing. It may need a little tweaking to fit around the gearbox.

Screen Shot 2017-07-26 at 23.14.20

G43_parts_2017-Jul-26_09-29-28PM-000_CustomizedView29517140883

My initial design will need a little tweaking to fit around the gearbox mounting but the majority of the work is done.

G43_parts_2017-Jul-26_09-18-23PM-000_CustomizedView20191270454

I am hoping to have an opening receiver. Although it’ll have no function, it’s one of those touches that is nice to have.

G43_parts_2017-Jul-26_09-17-25PM-000_CustomizedView1136747149

G43_parts_2017-Jul-26_09-16-48PM-000_CustomizedView14882526777


More of this build coming soon!


If you would like to find out some of the history of this rifle, you can see my long-ago written intro to the G43 here.


If you enjoyed this article, join us over on Facebook and check out our Etsy store. If you have an idea for a custom build of your own get in touch on enquiries.vintageairsoft@gmail.com.

FG42: First production model: In pictures

Battle Rifles, Custom builds, FG42, Products, Weapons, WWII

Airsoft replica of the WWII German battle rifle used by Paratroop units. The Fallshirmjägergewehr 42 was designed to give paratroops more firepower than their the standard rifles and SMGs as well as giving them a small enough package to jump with rather than having to drop them separately in a canister.

_DSC5984

This airsoft version is based on a later pattern, with only full automatic functionality. Semi-automatic functionality may be achieved with the addition of a mosfet or rate of fire control unit. 

_DSC5990

The bipod locks up and down solidly with knurled thumbscrews, as does the foresight unit. 

_DSC5993

This will come with a rubber bayonet, modified from a MAS36 but which maintains the look of the original.

_DSC5994

This replica takes standard TM/CYMA M14 magazines for ease of procurement, inserted in reverse. The version customers will receive will also have a false fire selector that is missing in this picture.

_DSC6004

The charging handle can move, the current design is not sprung but I hope to fix this in future versions.

_DSC6005

I have been asked a few times if I will be producing an early pattern FG42. Within a few months I will be producing a conversion kit with additional parts to make it into an early pattern for those who want it.


You can see the build process for this here and order the FG42 and many of our other items through Etsy.*

For large items like this, payments in instalments are welcome. Please get in touch to arrange.

*At present Etsy are being awkward about selling replica firearms. Please get in touch directly on enquiries.vintageairsoft@gmail.com to place your order

FG42: First production model: Improvements

Battle Rifles, Complete builds, Custom builds, FG42, Weapons, WWII

First things first, a locking system for the bipod. It flopped around a lot on the pre-production version so I have added locking lugs. This should hold it in both deployed and carry positions.

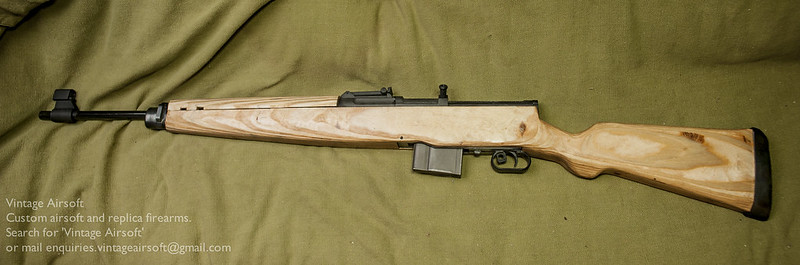
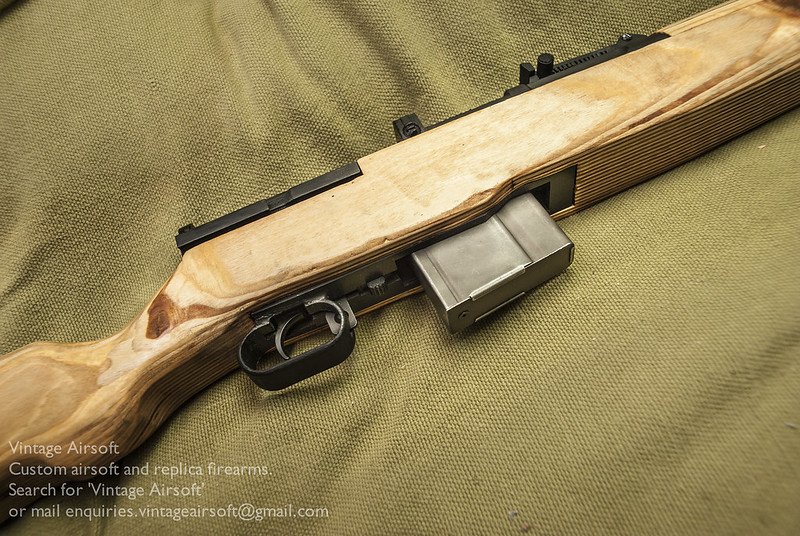
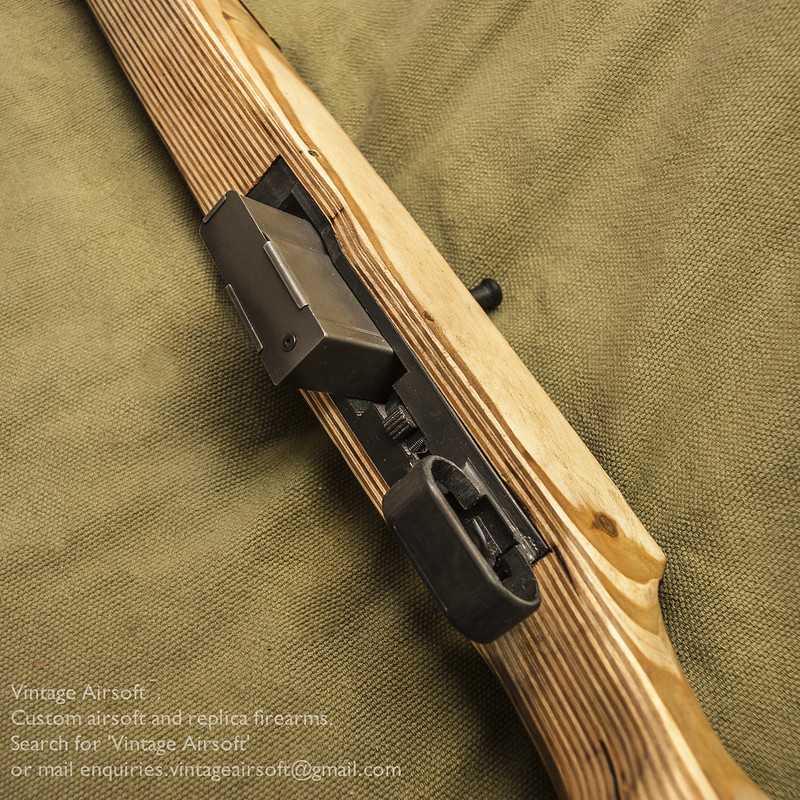
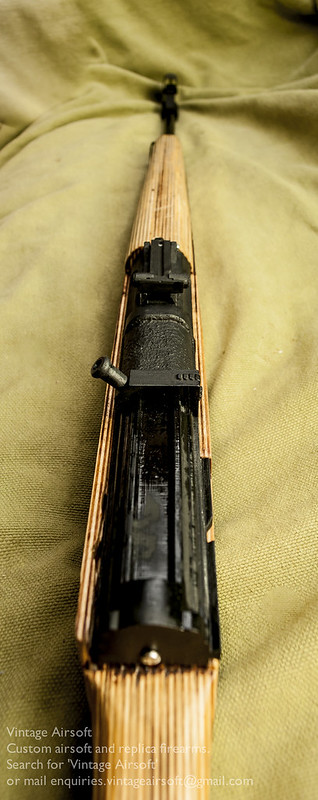
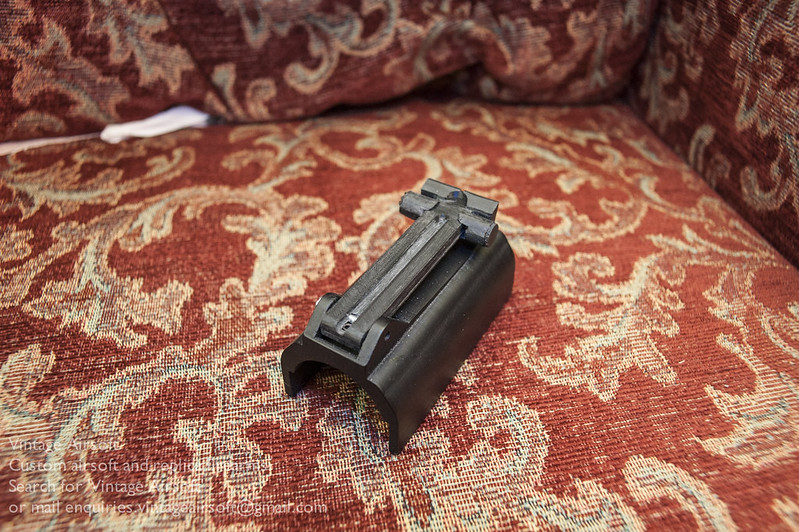
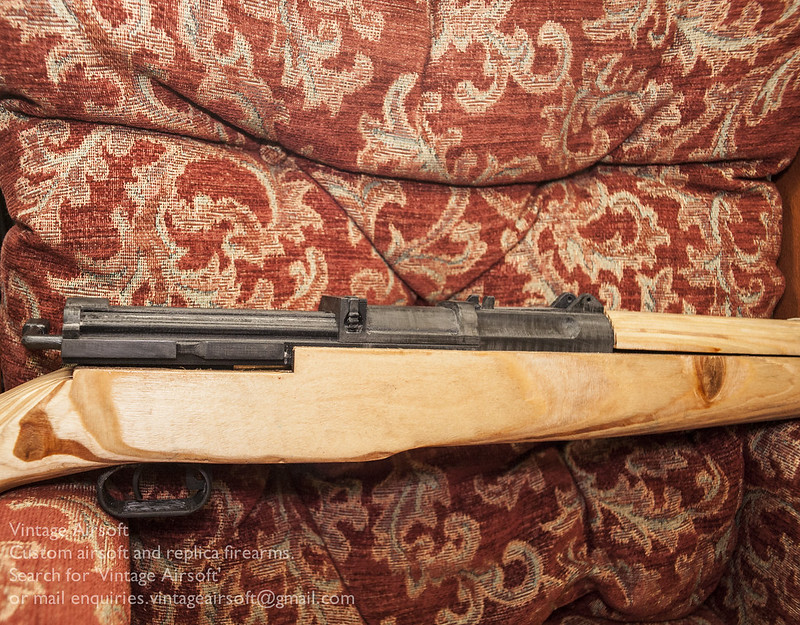
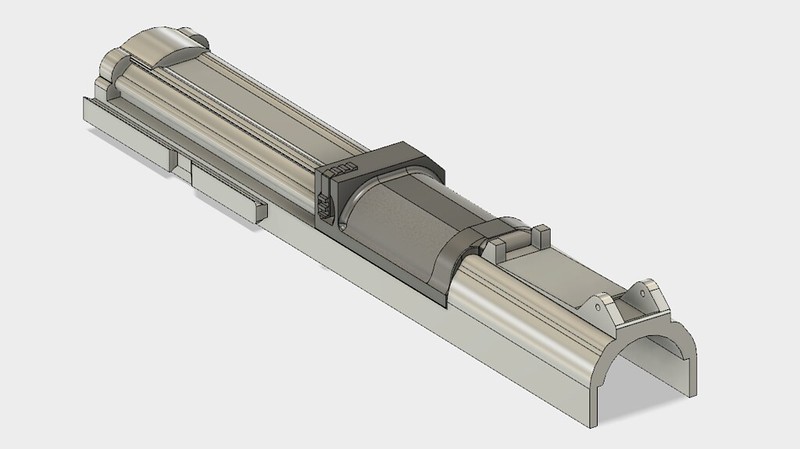
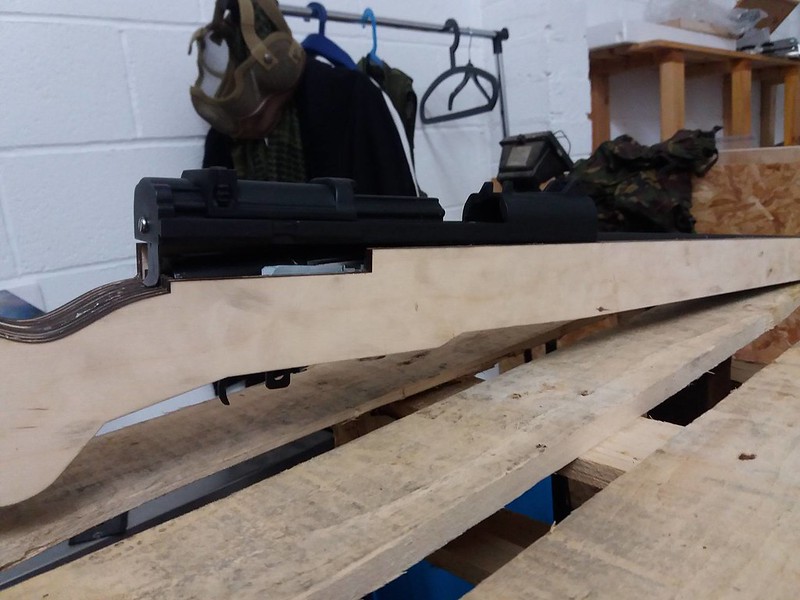
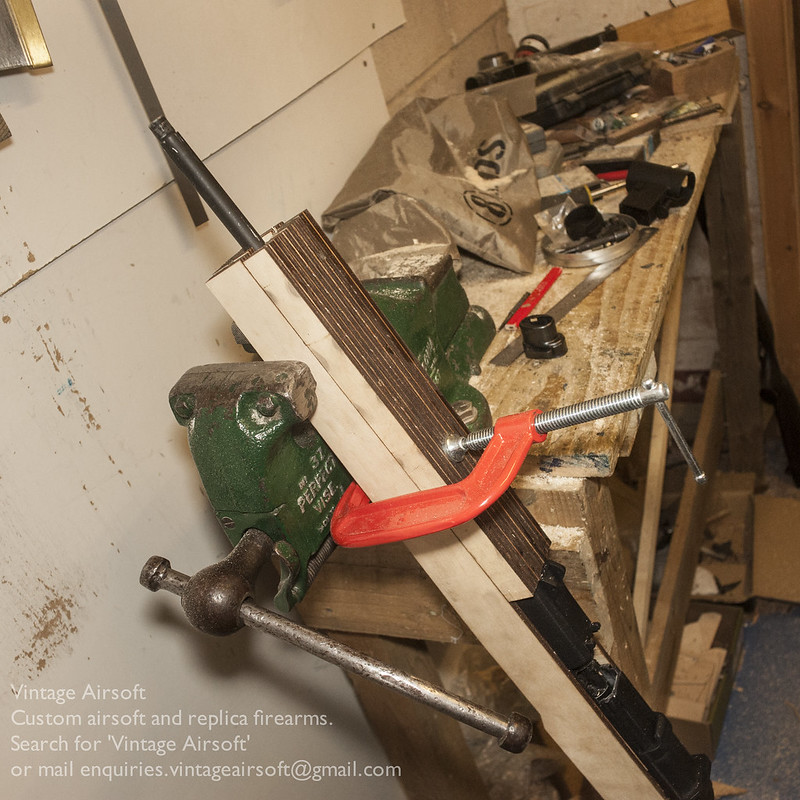
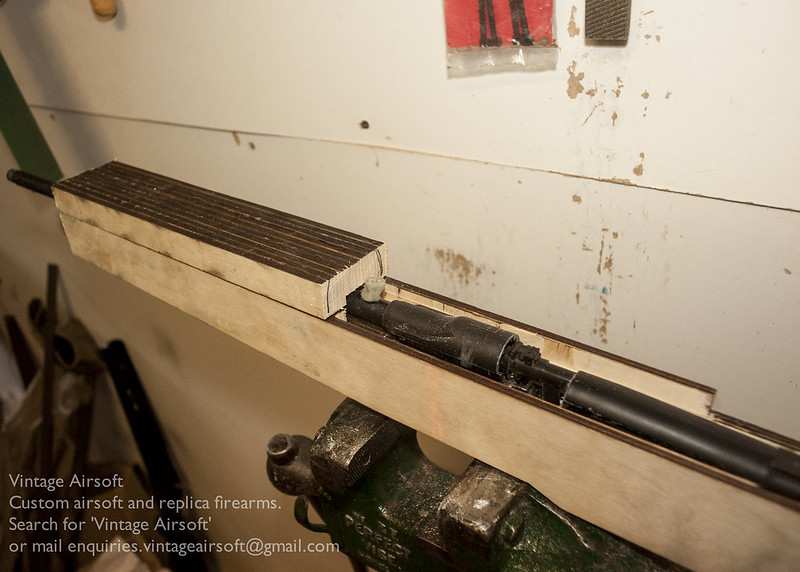
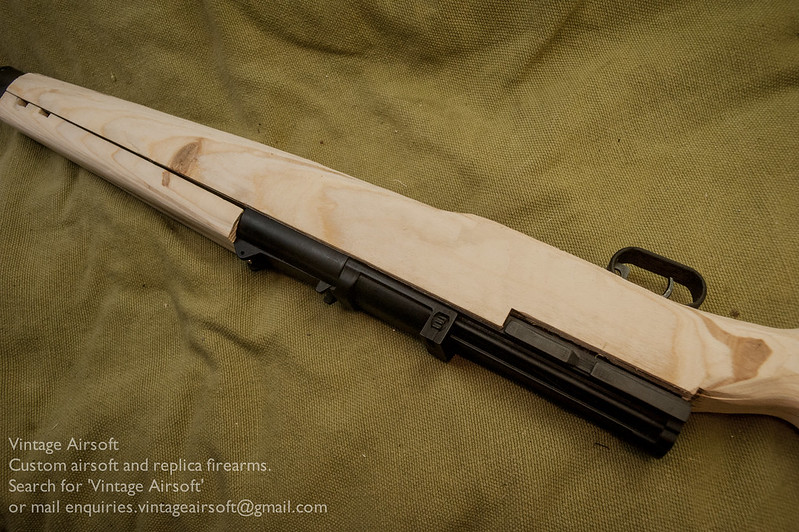
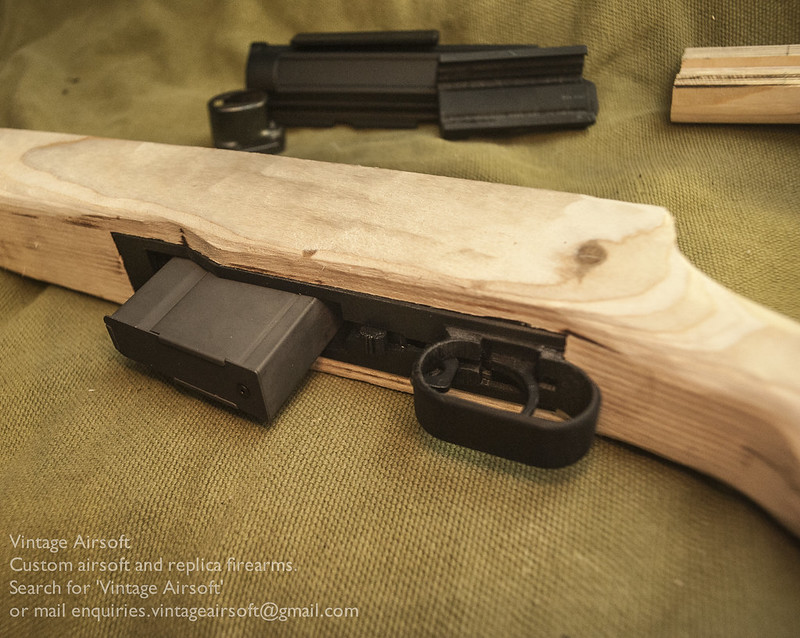
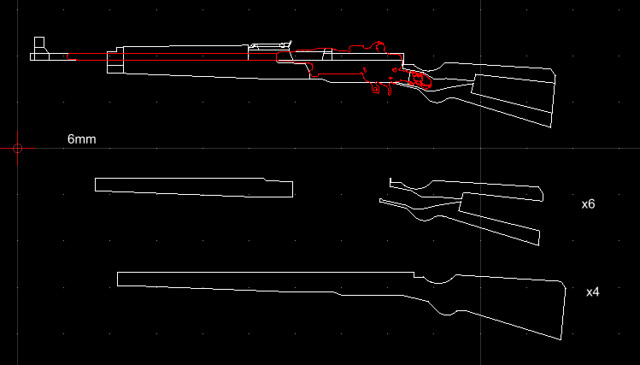
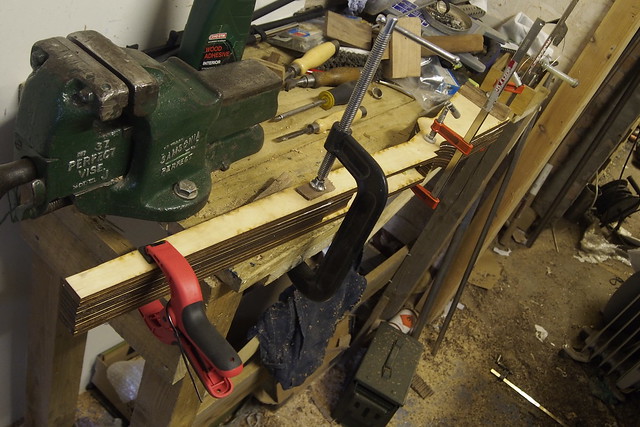
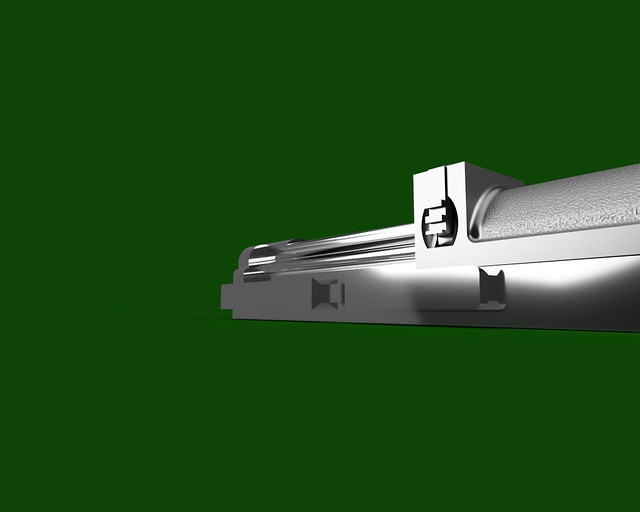
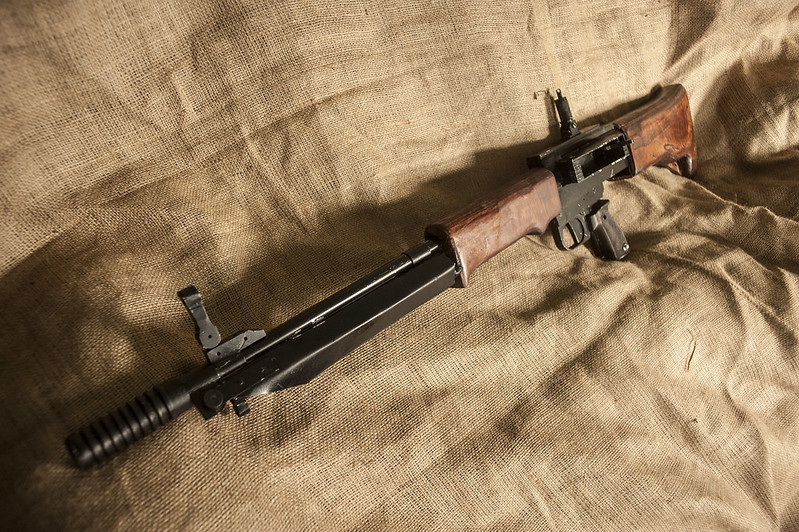
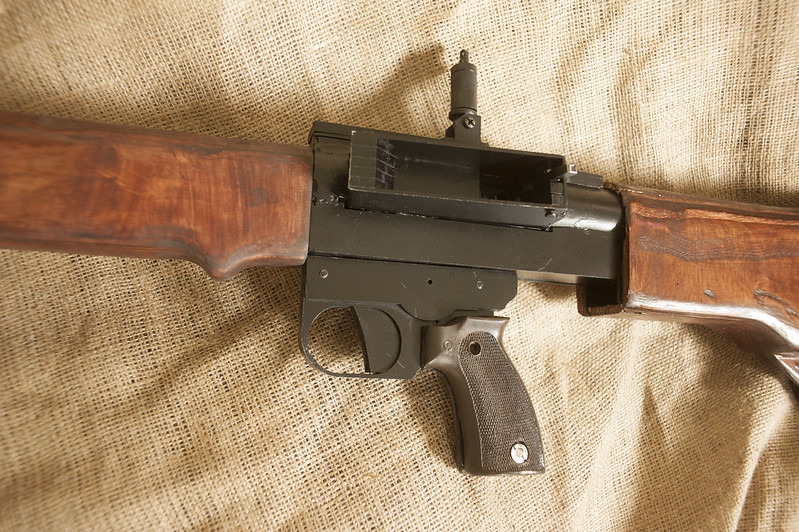
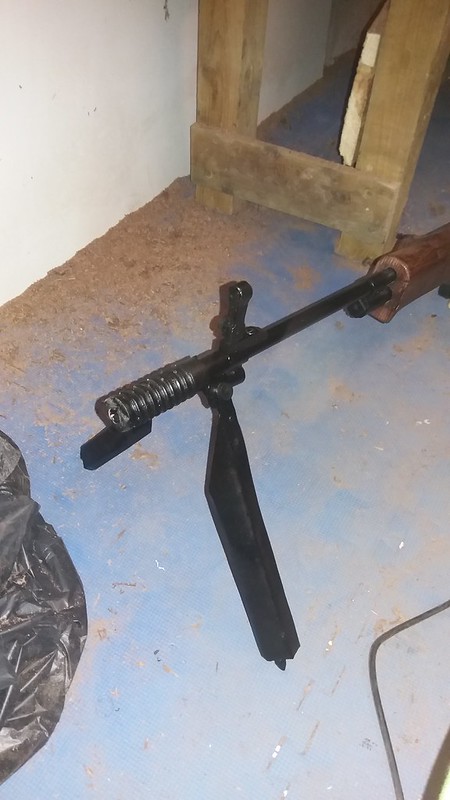
The new receiver and trigger group. The shape has been changed significantly, losing the fore-end entirely which allows for a much stronger wood fore-stock. The back has been extended to fill out the buttstock and support it fully.

The pistol grip has also changed to fit the new grips I am making.

I bought in some repro grips from the US and modified them with polymorph to fill in the air gap and make them really solid.

I then made rubber moulds of these modified grips and poured copies.

The new magazine well is a big improvement. It locks up very tightly on the magazine.

I have modified the Sten barrel to fit an extension. The gas port is welded directly onto the receiver.

The new foregrip in place. This is much more solid than the first version and will have a correct-looking curve across the top.

I sanded down the woodwork and stained it. Finishing it with hardwax oil.

I then cut a slot matching that in the receiver up into the gas tube for the operating handle in order to allow it to move.

Some of the new parts having their first coat of paint. I’m looking into 3D printed versions of some of these, but need to test out the strength of the parts.

_DSF8940

In position on the gun. 

20170328_200027

The bipod locked down, so far, so good!

20170328_200210

The new gas tube cover.

20170328_200228

There are a few other small changes, but this article covers the vast majority. I hope to have the first  production model completed this week!


If this build is of interest to you, please get in touch at: enquiries.vintageairsoft@gmail.com or join us on our Facebook page. Don’t forget you can buy our complete products via Etsy.

FG42 Pre-production prototype complete

Battle Rifles, Complete builds, Custom builds, FG42, Weapons, WWII

Long-awaited by many, the pre-production FG42 is now finished!

_dsc5936

This airsoft model was designed with a number of considerations in mind:

  1. It should be relatively affordable. Obviously work like this is expensive but the price should be kept as low as possible.
  2. It should use standardised airsoft parts as far as possible to allow for upgrade and tech work to be carried out with relative simplicity if/when it must be carried out.
  3. It should use standard magazines. Airsoft guns with dedicated mags for a relatively niche audience become unusable if the magazine malfunctions or breaks.
  4. It should have features as authentic as possible to the original.

_dsc5946

After several years of work, this prototype which roughly shows what the end product will be like. This is NOT the finished product, there are a number of design and manufacture differences that will be implemented in future models:

  • The pistol grips will be replaced with a design that is both easier to make and more authentic
  • Gas port detailing will be improved
  • The forestock will be re-designed: So that the operating handle will move and the shape of the woodwork will be improved
  • Bipod: locking mechanism to improve stability when in use
  • Add turf spike to bipod
  • Improve case deflector
  • Improve aesthetic of rear sight
  • Improve access to hop adjustment
  • I hope to produce a bayonet for it in time (such use as it may be!)

_dsc5947

_dsc5951

There are a number of positive features of this design which I shall be retaining however:

  • The base gun is an AEG airsoft Sten, taking upgrades for this model and having its excellent hop-up
  • The magazines are standard, unmodified M14 midcaps
  • Both fore and rear sight fold down for transport
  • The rear sight adjusts for elevation just like the original, you can see a video of a prototype here
  • The construction is, as far as possible, steel. The woodwork is laminate, like the originals (so far as I can gather)

_dsc5957

_dsc5958


If you are interested in this project or have an idea of your own, drop us a line on enquiries.vintageairsoft@gmail.com to discuss. ‘Like’ our Facebook page or follow the blog to get regular updates on projects and interesting videos and articles.


You can also buy many of our finished products in our Etsy store.

FG42: Part 6

Battle Rifles, FG42, Weapons, WWII

Through all this section I am working in the background on the furniture, staining and varnishing it for use. This is literally watching paint try so I will just give you an intermediate shot of the process rather than bore you with a step-by-step!

_dsf8189

There aren’t any good photos of the bipod in progress, each fold was handmade in the vise with a few different hammers and other tools until each was at the right angle. For a production version, these will probably be made with a press if I find a supplier who can do this.

_dsf8219

And folded away! This should really look the part when painted up and the furniture is in place.
_dsf8221

Next, shaping the grips. I used polymorph plastic coloured with acrylic paint as a base colour. These are just a rough first pass, they will be re-shaped with a heat gun to get a smoother finish.

_dsf8236

_dsf8237

After a bit of work with the heat gun and some tools, the finish is now quite smooth, providing a good base for etching in the chequering.

_dsf8268

I oil backed the rear sight for a really wear-resistant finish. As with previous versions, this adjusts just like the original.
_dsf8239

On the lathe, I turned the muzzle brake in plastic. When this is finished I shall produce a mould to cast more from as it is quite a complex piece.

_dsf8241

I made a mould and took a casting from it. This has been painted up to look like metal!

_dsf8271

And this slots onto the gun! Oh yes, I have now oil finished the foresight unit and bipod, which should resist the wear and tear that will inevitably affect these parts better than paint.

_dsf8272


_dsf8273


_dsf8275

Pretty much all there at last! Just a few last details to finish off…

_dsf8286

Completed pictures to follow.


If you are interested in this project or have an idea of your own, drop us a line on enquiries.vintageairsoft@gmail.com to discuss. ‘Like’ our Facebook page or follow the blog to get regular updates on projects and interesting videos and articles.


You can also buy many of our finished products in our Etsy store.

FG42: Part 5

Battle Rifles, Custom builds, FG42, Weapons, WWII

Since the last post, I have attached the new magazine well, it’s not looking pretty yet but is feeding from the magazine! At this stage function> appearance, though it’s not long before it looks right and actually works.

_dsf7989

My second model bipod legs, these are much thinner and lighter than the first attempt but are the same basic shape. However on completion I found that they interfered with the barrel. Not a problem though, a new design is due from the laser cutters any day now.

_dsf7979

The bipod mounting unit and foresight unit is going to be one part.

_dsf7988

The foresight mounting block, which incorporates the bayonet mount, barrel lug and front sling mount.
_dsf7995

Roughly cleaned up, this will get some attention from the scotch brite pads before finishing.

_dsf8041

And in place on the barrel, the foresight can be folded down for transport. The screw will be replaced with a knurled head screw to lock it in place.

_dsf8042

Next, I secured the buttstock in place. A piece of polymorph prevents the wobble of this piece, I plan to make a front cover to hide the gaps. On the production version I will tweak the design to sit closer to the receiver naturally.2

_dsf8126

At the front end, the fore-stock has been screwed into position around the cocking handle. This one has been welded into position, in time I hope to produce a version that has a moving cocking handle but at present this is where the battery goes.

_dsf8128

So finally we can now see the overall format of the FG42! The sling is from Zib-Militaria, it is effectively identical to an MG34 sling. The metal parts look as though they have been painted while still rusty so I won’t be providing these to customers.

_dsf8135

_dsf8136 _dsf8137

Not far off now!

  • Details like the selector switch, pistol grips
  • Stain and varnish the woodwork
  • Flash suppressor
  • Gas tube/battery compartment cover

And of course overall paintwork etc…!

All that to come in the next instalment.

If you are interested in this project or have an idea of your own, drop us a line on enquiries.vintageairsoft@gmail.com to discuss. ‘Like’ our Facebook page or follow the blog to get regular updates on projects and interesting videos and articles.

You can also buy many of our finished products in our Etsy store.